Our boats aren't getting any younger. With age, it becomes more and more important to inspect all your aging equipment. Saturday, our steering bracket under the cockpit sole suddenly failed while we were sailing in the Whaleback Regatta. We heard a "Pop" and then had no steering. We quickly lowered sail and deployed the emergency tiller and motored home. I spent the remainder of the day beneath the cockpit sole getting intimately acqainted with steering gear. Here's what I found when I got the bracket out. Hopefully this won't end our sailing season short . . .
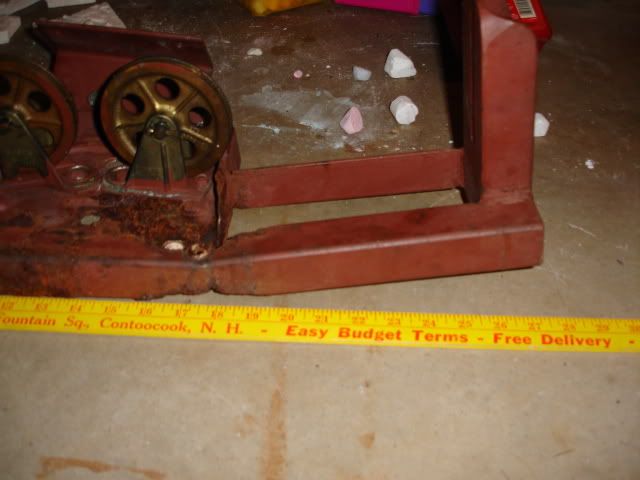
Photo 1 showing bend in bracket due to rust - Don't mind my kids sidewalk chalk in the photo.
<a href="http://s165.photobucket.com/albums/u78/ ... C04063.jpg" target="_blank"><img src="http://i165.photobucket.com/albums/u78/ ... C04063.jpg" border="0" alt="Photobucket"></a>
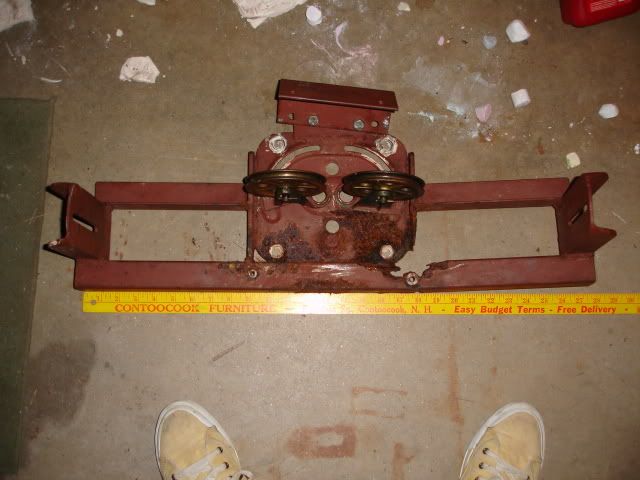
Photo 2 showing top view. Note the extent of the rust.
<a href="http://s165.photobucket.com/albums/u78/ ... C04062.jpg" target="_blank"><img src="http://i165.photobucket.com/albums/u78/ ... C04062.jpg" border="0" alt="Steering bracket failure"></a>
Inspect Your Steering Bracket
Moderator: Jim Walsh
-
Carl Thunberg
- Posts: 1329
- Joined: Nov 21st, '05, 08:20
- Location: CD28 Cruiser "Loon" Poorhouse Cove, ME
Inspect Your Steering Bracket
CDSOA Commodore - Member No. 725
"The more I expand the island of my knowledge, the more I expand the shoreline of my wonder"
Sir Isaac Newton
"The more I expand the island of my knowledge, the more I expand the shoreline of my wonder"
Sir Isaac Newton
bracket shot
Carl,
Glad the circumstances were good and e-tiller was handy. I also hope you are back on the water soon.
Chase
Glad the circumstances were good and e-tiller was handy. I also hope you are back on the water soon.
Chase
-
Carl Thunberg
- Posts: 1329
- Joined: Nov 21st, '05, 08:20
- Location: CD28 Cruiser "Loon" Poorhouse Cove, ME
Good Emergency Drill
It really was a good emergency drill to deploy the emergency tiller and actually use it. I was surprised how much work the emergency tiller took. Because of the need to avoid the wheel, the emergency tiller has very little mechanical advantage. I was tired by the time we got back to our mooring. My wife gets the credit for making the emergency tiller readily available. She's the one who found the mounting bracket on the interior of the transom. The P.O. had kept it under a pile of junk in a cockpit locker.
CDSOA Commodore - Member No. 725
"The more I expand the island of my knowledge, the more I expand the shoreline of my wonder"
Sir Isaac Newton
"The more I expand the island of my knowledge, the more I expand the shoreline of my wonder"
Sir Isaac Newton
-
seadog6532

- Posts: 211
- Joined: Sep 19th, '07, 14:34
- Location: last boat 31' C&C Corvette, 0wner of CD30k #112 Arianna.
-
Carl Thunberg
- Posts: 1329
- Joined: Nov 21st, '05, 08:20
- Location: CD28 Cruiser "Loon" Poorhouse Cove, ME
Update
I called Edson. This is not an Edson product. I called Robinhood and they suggested repairing what I have. I found a local welding shop. This guy is "retired" and does just enough business to pay his overhead and keep him busy. He's replacing the section of rusted tubular steel and welding in a new plate to receive the pedestal bolts. It'll be as good as new and I'm paying a fair price and supporting local business!
CDSOA Commodore - Member No. 725
"The more I expand the island of my knowledge, the more I expand the shoreline of my wonder"
Sir Isaac Newton
"The more I expand the island of my knowledge, the more I expand the shoreline of my wonder"
Sir Isaac Newton
You know what they say............never ASSume.I'm sure your welder will do a good job. Prime and paint and it should be good for another 20 yrs.
Do you know what caused the failure ? electrolysis, water leaking thru the sole. Might be a good time to rebed all hardware that passes thru the cockpit floor. Good luck
________
MFLB
Do you know what caused the failure ? electrolysis, water leaking thru the sole. Might be a good time to rebed all hardware that passes thru the cockpit floor. Good luck
________
MFLB
Last edited by Ron M. on Feb 11th, '11, 06:08, edited 1 time in total.

Re: Update
Excellent, Carl! Glad to hear everything worked out so well.Carl Thunberg wrote:I called Edson. This is not an Edson product. I called Robinhood and they suggested repairing what I have. I found a local welding shop. This guy is "retired" and does just enough business to pay his overhead and keep him busy. He's replacing the section of rusted tubular steel and welding in a new plate to receive the pedestal bolts. It'll be as good as new and I'm paying a fair price and supporting local business!
-
Carl Thunberg
- Posts: 1329
- Joined: Nov 21st, '05, 08:20
- Location: CD28 Cruiser "Loon" Poorhouse Cove, ME
Question RE: Re-Assembly Sequence
Okay, I have all the parts I need, but re-assembling the pedestal with the throttle cable, transmission cable, wiring for the instruments, and the steering chain/cable is a little overwhelming for someone who's never done this before. I THINK this is the re-assembly sequence. Please, someone with experience, tell me if this is right. I'd hate to get to step 8 and then realize it should have been step 4, and then start over again. Here goes:
1. Mount the pedestal, through-bolting it to the steering bracket under the cockpit sole. Use whatever bedding compound you choose (In my case 3M 4000 with UV inhibitors).
2. Remove the chain sprocket so you can install the mounting bracket for the throttle & transmission cables.
3. Fish the throttle and transmission cables up from below. Connect them to the appropriate levers. Question: Does it matter which position the lever is in when you screw the cables to the split connector that then screws into the pedestal body?
4. Re-install the chain sprocket. Drop the steering cables down through the pedestal and center the chain on the sprocket so the center link is lined up with the top spoke of the wheel.
5. Connect the steering cables below in the obvious way. Tension.
6. Fish electrical wiring through the pedestal guard to re-connect whatever was there before.
7. Re-assemble compass, etc.
8. Crack open a cold one!
Seriously, any and all suggestions would be welcome. I'm really trying to salvage something of my sailing season here and the Maine Cruise is still possible if I can get all this done this weekend. Needless to say, I won't be going to the Rendezvous. I need to stay focused on my own boat right now.
CDSOA Commodore - Member No. 725
"The more I expand the island of my knowledge, the more I expand the shoreline of my wonder"
Sir Isaac Newton
"The more I expand the island of my knowledge, the more I expand the shoreline of my wonder"
Sir Isaac Newton
-
Craig Curtis
- Posts: 25
- Joined: Feb 10th, '05, 15:09
- Location: 1990 CD40 "Coalescence"
Belmont Harbor, Chicago IL
Carl,
Though I cannot comment on whether the sequence is correct or not I would recommend epoxying the cockpit sole before you remount the pedestal. I have heard of some CD's not being bedded properly there and the sole getting saturated.
Scrape away 1/2 inch or so of the core of the sole around the hole and put in a peanut butter consistency mixture of epoxy and thickener - colloidal silica or something. If there are any thru bolt holes do the same there. Good insurance in case the bedding fails.
All the best and good luck, I bet you will be out and sailing with one finger on the wheel with the helm "like butter" in no time!
Paul
-
Carl Thunberg
- Posts: 1329
- Joined: Nov 21st, '05, 08:20
- Location: CD28 Cruiser "Loon" Poorhouse Cove, ME
Sweet Success!
We're back in business, and heading to Maine for the Maine Cruise! I've now logged more hours under my cockpit sole than I have behind the wheel this season. I can't imagine what this project would have cost if I had paid a yard to do it. As it is, I got out of this project for just over $300 including the welder, new throttle and transmission cables and new aluminum bolts from Edson, and I made my own steering cables and swaged them myself.
Seriously, go inspect the steering bracket under the cockpit sole holding your pulleys. This project would have been a lot more manageable on the hard when you can make a quick run to the hardware store than it was in the water.
Seriously, go inspect the steering bracket under the cockpit sole holding your pulleys. This project would have been a lot more manageable on the hard when you can make a quick run to the hardware store than it was in the water.
CDSOA Commodore - Member No. 725
"The more I expand the island of my knowledge, the more I expand the shoreline of my wonder"
Sir Isaac Newton
"The more I expand the island of my knowledge, the more I expand the shoreline of my wonder"
Sir Isaac Newton