I'm starting to think about upgrading Altariel's electric panel.
It's the original (1980) DC panel, with 6 switches and circuit breakers, with odds and ends of circuits added over the years, and kind of a spaghetti mess. Things generally work OK, but I've had to replace 1 switch, and I know things are generally deteriorating.
The wiring in the boat seems to be in reasonable shape, and I've rewired for the radio and a GPS. I'm trying to keep things simple electrically, so I don't see a need for more circuits, and I don't intend to add AC power. I also like the look of the original panel, with the Cape Dory name on it.
So I'm thinking about keeping the original panel, and just replacing the switches and circuit breakers (maybe use fuses instead?), and rewiring it through a bus bar instead of the direct connections it has now. I'll probably remount the panel with a hinge to make it more convenient to get it open and closed.
Has anyone done something like this? Can you see any huge disadvantages compared to replacing it with a new panel? Are there any books or articles that show how a simple system like this should be properly laid out to meet modern standards?
Thanks in advance for any observations and/or advice.
Upgrading DC panel (1980 era)
Moderator: Jim Walsh
-
Steve Behnke
- Posts: 22
- Joined: Jul 31st, '07, 16:06
- Location: 1980 CD27 #158
"Altariel", Juneau, Alaska
Blue Sea
last spring I replaced the DC panel and wiring in my CD-22.
The electrical system was a mess and I was having intermittent problems. The circuit breakers were literally crumbling. The wiring for the nav lights (Bow, stern, and masthead) did not appear to be very sound. So I replaced it all, except for the masthead circuit which was damn near impossible to remove or replace.
I researched the different brands of electrical panels that were available and it soon became apparent that Blue Sea Systems had the superior product, if you can get past the prices. I found a new Blue Sea panel on eBay for a reasonable price. It came with 5 breakers installed and spaces for three extra breakers. I ordered three more breakers, which are readily available (Defender). I also ordered plenty of marine-grade two and three-conductor 14 ga. wire.
Pulling all the new wire was fairly straight forward, but I wouldn't go as far as to say it was easy. The new panel uses buss bars for making the connections which made the job that much easier.
As with most things, technology over the last 25-30 years has definitely improved with marine electrical panels. This new panel is very nice indeed.
The new panel was smaller in dimension than the old panel even though there are thee more circuit breakers. I mounted the panel on a piece of 1/4" oak cut to the size of the original panel, stained and varnished, and mounted with a piano hinge for easy access. (Sorry, no pictures.)
In the end, I now have confidence in knowing that the electrical system is wired correctly and it is no longer the rat's nest that it was before.
Warren H.
Blue Sea Panel
Warren,
I too am replacing the original panel and the rat's nest behind it. Did you have a battery selector switch on your original panel? My panel has this switch and the Blue Sea panels I've been looking seem to be separate panels for battery selector and breakers. Any info would be greatly appreciated. Thank you. Jim
I too am replacing the original panel and the rat's nest behind it. Did you have a battery selector switch on your original panel? My panel has this switch and the Blue Sea panels I've been looking seem to be separate panels for battery selector and breakers. Any info would be greatly appreciated. Thank you. Jim
Jim Buck
Member #1004
Member #1004
-
Andy Denmark
- Posts: 630
- Joined: Feb 5th, '05, 11:38
Evolution
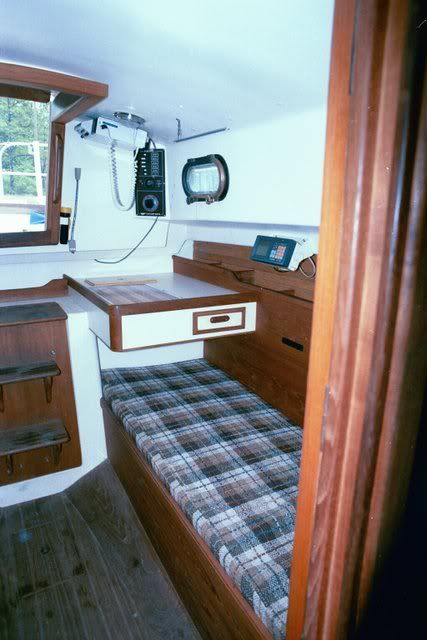
Here are some pix that depict Rhiannon's transformation through the years. I try to do things in related groupings and systems and undertook the "galley area and electrical stuff" as a winter project several years ago. The "before and after" tells a story (see the 1984 shot). More than the aesthetics of this renovation, the utility has greatly increased. There is better control of all things electrical and the CNG stove is terrific. I once detested shore power but after a few nights in a slip with a little ceramic heater going in late fall/winter, I am now a believer. My g/f likes her hair dryer and curling iron, too. Spent too many nights on anchor with a clay pot over an alcohol stove burner not to appreciate the difference. Of course, being 70 years of age may have something to do with that! Now "Mr. Heater" keeps me warm away from shore power and I find that plenty satisfactory after 6 years of use.
I'm rambling. Too damned cold outside (low teens -- rare for here) and maybe a bit too much single malt! Waiting for my feet to regain feeling before attempting to go to bed. Aaaaargh ---I need to be in the Bahamas !!! New engine soon to come!! Yes !!!
________
HONDA INTEGRA DC5 HISTORY
I'm rambling. Too damned cold outside (low teens -- rare for here) and maybe a bit too much single malt! Waiting for my feet to regain feeling before attempting to go to bed. Aaaaargh ---I need to be in the Bahamas !!!
________
HONDA INTEGRA DC5 HISTORY
Last edited by Andy Denmark on Feb 13th, '11, 03:40, edited 1 time in total.
-
Oswego John
- Posts: 3535
- Joined: Feb 5th, '05, 20:42
- Location: '66 Typhoon "Grace", Hull # 42, Schooner "Ontario", CD 85D Hull #1
No Battery Selector Switch...
Jim,
There was no no battery selector switch on the original panel, probably since mine is not the diesel version, I have only one house battery. There was a State of Charge meter that was shot.
The Blue Sea panel I selected did not have a DC voltmeter, but they do offer individual panels for meters and I would suppose switches for whatever configuration may be desired.
Warren H.
-
sfreihofer
- Posts: 223
- Joined: Dec 6th, '07, 22:05
- Location: 1981 Cape Dory 25 #794, S/V PEARL
- Contact:
Re: Upgrading DC panel (1980 era)
I've done the electrical panel on a CD25, adding several circuits. Originally it had four; it now has ten. It was a bit more involved than what you are contemplating, and it was my first attempt at an electrical system, but I have a few suggestions that you may find useful.
It will cost you more than you expect to do the job right... such as upgrading the wiring, and using heat shrink/epoxy seal connectors. It also requires the proper tools for crimping, cutting, stripping, etc. If you make the investment, you will get professional results.
If you can justify buying connectors, wire, etc., in lots of 25 or more, you can save a LOT of money. I used www.pacermarine.com, because they have a local outlet, and their prices were nearly 1/3 of the marine stores.
My boat had a rat nest of wiring, and the only way to tame those rats is to build a distribution panel which enables you to organize the power supply, panel, and distribution circuits.
I have completed the job, but I haven't documented the work yet. You can see an interim view of the progress here:
http://www.reefroof.com/RestElectric.htm. I will try to update the website soon so you can see the finished product.
Stan F
1981 CD 25 #794
Ft. Lauderdale, FL
www.ReefRoof.com
Instant Bubble-head. Just add water.
-
winthrop fisher

- Posts: 837
- Joined: Feb 7th, '05, 17:52
- Location: Typhoon Wk 75 "Easy Rider" &
cd 22 "Easy Rider Sr" 84
-
Steve Behnke
- Posts: 22
- Joined: Jul 31st, '07, 16:06
- Location: 1980 CD27 #158
"Altariel", Juneau, Alaska
Upgrading DC panel (1980 era)
I appreciate the good ideas and the very helpful photos.
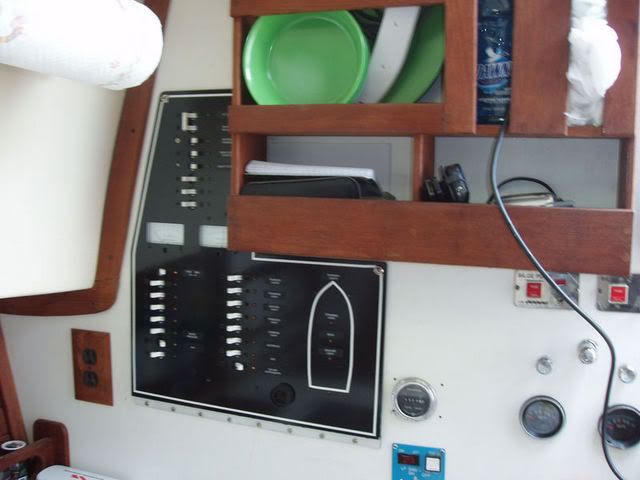
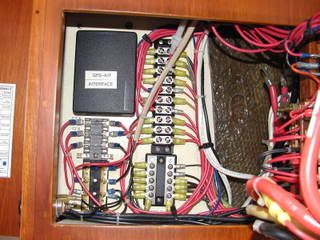
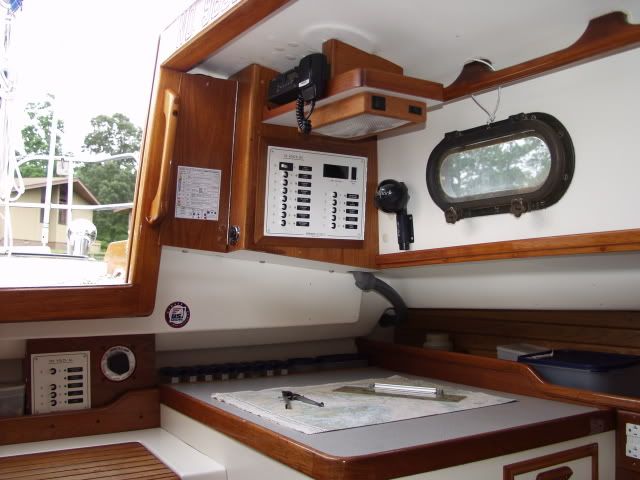
Andy -- what circuits do you have in the smaller (AC?) panel under the companionway? Also, what material did you use for the neat cable packaging you've got leading from the lower right of the DC panel? Thanks for pulling out the great before and after pictures -- you've sure done beautiful work. But it sure sets a high standard for those of us whose boats look a lot more like the 'before' picture!
Stan F. -- thanks for your advice and the link to your site. Your new panel looks good and similar to what I had in mind. Let me know when you get the rest of your pictures up.
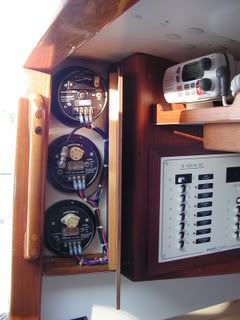
I haven't redone my whole panel but I did add a gifted Link 10 where the old voltmeter was, fit perfectly. And added a solar regulator where an old set of switches were added. I am happy with the installation and think like you do that there is validity to keeping the old panel if you are willing to do a bit more figuring out of things.
I believe Jack Rabbit marine, Hella and others have options for stuff you could use with the existing panel.
Paul
I believe Jack Rabbit marine, Hella and others have options for stuff you could use with the existing panel.
Paul
-
Andy Denmark
- Posts: 630
- Joined: Feb 5th, '05, 11:38
Winthrop & Steve - Thanks
When one gets to my age he starts thinking about those things that will outlive him.i] Rhiannon[/i] is such a thing so I don't hold back on making improvements. I hope my daughter, the ultimate recipient of this little boat, appreciates these things and won't sell the boat to buy another horse or new car. The things our boats represent to us is lost on many of the present generation.
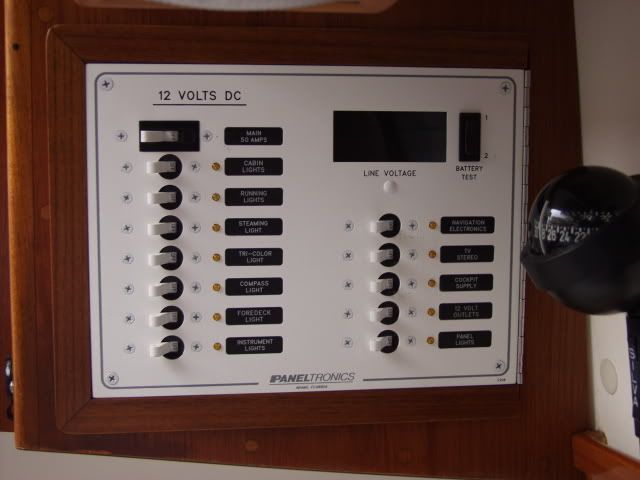
As for the AC panel: There is the Main breaker (on top), a breaker labeled "AC Outlets" (one GFI outlet by the galley and a duplex in the head. Another duplex can be daisy chained to the Ham/SSB location), a second breaker marked "Spare," and a third labeled "Inverter/Charger." There is a green LED by the main breaker that comes on when the shore power cord is plugged in and energized and each breaker has an orange LED that lights up when that circuit is energized. Paneltronics back lighting is awesome but annoying if you like darkness to sleep or for night vision. That's why I put a switch on the main panel to disable the back lighting
The neat thing about Paneltronics is that you can totally design a panel to suit your application. I have used them on several boats and they are definitely eye catching and functional. Their design worksheet makes it easy but this stuff ain't cheap! Ya' get what ya' pay for.
________
Sativa Strains
Last edited by Andy Denmark on Feb 13th, '11, 03:40, edited 1 time in total.
Well worth the effort
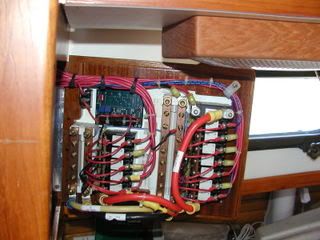
First rate job Andy, very nice . One of my first projects was to replace all the wiring and straighten out the panel. I attached 1/2" plywood inside the panel opening to which positive and negative buss bars were affixed. I installed a hinge on the panel and drilled holes for 4 added circuits , I stayed with fuses. I also did away with the battery selector switch using instead an on/off switch for each bank with an additional switch that combines both banks. This has worked fine.
Almost every used boat I have looked at had the typical 'rat's nest' of wiring, including mine. It is some work but it makes it so much easier to work on the electrical system or add new components , not to mention the safety factor, when this is done properly in a ship shape manner.
________
Michigan Marijuana Dispensary
Last edited by Ron M. on Feb 11th, '11, 06:03, edited 1 time in total.
-
Dixon Hemphill
- Posts: 218
- Joined: Aug 28th, '06, 18:38
- Location: Cape Dory 28 "VASA" #144 Annapolis, MD
Electric panels
A very interesting and informative discussion. I got a kick out of Steve Behnke's remarks because my panel also looks like the "before" photos. Altho mine is a bit of a rat's nest of wires it does seem to function so I plan to leave well enough alone until something does break down. Not a smart approach but there so many other projects I plan to tackle this year.
Andy, I too wonder what will happen to my CD28 after I can no longer sail. You have many more years ahead being only in your 70's. I celebrated my 84th last week. We have four grown kids and nine grandkids and although almost all of them have sailed with me I really wonder if any of them are interested in becoming sailors.
Andy, I too wonder what will happen to my CD28 after I can no longer sail. You have many more years ahead being only in your 70's. I celebrated my 84th last week. We have four grown kids and nine grandkids and although almost all of them have sailed with me I really wonder if any of them are interested in becoming sailors.
Within the the unlocked homes of the Swedish villages on the shores of the Baltic around the rocks sings the sea.
-
Troy Scott
- Posts: 1470
- Joined: Jan 21st, '06, 01:23
- Location: Cape Dory 36 IMAGINE Laurel, Mississippi
electrical supplies source/ old wiring
Stan F,
I checked out the Pacer Marine pdf online catalog. Very nice. Good to know. Thanks!
I would like to add to this discussion by saying that, even in a 1988 CD36, they still hadn't gotten the wiring right. It is not neat. The wires are not tin plated. The wiring mostly works, but it is corroded inside the plastic insulation. There are joints I can't really get to to check or fix. I've reluctantly decided to include complete rewiring in the refit. I would love to retain the old main panel (not that bad) for the nice Cape Dory logo, etc.., but I've decided to go with a new Blue Seas panel. They have a nice one that will barely fit where the old one was, with a lot more circuits and accurate digital meters.
I have a peculiar problem with the wires to the overhead lights in the main cabin. They were apparently put into place on the cabin ceiling before the ceiling was bonded to the underside of the deck. Now, most of the wires are embedded in the structure and can't be moved. But I think I've worked out a simple way to create a new path for the wires to those lamps. I'm planning to have a long aviation drill bit extended. If I start drilling from the cabin side (the panel with the portlights) I can drill in a straight line just above the ceiling, through the mish-mash under the side decks, all the way into the space above the cabinetry. If by that time all has gone well and I'm still in the mish-mash (not into the ceiling or the deck structure, I will continue until the drill pops out into the space under the hull-to-deck joint where the wiring is all run. However, if by the time I've drilled that far I feel like it would be tempting fate to continue, I'll just drill up from inside the cabinetry to meet the channel I've created, drop the wiring down into the cabinet and cover it from there. When I put the wood paneling back on the cabin sides the holes will all be covered, but I'm sure I will have filled them by then anyway. Does anyone see a problem with this idea, other than the obvious need to avoid cutting into structure?
Regards,
Troy Scott
Troy Scott