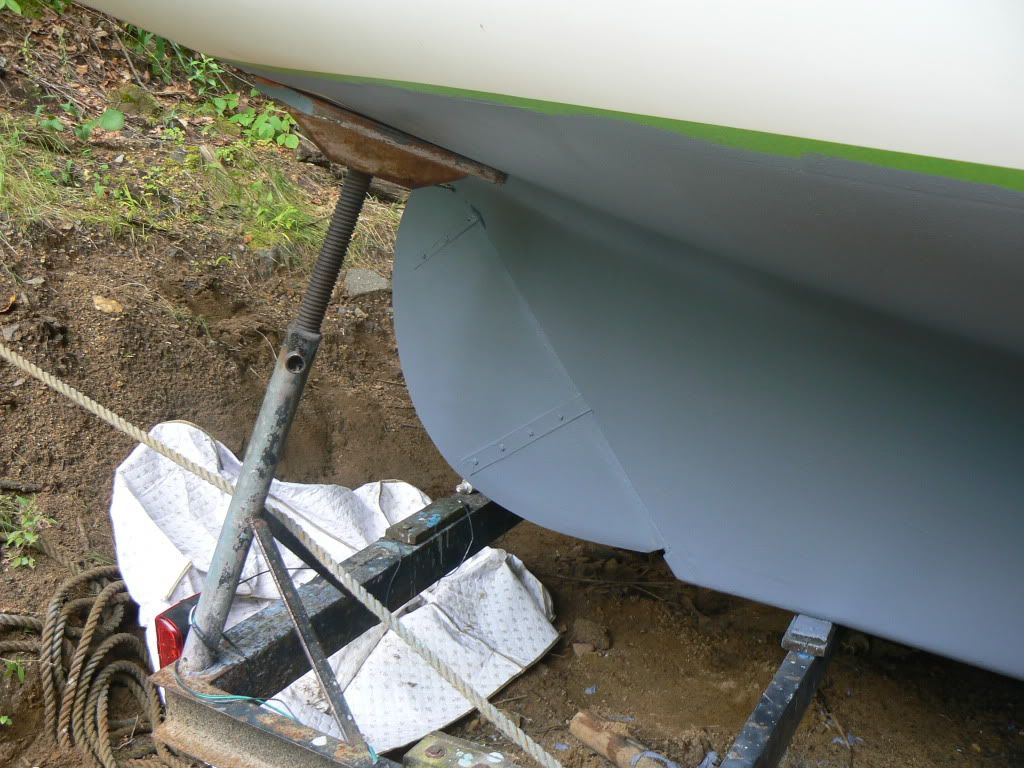
My new-to-me '72 Typhoon is now on the hard for the winter, and it looks like she is suffering from a (hopefully minor) rudder issue. I've found a lot of discussion on this board about the Typhoon rudder delaminating and/or separating from the metal prongs that attach it to the shaft, but I just want to make sure I understand what I'm looking at. To my untrained eye it looks like the two halves are beginning to separate at the top and a small chunk has been knocked off, but the remainder of the rudder seems sound and well stuck-together. Does this seem like a safe assessment, or is there space inside that could be full of water? There's no core, right, just solid fiberglass?
My other question is, what is a good strategy for fixing this? My thought is to grind down the area until I reach solid material, then build it back up with either layers of glass or epoxy thickened with chopped glass. I also like the idea of bronze reinforcing straps, as many have suggested and apparently done with success.
Thought? Suggestions?
<img src="https://lh5.googleusercontent.com/-CmfY ... udder1.jpg" />
<img src="https://lh4.googleusercontent.com/-i-vV ... udder2.jpg" height="800" width="600" />
Typhoon rudder strategy
Moderator: Jim Walsh
-
Steve Laume

- Posts: 4131
- Joined: Feb 13th, '05, 20:40
- Location: Raven1984 Cape Dory 30C Hull #309Noank, CT
- Contact:
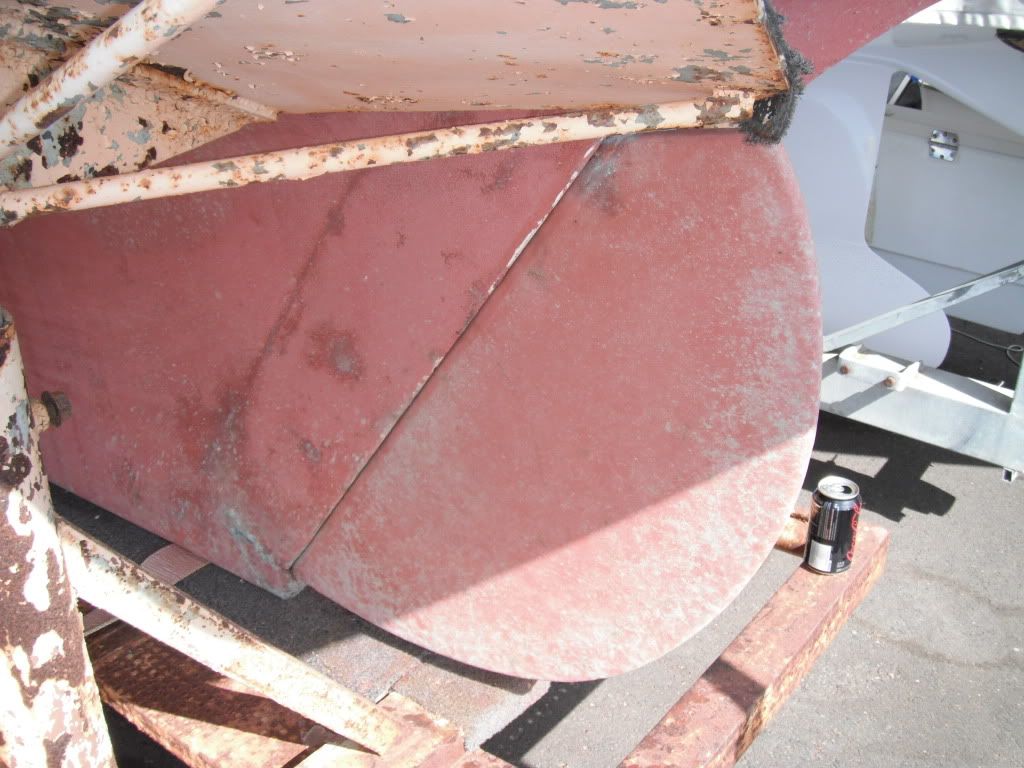
I immediately noticed the flat edge too. The rudder has definitely been worked on in the past. It has either been built up or ground off. It would be interesting to know which was done to it but I would agree that it needs some investigation before you make any determination as to what to do.
O. J. is the go to Typhoon rudder man. He may have some advice as to how to proceed. I would start by grinding away at the trailing edge to see what I could find out, Steve.
O. J. is the go to Typhoon rudder man. He may have some advice as to how to proceed. I would start by grinding away at the trailing edge to see what I could find out, Steve.
rudder problems
I agree with Steve OJ is the man when it comes to rudder repair. He helped me out with my repairing the gudgeon on my 25 a few years back(thanks oj). Drilling a few holes on the bottom of the rudder would probably tell you how much water is still inside. good luck on your winter project!
-
Oswego John
- Posts: 3535
- Joined: Feb 5th, '05, 20:42
- Location: '66 Typhoon "Grace", Hull # 42, Schooner "Ontario", CD 85D Hull #1
Re: Typhoon rudder strategy
Hi Bamabratsche,bamabratsche wrote:My new-to-me '72 Typhoon is now on the hard for the winter,
Does this seem like a safe assessment, or is there space inside that could be full of water? There's no core, right, just solid fiberglass?
My other question is, what is a good strategy for fixing this? My thought is to grind down the area until I reach solid material, then build it back up with either layers of glass or epoxy thickened with chopped glass.
Thought? Suggestions?
<img src="https://lh5.googleusercontent.com/-CmfY ... udder1.jpg" />
<img src="https://lh4.googleusercontent.com/-i-vV ... udder2.jpg" height="800" width="600" />
As others have noted, it sure looks like someone has done work on this blade previously. So is it solid glass throughout? I don't know but I would hope so. Lets say that normally it is solid throughout.
If I was to do the repair, I would gouge and scrape out all of the punky residue until I reach good, solid glass. I would drill from the top, drilling straight down into the blade about 2 1/2" or 3" for 3/8" white oak dowels. The top of the dowels should extend upward into the area to be rebuilt.
Chopped glass and epoxy or polyester would be formed to recast the repair.
Most rudder blades of this type are made of two pieces sandwiched together around the rudder post fingers. The majority of the rudder problems start with separation of the halves. I always make it a practice to epoxy/poly fiberglass tape around all joints of the sandwich. Most importantly, bring the tape around the rudder post and extend it back onto both sides of the blade. On occasion, I have applied cloth on the entire rudder blade as well as the seams.
If you suspect any water or moisture inside of the blade, the last thing that you want is for the weather to freeze. There is no real harm done by drilling several weep holes in the bottom before you tape the seams. You can determine if the blade is solid or cored by drilling a few random holes sideway through the width of the blade.
Do you own or have access to a moisture meter. This could tell you a lot. One of many ways to dry out the damp blade before epoxying is to bend a crude sheet metal or aluminum tent above the blade to trap rising heat. Then place a 40 watt incandescent bulb on either side of the blade to warm it.
When the blade is dry, rebuild the damaged section, fill the drilled holes with epoxy or poly mixture and apply tape and glass blanket.
Good luck,
O J
"If I rest, I rust"
Voting Member #490
Voting Member #490
-
bamabratsche

- Posts: 117
- Joined: Aug 31st, '11, 09:40
Thanks for the pointers! I did not realize the trailing edge isn't normally flat, so I agree it would be interesting to know what was done to it in the past. I will give it a try grinding the area down to see how far the damage goes, then reassess when I have a better idea of how much needs to be done. Hopefuly building the trailing corner back up and putting tape around all the edges will be all it needs (famous last words....). This may be somewhat logistically challenging since there apparently isn't a way to easily drop the rudder, but we shall see.
-
Oswego John
- Posts: 3535
- Joined: Feb 5th, '05, 20:42
- Location: '66 Typhoon "Grace", Hull # 42, Schooner "Ontario", CD 85D Hull #1
Typhoon Rudder Strategy
Hi Bamabratsche,bamabratsche wrote: This may be somewhat logistically challenging since there apparently isn't a way to easily drop the rudder, but we shall see.
With this type of repair, it may not be necessary to drop the rudder. To gouge out the punk and repair the top of the rudder blade, you could go hard over either way with the tiller and lock it into position.
With the rudder blade in the same position, you shouldn't have too much of a problem applying fiberglass tape to most of the seams. Most of your problem will be in the most important area to apply the tape. That would be covering the seam on the foreward edge of the blade where it abuts the rudder post. Here is one way that I have had success epoxying/polyestering glass tape around the post without removing the entire assembly.
The following method requires another person to help you. There is normally enough room between the foreward edge of the rudder post and the false keel to slip glass tape in the space.
What I do is cut 8 or 10 pieces of 4" glass tape about 8" or so long. I make the cut on a bias so the leading edge of the tape has a point for insertion between the post and the hull. I cut the tape with sharp scissors or laying the tape on a board and slicing it with a razor knife with a new blade. I try to reduce any frazzling of the edge threads of the tape. You can put masking tape over the cut line to help prevent fraying.
The idea is to have the helper hold the first piece of tape flat on a piece of wax paper. At the midway point, 4" on an 8" length of tape, paint a band of epoxy or poly about 1/2" to 3/4" wide across its width. Make sure that it is wetted through. Pass the tape through the slot and bring both sides back so you have about 4" of tape on either side of the blade. Wet it down. I apply this to the bottom of the blade and post. You can have the helper swing the tiller from side to side to ensure that the entire post is wet.
Do the same with the second piece of glass tape, slightly overlapping the preceding section. I work my way up the post, shingle effect, until the entire seam is protected.
It's not a bad idea to unhook the tiller and work it back and forth a few times until the epoxy kicks to make sure that the glass tape isn't glued to the false keel. Since you're at it, it might also prove to be a good idea to blanket the entire face of each side of the blade to totally encapsulate or sheathe it in fiberglass.
Good luck,
O J
"If I rest, I rust"
Voting Member #490
Voting Member #490
-
Steve Laume
- Posts: 4131
- Joined: Feb 13th, '05, 20:40
- Location: Raven1984 Cape Dory 30C Hull #309Noank, CT
- Contact:
Re: Typhoon rudder strategy
I am not sure where I could find white oak dowels. I do know our local farm and garden supply stores sell fiberglass fence wands for electric fence. They come in several diameters from 5/16 to 1/2 inch by 4' or 5' long. I never thought of using these for marine applications before but now you have me thinking.Oswego John wrote:
I would drill from the top, drilling straight down into the blade about 2 1/2" or 3" for 3/8" white oak dowels. The top of the dowels should extend upward into the area to be rebuilt.
Good luck,
O J
Cheaper and stronger than white oak with no chance of ever rotting away, Steve.
-
Oswego John
- Posts: 3535
- Joined: Feb 5th, '05, 20:42
- Location: '66 Typhoon "Grace", Hull # 42, Schooner "Ontario", CD 85D Hull #1
Oak Dowels
Hi Steve,
I turned mine on a wood lathe.
Fiberglass rod would be excellent, too.
Best Regards,
O J
I turned mine on a wood lathe.
Fiberglass rod would be excellent, too.
Best Regards,
O J
"If I rest, I rust"
Voting Member #490
Voting Member #490
-
Markst95

- Posts: 628
- Joined: Aug 5th, '08, 10:04
- Location: 1972 Typhoon Weekender "SWIFT" Hull #289 Narragansett Bay, RI
On my 72 the gap is really tight. I would have liked to fiberglass the front end but decided to use a couple of straps around the rudder shaft. I wanted to use bronze but couldn't find any so I used a couple of stainless straps with 5200 underneath to keep it from touching the bronze. I then barrier coated it. So far after 3 years its held up well.
-
Oswego John
- Posts: 3535
- Joined: Feb 5th, '05, 20:42
- Location: '66 Typhoon "Grace", Hull # 42, Schooner "Ontario", CD 85D Hull #1
Shape of Rudders
I didn't say anything in my earlier posts concerning something that I had noticed in the pictures in this thread.
The reason that I kept quiet is because many times in life I had questioned something, and due to my ignorance, I wound up with egg all over my face. I wondered if somewhere along the line there was a change in the Ty's rudder that I wasn't aware of? Hmmm.
Take a look at the contour of the rudder blade in Bamabratsche's '72 Typhoon and compare it with the contour of Markst95's '72 Typhoon.
Markst95's rudder shows the traditional shape of the Ty blade. When I spotted Bamabratsche's rudder, it looked to me like that of a CD 25.
O J
"If I rest, I rust"
Voting Member #490
Voting Member #490
-
Scott Launey
- Posts: 61
- Joined: Apr 21st, '10, 15:49
- Location: 1966 Typhoon Weekender "Angelina" Hull #36
Naugus Fiberglass Mfg. Located: San Diego
OJ,
The rudder on my 1966 Ty looks even larger then Markst95's rudder. What went on in the early years with the Tys? I also did as you did by inserting fiberglass tape between the post and hull and it worked fine.
Scott
[img]http://i1216.photobucket.com/albums/dd3 ... CF3248.jpg[/img]
The rudder on my 1966 Ty looks even larger then Markst95's rudder. What went on in the early years with the Tys? I also did as you did by inserting fiberglass tape between the post and hull and it worked fine.
Scott
[img]http://i1216.photobucket.com/albums/dd3 ... CF3248.jpg[/img]
Scott Launey
San Diego, CA
1966 Typhoon Weekender
"Angelina"
Naugus Mfg. #36
San Diego, CA
1966 Typhoon Weekender
"Angelina"
Naugus Mfg. #36
-
Markst95
- Posts: 628
- Joined: Aug 5th, '08, 10:04
- Location: 1972 Typhoon Weekender "SWIFT" Hull #289 Narragansett Bay, RI
Re: Shape of Rudders
Now that you mention it I thought the same thing. Even the area of the hull above the rudder looks different. Bamabratsche, are you sure your TY's a 72?. Can you post some general pics? I've known of many times where a previous owner doesn't know the year of the boat so they put 72 as it was the last year before Hull #'s were required.Oswego John wrote:Take a look at the contour of the rudder blade in Bamabratsche's '72 Typhoon O J
-
bamabratsche
- Posts: 117
- Joined: Aug 31st, '11, 09:40
Wow Scott, that rudder is way bigger than the one on mine. I will try and take some more photos when I'm down at the marina this weekend to compare.
I have no proof it's a 72, but if I recall correctly it's hull number 411. You guys have gotten me curious about the boat's history now--there have been some other interesting modifications like an enlarged bilge access hole in the cabin and an oddly-done side deck recore, so someone clearly did some work on her in the past. I don't think the previous owner had her long, and apparently before that she sat covered for something like 10 years.
The bilge access hole has been particularly annoying since the edges were not well sealed and there was extensive core rot of the cabin sole. (See http://capedory.org/board/viewtopic.php ... highlight=) The recore is currently in progress, but may have to wait for spring to finish up since it's finally gotten cold here over the past couple of weeks.
-
bamabratsche
- Posts: 117
- Joined: Aug 31st, '11, 09:40
Well, I took advantage of the warmer weather this weekend to get over to the marina and take some photos of the rudder and do a little digging to try and find out what was going on inside.
As usual, the damage was more extensive than it seemed from the outside--turns out there were about four or five inches on the left side that were completely debonded from the rest of the rudder and the shaft. I used a dremel "multi-max" to cut slices off the debonded part, starting at the top until I came to solid material. Everything was dry as a bone, but had clearly had water in it for a while, and I also uncovered a pretty large void. I'm glad I didn't do what I was tempted to do at first, which was to just use a syringe to inject as much epoxy as I could into the hole, clamp it, and be done with it.
<a href="https://picasaweb.google.com/lh/photo/p ... site"><img src="https://lh5.googleusercontent.com/-jlCb ... 525202.JPG" height="480" width="640" /></a>
So my plan (when the weather warms back up again) is to bevel the edges where I cut off the debonded material, get as much corrosion off the shaft as I can, glass it back up like a normal patch, then tape around the edges of the whole rudder, as has been suggested.
I also got a photo of the whole stern of the boat, since there was speculation that the rudder is different from other Typhoons. I'd be interested in hearing what the folks who know more about this think.
<a href="https://picasaweb.google.com/lh/photo/I ... site"><img src="https://lh4.googleusercontent.com/-s-WB ... 525201.JPG" height="800" width="600" /></a>