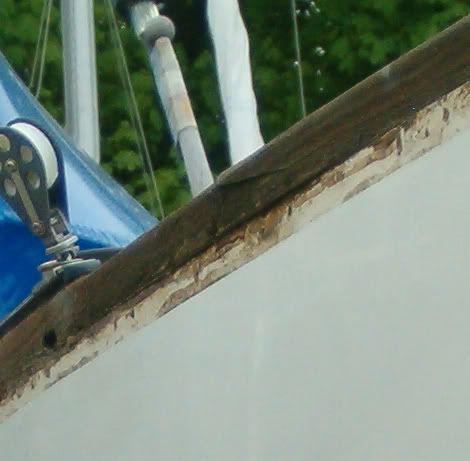
In addition to replacing a short section of Parfait's rub rail, I am considering resurfacing and refinishing the entire rail and toe stop. I suspect the resurfacing requires removal of the rails, but out of curiosity and laziness, does anyone have a trick for avoiding damaging the gel coat above and below the rail when sanding or planing the rail surface?
Perhaps after all these years they need to be pulled and resealed anyway, but boat time is constant and sailing time is minimal.
Rub rail resurfacing
Moderator: Jim Walsh
-
Parfait's Provider

- Posts: 764
- Joined: Feb 6th, '05, 13:06
- Location: CD/36 #84, Parfait, Raleigh, NC
berthed Whortonsville, NC
Rub rail resurfacing
Keep on sailing,
Ken Coit, ND7N
CD/36 #84
Parfait
Raleigh, NC
Ken Coit, ND7N
CD/36 #84
Parfait
Raleigh, NC
-
Neil Gordon
- Posts: 4367
- Joined: Feb 5th, '05, 17:25
- Location: s/v LIQUIDITY, CD28. We sail from Marina Bay on Boston Harbor. Try us on channel 9.
- Contact:
Teak removal for refinishing
FYI, the question of removing teak toe/rub rails came up at our 2011 winter meeting. Norm LeBlanc, noted marine surveyor and our featured speaker, suggested that there was no practical way to do that without pretty much destroying the teak in the process.
Fair winds, Neil
s/v LIQUIDITY
Cape Dory 28 #167
Boston, MA
CDSOA member #698
s/v LIQUIDITY
Cape Dory 28 #167
Boston, MA
CDSOA member #698
-
Steve Laume

- Posts: 4131
- Joined: Feb 13th, '05, 20:40
- Location: Raven1984 Cape Dory 30C Hull #309Noank, CT
- Contact:
-
SurryMark

- Posts: 302
- Joined: Nov 18th, '08, 10:04
- Location: Formerly CD27Y, Tula. Now Luders Sea Sprite 34
- Contact:
don't pull it off
I think that the rub rail would have to be real real real real bad to justify pulling it off, because it surely means replacing the whole thing. You can get just about any finish off with heat and a scraper - maybe a small carbide scraper. I just held back 1/8" or so from the hull on the underside, and then put the new finish on up to the hull. Nobody would accuse me of being bristol at all costs, but the job got approving nods around the harbor. You might get an estimate from a yard for replacing the rub rail, and compare that to the stuff on your wish list.
-
Dick Turner
- Posts: 20
- Joined: Feb 7th, '05, 10:31
- Location: CD 31 "Mystical" Hull #32 New Bern, NC Berthed at Pecan Grove Marina, Oriental, NC
-
Parfait's Provider
- Posts: 764
- Joined: Feb 6th, '05, 13:06
- Location: CD/36 #84, Parfait, Raleigh, NC
berthed Whortonsville, NC
More than scraping
More than scraping is required as this rail is weathered. The Fein detail sander or functional equivalent might be required. I can imagine a stationary guide attached to the the detail sander to keep it off the hull by a tad. That does sound like a job to do from either scaffolding or a floating platform. How about a bosn's chair slung over the side that would hook onto the toe rail? Has anyone rigged scaffolding from the deck?
Keep on sailing,
Ken Coit, ND7N
CD/36 #84
Parfait
Raleigh, NC
Ken Coit, ND7N
CD/36 #84
Parfait
Raleigh, NC

Better and easier to remove the rail
I am very surprised to hear that, since I removed my rubrails this spring, with no damage to the teak. It was simple to remove the bungs, remove the screws, and pull the rail off. The screws were the worst part, since they have Phillips heads, and some took patience to get out without rounding out the slots.Neil Gordon wrote:FYI, the question of removing teak toe/rub rails came up at our 2011 winter meeting. Norm LeBlanc, noted marine surveyor and our featured speaker, suggested that there was no practical way to do that without pretty much destroying the teak in the process.
The rewards for doing this are that 1) you can do a much better and easier job of refinishing, and 2) you can varnish the underside, to seal the wood and protect your new finish from water damage.
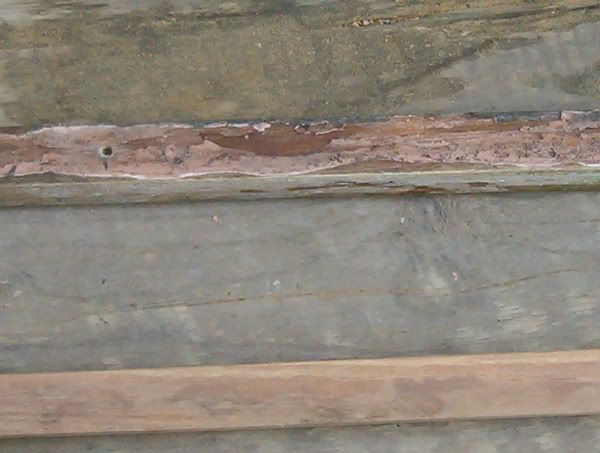
My rails were bedded in what I believe is Sikaflex. The bedding compound was elastic and not highly adhesive - it stretched several inches, and then broke. Here is what it looked like when the rubrail came off.

Here is a photo of the Sikaflex remaining on the hull. It mostly just scrapes off, since it is still soft:
I think it is an excellent idea to remove any (badly weathered) wood trim before refinishing it. This is partly because it is so much easier to work on the piece when it's off the boat. You can do a good job of thoroughly removing the old finish and weathered surfaces, without working upside down or missing tight spots and so on.
Just as importantly, though, removing the piece enables you to get several coats of varnish on the underside. This seals the piece so that the new varnish won't be lifted by moisture that creeps in from underneath.
Here are before and after shots of the sanding process. This would have been much harder to do with the rail still attached to the boat:
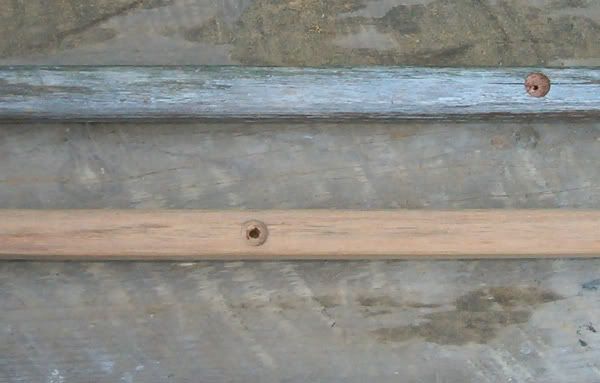
Here's the bottom, showing the old bedding removed (carbide scraper + sanding).
A couple of other practical notes:
- I replaced the original Philips head screws with Roberts (square) ones, since they are easier to install and remove.
- I also discovered that the bungs are an odd size (7/16"). Half-inch will fit (barely), but I found 7/16" at Hamilton Marine this summer.
I'd certainly recommend removing any trim to refinish it, in order to do a proper job, and save labor at the same time.
Last edited by Duncan on Nov 1st, '11, 10:06, edited 3 times in total.


LeBlanc must have been talking about teak bedded with 3M 5200. In that case, he is probably right. But, as long as some fool didn't make that mistake, I agree with Duncan; you should be able to get teak bedded with Dolfinite (what Cape Dory used), polysulfide, silicone or even 3M 4200 off in one piece. Don't forget the old trick of using a guitar string to saw through the adhesive. Sometimes that even works with 5200.
-
Parfait's Provider
- Posts: 764
- Joined: Feb 6th, '05, 13:06
- Location: CD/36 #84, Parfait, Raleigh, NC
berthed Whortonsville, NC
Teak Removal
It is certainly true that I was able to lift the damaged section without damage to the hull. The adhesive certainly wasn't 5200.
Keep on sailing,
Ken Coit, ND7N
CD/36 #84
Parfait
Raleigh, NC
Ken Coit, ND7N
CD/36 #84
Parfait
Raleigh, NC

Roberts Square Head Screws
Where did you buy the Stainless Steel Roberts Head Screws?
-
Parfait's Provider
- Posts: 764
- Joined: Feb 6th, '05, 13:06
- Location: CD/36 #84, Parfait, Raleigh, NC
berthed Whortonsville, NC
Square Drive Screws
Google the subject line for a long list including Jamestown.
Keep on sailing,
Ken Coit, ND7N
CD/36 #84
Parfait
Raleigh, NC
Ken Coit, ND7N
CD/36 #84
Parfait
Raleigh, NC
-
Oswego John
- Posts: 3535
- Joined: Feb 5th, '05, 20:42
- Location: '66 Typhoon "Grace", Hull # 42, Schooner "Ontario", CD 85D Hull #1
Roberts Square Head
My local Ace hardware carries them, both in black oxide and galvanized finish.
O J
O J
"If I rest, I rust"
Voting Member #490
Voting Member #490

Re: More than scraping
I have a Fein Multimaster as well as the detail sanding kit. For sure, hands down, it cannot be beat for certain jobs and it is a serious professional grade tool which does a hell of a lot more for me then sanding. But, of course anyone who knows these tools, they are expensive as hell, but worth every pennyParfait's Provider wrote:More than scraping is required as this rail is weathered. The Fein detail sander or functional equivalent might be required.
That said, the patent ran out on them a year or two ago and everyone under the sun is now making similar tools, Dremel, Black and Decker, Porter Cable and several more. Not a single one of them is anywhere near the quality of a Fein, but they are a lot more affordable and worth considering. Considering a Fein costs about $350 and most of these are under $100 (the PC is about $150 and the most expensive knockoff I have found). If looking for light use, especially if detail sanding is the only purpose (the Fein comes into its own when cutting, not sanding) then honestly everyone should own at the very least one of these knock offs.
But you get what you pay for, my Fein has been rained on, doused in salt water, lived on a boat for 7 years and still works like new. Its by far my most loaned out tool and the most coveted tool of mine by those who borrow it.
When considering a Fein vs knockoff, the price of blades is something to cosider as well (each manufacturer makes their best effort to make their blades incompatible with the others), a typical cutting blade for a Fein is around $40 and easily destroyed. Similar blades for knock offs are less then half that (though I am sure even more easily destroyed). But blades are destroyed from misuse of the tool, treat them gently and dont let them get hot and they will last and last, go slow, its not a sawzaw.
Lastly, Fein (and the others) rape you on sandpaper. Whichever tool you buy, take the sanding pads for the triagular sanders and heat them a little to soften the glue that holds the velcro on them, and peel it off. You now have a nice cusioned pad to directly adhere sticky back paper of any brand which you can cut to shape and buy a roll that will last you a decade for what 50 peices will cost you. I used to buy PC sticky back, but they did something and it sucks now, I now buy a finnish brand paper which I will have to dig out to find its name. Fein actually used to sell sanding fittings that took sticky back and stopped and only did the velco fittings because people did this. For the detail sanding its much easier since it can use any sheet paper (it uses a clamp to secure non sticky back paper) but using high quality paper (not Home Deport Norton) works very well. It is worth noting the overpriced Fein paper is the highest quality paper, but you can get the same quality for less is my point.
Buy one of these style tools if you own a boat, you wont regret it, buy a Fein if you want something that lasts and does the job best, but at the very least a knockoff is great for casual use.
Sorry to be long winded, but mention of my favorite tool got the best of me.
PS: Fein wet/dry vacs are by far the best i have ever used, I stayed in a boatyard once that let me use the ones they had (about 6) any time I wanted, if I owned a home and had a place to store one I would pay the insane price for one.
Russell
s/v (yet to be named) Tayana 42CC
s/v Lady Pauline Cape Dory 36 #117 (for sale)
s/v (yet to be named) Tayana 42CC
s/v Lady Pauline Cape Dory 36 #117 (for sale)
-
Oswego John
- Posts: 3535
- Joined: Feb 5th, '05, 20:42
- Location: '66 Typhoon "Grace", Hull # 42, Schooner "Ontario", CD 85D Hull #1
Refinishing Weathered Rails
I think it is too late in the season, so probably next spring I will redo the rails on two Tys that I am rehabbing.
I want to mention the method that I sometimes use. I power sand the main portion of the rail with a vibrating electric sander. Then I press a 10" wide taping knive into the corner made with the rail touching the hull or deck. I try to lay the knife as flat as possible against the hull. I finish the edges of the rail by hand using a foam backed sanding block.
The metal taping knife prevents the sandpaper from abrading the surfaces of the hull and deck. I sometimes use the broadknife as masking when applying the finish coats.
This will give you an idea of what the knives look like. On straight runs I use a 12" knife and use a narrower knife on curves. With a little practice and using a good quality brush, sanding and finishing is quite easy.
Good luck,
O J
http://www.harborfreight.com/catalogsea ... ing+knives
"If I rest, I rust"
Voting Member #490
Voting Member #490