We are in the process of replacing our cabin sole. We found that the saloon sole was simply screwed down, while the galley sole was screwed and cemented, using some orange colored adhesive.
How should we attach the new one? Screws? Adhesive (if so, which one)? Both? If you use adhesive, why do you need the screws? Is this a belt and suspenders approach? Seems like more work, and we're not lacking for enough work.
Attachment of Cabin Sole
Moderator: Jim Walsh
-
Tom Keevil
- Posts: 453
- Joined: Feb 6th, '05, 23:45
- Location: Cape Dory 33 "Rover" Hull #66
Attachment of Cabin Sole
Tom and Jean Keevil
CD33 Rover
Ashland OR and Ladysmith, BC
CD33 Rover
Ashland OR and Ladysmith, BC
-
Jeff and Sarah
- Posts: 437
- Joined: Aug 25th, '09, 17:03
- Location: CD33 "Prerequisite" / CD28 Flybridge Trawler "Toboggan"; Annapolis, MD
-
Steve Laume

- Posts: 4131
- Joined: Feb 13th, '05, 20:40
- Location: Raven1984 Cape Dory 30C Hull #309Noank, CT
- Contact:
Glued, screwed and tattooed comes to mind. Sounds like more fastening than you would need with modern adhesives. Then the question becomes, what is the best adhesive to fasten a cabin sole?
My question is what precipitates the need to replace the sole? I have looked at mine and it is sound but dinghy. Has anyone considered adding another layer of teak and holly plywood over the original sole?
It seems like 3/8" would not be a great loss in headroom, Steve.
My question is what precipitates the need to replace the sole? I have looked at mine and it is sound but dinghy. Has anyone considered adding another layer of teak and holly plywood over the original sole?
It seems like 3/8" would not be a great loss in headroom, Steve.

My new cabin sole I put down the subfloor as 1" cooza board (it shall never rot again!), that was screwed down mostly, a few part epoxied. Then on top of that 3/8" teak which is epoxied to the cooza (no more crappy thin veneer for me). I also made nearly the entire cabin sole removable, which gives me access to all sorts of new storage space and will facilitate replacing the fuel tank should I ever need to.
Russell
s/v (yet to be named) Tayana 42CC
s/v Lady Pauline Cape Dory 36 #117 (for sale)
s/v (yet to be named) Tayana 42CC
s/v Lady Pauline Cape Dory 36 #117 (for sale)
When I laid my new floor of 3/8" solid mahogany I used nothing more than adhesive and a couple of hundred pounds of lead weights. However, one word of caution. There are different adhesives for solid wood flooring and laminate flooring. Using the wrong type could spoil a otherwise good job. Do your home work!
Have A Nice Day
Glue and Screws
I'm not a boat builder, but I can tell you that in terms of building construction, the point of using both glue and mechanical fasteners is that the glue will keep the floor from squeaking, and the fasteners will eliminate the need for clamping.
Fair Winds,
Kevin
Fair Winds,
Kevin
Kevin L.
-
bottomscraper

- Posts: 1400
- Joined: Feb 5th, '05, 11:08
- Location: Previous Owner of CD36 Mahalo #163 1990
- Contact:
On another board I frequent they say "No pictures, didn't happen".Russell wrote:My new cabin sole I put down the subfloor as 1" cooza board (it shall never rot again!), that was screwed down mostly, a few part epoxied. Then on top of that 3/8" teak which is epoxied to the cooza (no more crappy thin veneer for me). I also made nearly the entire cabin sole removable, which gives me access to all sorts of new storage space and will facilitate replacing the fuel tank should I ever need to.
Since I am relatively certain that this did happen I would love to see pictures.
Rich Abato
Nordic Tug 34 Tanuki
Previous Owner Of CD36 Mahalo #163
Southern Maine
http://www.sailmahalo.com
Nordic Tug 34 Tanuki
Previous Owner Of CD36 Mahalo #163
Southern Maine
http://www.sailmahalo.com
I am currently without a working camera, someone else wants pictures of my radar arch too. When I get around to getting a new battery for my camera i will take photos and upload. Next month I will probably sit still someplace for a month or so, so will deal with the camera then when I can actually wait for mail.bottomscraper wrote:On another board I frequent they say "No pictures, didn't happen".Russell wrote:My new cabin sole I put down the subfloor as 1" cooza board (it shall never rot again!), that was screwed down mostly, a few part epoxied. Then on top of that 3/8" teak which is epoxied to the cooza (no more crappy thin veneer for me). I also made nearly the entire cabin sole removable, which gives me access to all sorts of new storage space and will facilitate replacing the fuel tank should I ever need to.
Since I am relatively certain that this did happen I would love to see pictures.
Russell
s/v (yet to be named) Tayana 42CC
s/v Lady Pauline Cape Dory 36 #117 (for sale)
s/v (yet to be named) Tayana 42CC
s/v Lady Pauline Cape Dory 36 #117 (for sale)
-
bottomscraper
- Posts: 1400
- Joined: Feb 5th, '05, 11:08
- Location: Previous Owner of CD36 Mahalo #163 1990
- Contact:
Thanks!Russell wrote:
... When I get around to getting a new battery for my camera i will take photos and upload. ...
Rich Abato
Nordic Tug 34 Tanuki
Previous Owner Of CD36 Mahalo #163
Southern Maine
http://www.sailmahalo.com
Nordic Tug 34 Tanuki
Previous Owner Of CD36 Mahalo #163
Southern Maine
http://www.sailmahalo.com
-
Ben Thomas

- Posts: 215
- Joined: Feb 5th, '05, 12:17
- Location: 82 CD30 Milagro Hull #248
cabin sole
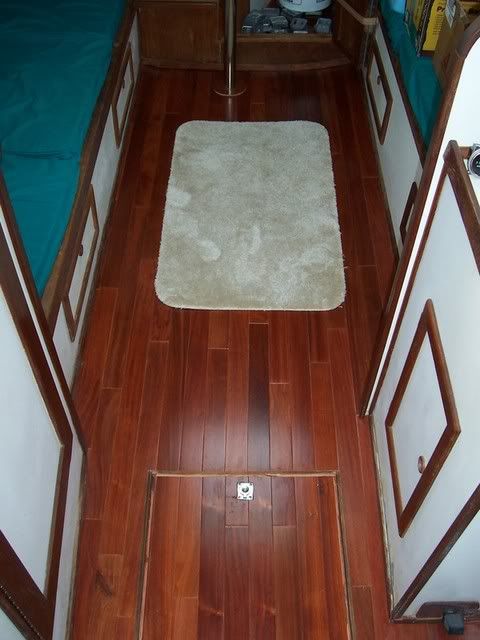
Tom, I chose to use this product from PYI, floor anchors as I wanted easy access
Here is the link
[/url]http://www.pyiinc.com/index.php?section ... s&sn=1[url]
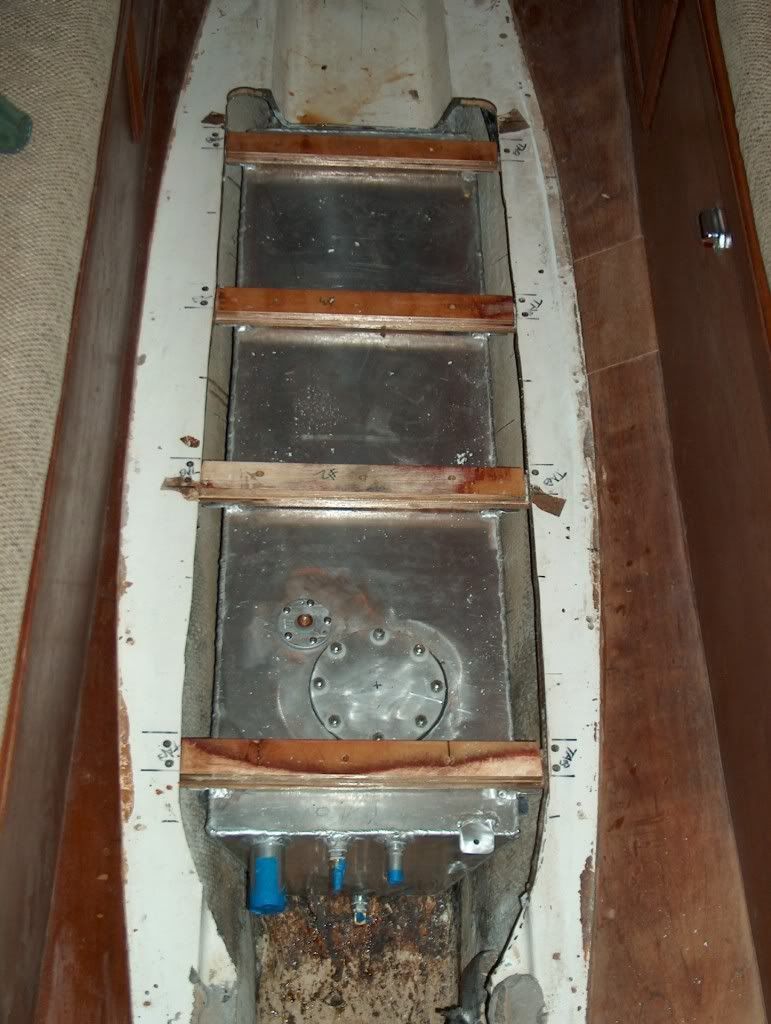
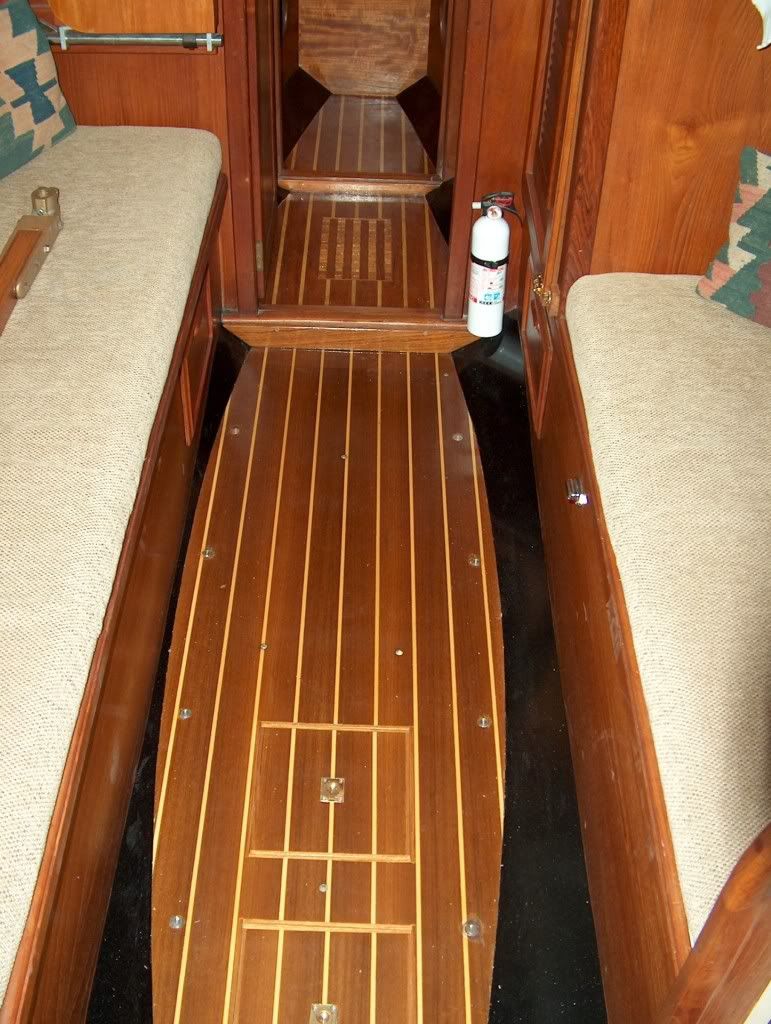
I built the new sole with two hatchs, one for fuel tank the other bilge pumps.
Ben[/img][/url]
Here is the link
[/url]http://www.pyiinc.com/index.php?section ... s&sn=1[url]
I built the new sole with two hatchs, one for fuel tank the other bilge pumps.
Ben[/img][/url]
-
Tom Keevil
- Posts: 453
- Joined: Feb 6th, '05, 23:45
- Location: Cape Dory 33 "Rover" Hull #66
Thanks for the input everyone. It is obvious that there were a variety of cabin sole construction methods on different models. I think I'm going to do the adhesive and screws route, though maybe not so many screws as the original.
Steve, the replacement is due to the fact that the plywood is delaminated. Apparently, before we bought the boat, the fresh water tank under the settee leaked, and the edges of the sole were not sealed. The previous owner had injected epoxy to partially stabilize the situation, but we are finally getting around to doing it right.
Jeff, I'm sorry but I haven't been documenting this job. I think I'm too old to instinctively photograph everything I do in life and post in on facebook. I can provide some information that would have helped me if I'd known it in advance.
The sole is 1/2" plywood mounted on fiberglass. The fiberglass is actually 1/4" glass on top and bottom, enclosing 3/4" plywood in the center. It is a very sturdy setup. It looks as if the galley and the saloon were built by different people, using slightly different techniques. For example, as I mentioned, one was screwed and glued, while the other was just screwed.
There is a rectangular well around each hatch, created by eliminating the 3/4 plywood and the upper glass layer for about 2 inches all around the hatch. Into this well they put some thickened resin of some sort, and then set a wooden frame into that. It is built like a picture frame, and is screwed and glued to the underside of the teak and holly plywood. In one case the screws came in the top, and in the other case they came into the bottom. It is this wooden frame that creates the ledges that the hatch sits on. The hardened resin did not stick to the fiberglass, it just provides a solid footing. A major point to be taken from this is that the hatch opening is the absolute worst place to try to pry up the flooring. You need to start on an edge somewhere. I eventually used a circular saw and a Fein Multimaster knockoff (Rockwell Sonic Crafter) to cut the sole into easily handled pieces. You must cut the saloon sole anyhow, as it won't fit out the companionway.
Another important discovery is that the galley sink is installed on top of the sole, so you need to cut through the plywood at that point. The sole was also underneath the little triangular bit on the forward port corner, and slightly under the navigation table.
To avoid a repeat of this job, I have sealed the bottom and edges of the new plywood with penetrating epoxy sealer. I also added a hatch in between the two existing ones to provide better access to that area of the bilge, and enlarged the forward hatch to provide better access to the knotmeter.
I'm now in the process of fitting the new sole pieces. The major thing to know here is that nothing is straight or square. Boatbuilding is not carpentry, and getting it all to fit is a tedious business, especially if you don't have access to a good shop. It's going slowly, but I'm getting there. Thank goodness for the Sonic Crafter and teak molding!
Tom and Jean Keevil
CD33 Rover
Ashland OR and Ladysmith, BC
CD33 Rover
Ashland OR and Ladysmith, BC
-
Jeff and Sarah
- Posts: 437
- Joined: Aug 25th, '09, 17:03
- Location: CD33 "Prerequisite" / CD28 Flybridge Trawler "Toboggan"; Annapolis, MD
Tom,
Thanks for the information. My saloon sole is delaminating near the mast step- apparently there was some water intrusion through the mast collar before I bought the boat. The rest of the sole is good enough to hang on to- maybe not perfect, but certainly good enough for a 30 year old boat. It's not a job I'm willing to do while I live aboard though so it won't happen until at least the fall.
Jeff
-
Tom Keevil
- Posts: 453
- Joined: Feb 6th, '05, 23:45
- Location: Cape Dory 33 "Rover" Hull #66
Jeff: mast step
Jeff, on our boat the bit of plywood that fits around the mast is a separate piece that is removable to allow inspection of the mast step. It may be wedged in pretty tightly, but I doubt that it is permanently installed.
Tom and Jean Keevil
CD33 Rover
Ashland OR and Ladysmith, BC
CD33 Rover
Ashland OR and Ladysmith, BC
-
Jeff and Sarah
- Posts: 437
- Joined: Aug 25th, '09, 17:03
- Location: CD33 "Prerequisite" / CD28 Flybridge Trawler "Toboggan"; Annapolis, MD
Cabin sole redo
There is a product that is sold by Loews that did the trick for us on our 28 foot sailboat. In fact, it worked so great, I also used it to
cover a bunch of holes on the side near the stove.
If you have a floor that is in good condition, painted or not (like ours) it will work with a minimum of fuss.
It is called Home Fashion Timber Series and comes in two colors.
Each plank is four by 36 inches, and comes in a package of 30 pieces that actually match the pattern of each piece.
Now the good part. Lay it down, and cut it with a pair of good scissors, then peel off the paper and place it on the floor. It really
sticks!
I have had on our boat for over five years, and it looks good as new in spite of dropping most everything on the floor. It is also
"rough" so when you step on the flooring you will not slide and
fall down.
The carton runs less than $40.00. Try that price on teak!!
Ken Cave
Dragon Tale
Cape Dory 28 #227