I did a search on this and saw a number of posts. But since I'm not the sharpest fluke on the anchor, I was wondering if anyone would be kind enough to go through the steps necessary to replace the hose on the stuffing box. I'm assuming that the propeller shaft will have to be removed, at least partially, and if that's the case I guess it would be prudent to replace the cutlass bearing at that time.
Any advice is welcomed, as well as any pictures, I am a visual learner.
Thanks,
Cliff
Replacing Stuffing Box Hose
Moderator: Jim Walsh
-
gates_cliff
- Posts: 463
- Joined: Sep 3rd, '08, 13:23
- Location: CD 27, "Katie Girl", Galesville, MD
-
Ray Garcia

- Posts: 258
- Joined: Apr 27th, '05, 22:08
- Location: 1981 CD27 #212 "Spirit" Huntington, NY
- Contact:
This is the easiest hardest job you can do. Easy to replace the hose, hard to get into the space to work. A thorough job would take a day or more including replacement of cutlass bearing.
Here is what I did (CD27) plus some commentary.
Obviously the boat must be hauled to complete the job.
What you need:
Hose can be a soft wall exhaust hose or specialty stuffing box hose. Make sure you order right diameter hose. Example:
http://www.deepblueyachtsupply.com/cata ... d%20Clamps
4 hose clamps, get the quality ones. Spending a few dollars more is highly recommended, for at least piece of mind. Not to mention if clamps fail boat sinks.
Thread locking material for coupling bolts.
Stainless steel safety wire for shaft coupling bolts.
Anti-seizing compound for shaft and coupling (lanacoat, teflon grease, etc.)
Safety equipment:
Mechanics or work gloves. Hose clamps can have sharp edges. You will also get a better grip on the hose.
If you are at the yard alone tie off locker lid so they do not fall and let someone know you are working below. Keep both locker lids open. A cell phone below with you may help.
Work light - cool fluorescent preferred or regular safety work light. Bring a spare bulb, it is going to blow. Trust me I know.
Rags - For cleanup and to block the opening to bilge behind engine pan. The bilge is like a magnet, something is bound to slip out of your hands and fall down below.
Cold beer, Bengay, Icy Hot.
Procedure:
Lock steering wheel to port or starboard to get rudder out of the way. Tie off tiller if you don't have a wheel.
Place transmission lever in neutral. Shaft needs to freewheel to facilitate removal.
Gather some moving blankets or other cushioning material for use between yourself and the hull sides while in the locker. More than likely you will be bending yourself to fit. This is the hard part.
Gather all the tools you might need before descending into the abyss. You will need screwdriver(s), adjustable wrench(s), socket wrench(s), needle nose pliers, wire cutters, and container for nuts and bolts. Organize them and place them below before descending. You may be down there for a bit so better to have everything you need instead of re-folding yourself in and out of the workspace. An assistant would be helpful.
Remove shaft-coupling bolts. Separate couplings slightly in preparation to press shaft out of coupling using socket. Search forum for shaft coupling removal. Plenty of detailed information available.
Cut safety wire and remove coupling shaft bolts before removing shaft from coupling.
Remove shaft key and place in container.
Place coupling aside and gently push shaft backwards towards stern.
Remove clamps from stuffing box hose and remove entire unit.
Un-fold yourself from cockpit locker and drink 1 beer, only if needed. Let nerve function return to arms and hands.
I would recommend you thoroughly clean stuffing box and remove old shaft packing material.
Remove and inspect shaft for wear. Clean as needed. Do not apply any petroleum based grease to shaft that could contaminate cutlass bearing.
Now is the time to inspect and replace cutlass bearing if needed.
Place new hose on stuffing box, tighten 2 clamps securely. Use warm water/soap if needed to install hose on box.
Pre-cut shaft packing material and place aside.
Re-install shaft through cutlass bearing gently pushing into place. Do not use petroleum based lubricant except mild soap if needed.
Re-fold yourself back into the abyss remembering to bring everything you need.
Place hose on shaft log and tighten 2 clamps securely. Use non-petroleum based lubricant if needed to install hose on log. Make sure you remember to keep stuffing box assembled before installing. You do not want to take everything apart just to put back the packing nut.
Place coupling on shaft along with key and tighten coupling shaft bolts. Re-install safety wire last when everything is back together. Use liberal amounts of anti-seize compound of choice on shaft where it enters coupling, and between couplings. It will help disassembly next time you perform maintenance.
If you replaced cutlass bearing, check and adjust engine/shaft alignment. Double check alignment once boat is launched.
Replace coupling bolts and tighten securely. Use thread lock or similar to keep bolts in place.
Install shaft packing into stuffing box. Remember to stagger joints. Loosely tighten packing nut. Adjust when boat launched.
Gather your tools, retrieve tool(s) you dropped in the bilge.
Rescue yourself from abyss. Double-check your work
Arch back; drink remaining cold beer; apply Bengay and Icy-Hot as needed.
Enjoy job well done.
[img]http://www.cd27spirit.us/images/board/stuffbox.jpg[/img][/img]
-
gates_cliff
- Posts: 463
- Joined: Sep 3rd, '08, 13:23
- Location: CD 27, "Katie Girl", Galesville, MD
replacing stuffing box hose
WOW! Thank you so much, that is exactly what I needed. I am certain I would have had to make more trips up and down without the details you provided.
I'll let you know how it goes.
I will be certain to have an assistant. Once when working on another boat underneath the cockpit, I almost got stuck, couldn't get back out the same way I went in. Ended up working my way around in a 360 to get back out. Was alone at the time and won't make that mistake again.
Thanks again.

-
gates_cliff
- Posts: 463
- Joined: Sep 3rd, '08, 13:23
- Location: CD 27, "Katie Girl", Galesville, MD
CD Model
Mine is a 27. From the other posts on here, I beleive I won't have to remove stern tube.
Thanks
Thanks
-
Cathy Monaghan

- Posts: 3502
- Joined: Feb 5th, '05, 08:17
- Location: 1986 CD32 Realization #3, Rahway, NJ, Raritan Bay -- CDSOA Member since 2000. Greenline 39 Electra
- Contact:
Fiberglass....
Hi Russell,Russell wrote:What model CD do you have? On the CD36 replacement involves removing the stern tube entirely.
I believe that the CD28, CD330 and the CD36 (and all the sailboats larger than the CD36) have bronze stern tubes. All the rest of the CD sailboats have fiberglass stern tubes and they cannot be removed.
Cathy
CD32 Realization, #3
Rahway, NJ
Raritan Bay
Replace with PSS
As long as you're going through the agony of pulling the shaft, etc. you should consider replacing the whole stuffing box with one of the new PSS shaft seal systems. $200, and you don't have to worry about drips, is it too tight/too lose, etc.
-
Maine Sail
- Posts: 839
- Joined: Feb 8th, '06, 18:30
- Location: Canadian Sailcraft 36T
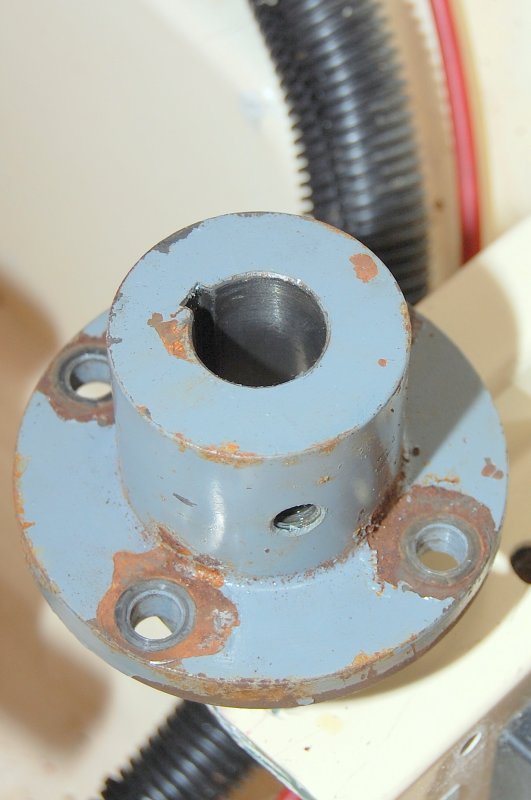
The above advice by Dog Watch is very good. The one exception and point I'll address is that a one piece (not a split coupling) coupling should NEVER just "slide" onto the shaft.Dog Watch Ray wrote:
Place coupling on shaft along with key and tighten coupling shaft bolts. Re-install safety wire last when everything is back together. Use liberal amounts of anti-seize compound of choice on shaft where it enters coupling, and between couplings. It will help disassembly next time you perform maintenance.
A properly fit coupling is to a tolerance of .001 or greater usually out to the ten thousands and is and should be a light "tap fit". Tap fit means you need a phenolic, brass or lead hammer to tap the coupling and seat it into position. Anything less than a light tap fit will result in shaft wearing and damaging movement between shaft and coupling.
Having worked in boat yards and replace many prop shafts and couplings all I can say is that it is rare, very, very rare that a one piece coupling can be reused once you have removed it from the shaft. Owners always complained about the cost of a new coupling and a fit and face charge but they would have complained more if the movement between shaft and coupling took out a $600.00 shaft.
When ever you remove a one piece coupling from a shaft bring the shaft and coupling to your local shafting or prop shop and have it checked for fit, coupling to shaft, and then have the coupling checked for facing or run out. while you;re there it's a good idea to have them check the run out of the shaft.
One more note is that it is not a good idea to use any anti-seize product containing graphite, copper, aluminum or any other dissimilar metal which will lead to galvanic corrosion between the iron coupling and Nitronic 50, Aquamet, Aqualoy or tobin bronze shaft.
I have found Tef-Gel to be the ONLY product in the last 20 years to allow ZERO rust interface between the coupling and the shaft. It also contains NO dissimilar metals.
Checking the Facing of The Coupling:

A Coupling That Had Been Installed With Tef-Gel (NO RUST):
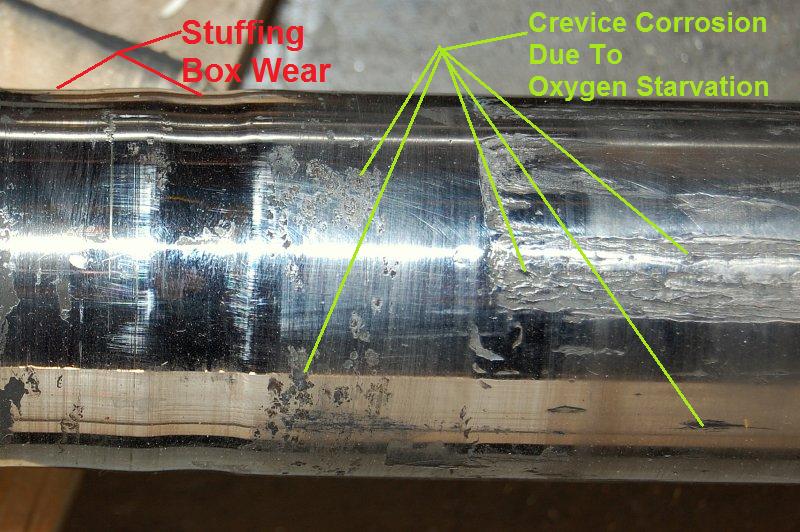
Contrary to popular belief all traditional type stuffing boxes must leak some when spinning. Yes even Gore GFO or Western Pacific Tradings GTU packing need to drip some to both lubricate the shaft and to prevent crevice corrosion. Crevice corrosion occurs in stainless alloys when the ocean water it is in contact with becomes oxygen starved. By completely running a traditional stuffing box dry you will wear the shaft and cause oxygen starvation inside the shaft log when you can't see it. by allowing even a few drips per minute you can keep fresh sea water moving though the shaft log. All PSS seals, for the last 8 years or so, have a vent hose. This prevents the log from becoming air bound and also prevents crevice corrosion on stainless alloy shafts. Very few people talk about this dirty little secret, crevice corrosion, but if your shaft looks like the one below REPLACE IT!!!
-
gates_cliff
- Posts: 463
- Joined: Sep 3rd, '08, 13:23
- Location: CD 27, "Katie Girl", Galesville, MD
Local Suppliers Annapolis, ect
Wondering if anyone knows of local suppliers for Tef-Gel and PSS Shaft seal around Annapolis or Greater Washignton DC area.
Ok, looks like I will need to figure a day to remove the coupling, shaft, etc. then take the shaft and coupling to a prop shop, probalby take a week or 2 for them, then another day or so to reinstall. Guess I better get my butt in gear if I plan to do any sailing this spring.
Thanks to all of you. Although, getting a little concerned that I mght screw something up and damage my shaft or misalign or something.
-
paul marko
- Posts: 76
- Joined: Mar 5th, '05, 21:45
- Location: CD28/77,Ixcatl/port charlotte Fl.
Secure the Lazerette hatch
I read all the good advise concerning the shaft/ hose replacement, but I missed an essential warning,
When entering the Shaft tube area via a Lazarette:
tie the Lazarette lid ,so it can't close accidentally, I spent 4 hrs on a cold winter night locked in my CD 28 when the lid fell shut and the exterior hasp snapped closed.
Not wanting to freeze to death, I beat (with much animation) the area around the hasp and finally broke it lose.
best of Luck Paul Marko
-
gates_cliff
- Posts: 463
- Joined: Sep 3rd, '08, 13:23
- Location: CD 27, "Katie Girl", Galesville, MD
Valuable Advice
Paul,
Now that is really invaluable advice!
Now that is really invaluable advice!
PSS supplier
I've been looking at getaprop.com - they seem to have very good prices, and have all the bits and pieces you'd need.
I'm planning an entire replacement (flange, drivesaver, shaft, PSS, and cutlass bearing) from them for this year's upgrades.
Matt
I'm planning an entire replacement (flange, drivesaver, shaft, PSS, and cutlass bearing) from them for this year's upgrades.
Matt
-
Randy Capstick
- Posts: 109
- Joined: Feb 6th, '05, 19:55
- Location: 1980 Ty Weekender, 1984 CD36 Glen Margaret, Nova Scotia, Canada
PSS Supplier
Hi Matt,
I replaced my Shaft, Coupling, Cutlass bearing and replaced my stuffing box with a PSS shaft seal on my CD28 last year. I purchased everything from...
http://www.deepblueyachtsupply.com/
I was very happy with their prices,service and delivery and would recommend them.
It's very limited space wise getting the PSS shaft seal to fit (with the Volvo md7b engine) but it is possible.
Good Luck,
Randy
-
gates_cliff
- Posts: 463
- Joined: Sep 3rd, '08, 13:23
- Location: CD 27, "Katie Girl", Galesville, MD
Requires Contortionist
I was at my boat today. Removed the fuel tank, and while there was sitting in the port cockpit locker. Man, that was painful, and I'm not all that big, 5'10" 200 lbs. I can't quite figure out how to rearrange my body so that I could reach down to where the shaft log, coupling, etc is located. How do you guys do it? You must be much thinner than I am, and much more agile, or flexible or something.
-
John Vigor

- Posts: 608
- Joined: Aug 27th, '06, 15:58
- Contact:
Re: Requires Contortionist
Have you tried removing the companionway steps and going in over the engine? Depending on the engine, you might need a pillow to cushion your stomach. It's a bit claustrophobic, but on my boat it's a lot easier to get to the stern gland that way than it is through the cockpit locker.gates_cliff wrote:I was at my boat today. Removed the fuel tank, and while there was sitting in the port cockpit locker. Man, that was painful, and I'm not all that big, 5'10" 200 lbs. I can't quite figure out how to rearrange my body so that I could reach down to where the shaft log, coupling, etc is located. How do you guys do it? You must be much thinner than I am, and much more agile, or flexible or something.
John V.
http://www.johnvigor.com