I need to replace the gaskets on all of my port holes on my CD30.
Is there a place that makes them?? If so info please
Do you just use round rubber gasket material?? if so info please
Are there any tricks to help make it easier to do??
portholes
Moderator: Jim Walsh

gasket material
Use the SEARCH feature on this site. Plenty of info re: material, where to buy, technique to install, type of glue etc.
________
No2 vaporizer review
________
No2 vaporizer review
Last edited by Ron M. on Feb 11th, '11, 05:39, edited 1 time in total.
-
barfwinkle

- Posts: 2169
- Joined: Feb 6th, '05, 10:34
- Location: S/V Rhapsody CD25D
Speaking of Portlight Gaskets
Hi everyone
As some of you may know, its been raining here! How much you might ask? The river flow below the Dam is approaching 200,000 CFS (192,000 CFS since 0100) and the crap from Northern Oklahoma and Kansas, where the rain has been significantly heavier, is yet to arrive (FYI Mr Brey, Bartlesville is underwater) In Fact to our south they have CLOSED Lake Texhoma, NO ONE ALLOWED ON THE LAKE, because of the debris and "FLOW" Flow on an inland lake????? Oklahoma's and inland Texas' version of a tides
I say all of that to say, during all the deluge that has fallen these past few weeks, Rhapsody's New Portlight Gaskets have not leaked one drop, not one ioda (sp), zilch, NONE
And if anyone is interested, I still have about 60 feet of the material that I'll be glad to share for the cost of shipping and a nominal fee. I paid $40.00 for 100 feet! Make me an offer. It really is a pretty simple task to perform.
Fair winds.
As some of you may know, its been raining here! How much you might ask? The river flow below the Dam is approaching 200,000 CFS (192,000 CFS since 0100) and the crap from Northern Oklahoma and Kansas, where the rain has been significantly heavier, is yet to arrive (FYI Mr Brey, Bartlesville is underwater)
I say all of that to say, during all the deluge that has fallen these past few weeks, Rhapsody's New Portlight Gaskets have not leaked one drop, not one ioda (sp), zilch, NONE
And if anyone is interested, I still have about 60 feet of the material that I'll be glad to share for the cost of shipping and a nominal fee. I paid $40.00 for 100 feet! Make me an offer. It really is a pretty simple task to perform.
Fair winds.
Bill Member #250.
-
John Danicic

- Posts: 594
- Joined: Feb 5th, '05, 10:30
- Location: CD 36 - Mariah - #124 Lake Superior
- Contact:
To All:
I am currently involved in that very project. When I am on the boat, I do a portlight a day, sort of.
I ordered a hundred feet of this stuff from McMaster-Carr.com. Each portlight takes about 3 feet so there is enough to do a few boats. It also looks like the same stuff used on the hatches but I haven't attempted that as yet.
Order Number 8605K44
Weather-Resistant EPDM Foam Rubber Cord 1/2" Diameter, 100' Length
In stock at $33.62 Each - 100 ft roll.
It appears absolutely identical to the Spartan stuff but you do have to cut it to size your self. A layer of contact cement applied to both the portlight and the cord is all you need.http://www.mcmaster.com/nav/enter.asp?p ... %3Dfindtab
Replacing them is a fun thing to do at an anchorage. I used a 1/4 inch wood chisel to remove the old stuff. It comes off easily and the bits that stick can be sanded off with a little 80 grit sandpaper. Let the contact cement dry thoroughly on both the gasket and the portlight before you install it. Once it sticks, close the portlight for a few hours to set it on permanently. I found that the portlights are now easier to tighten down and the screens fit better as well.
Sail on.
John Danicic
CD 36 - Mariah - #124
Lake Superior

gasket maintenance
After you get the new gaskets installed keep them new and supple by applying a coating of silicon grease once a year, especially on the lower edges that get the sun. My 23 y/o gaskets don't drip a drop. When I got Seraph, 5 years ago, a few of the gaskets were dried and showed signs of cracking. They look much better after severals years of silicon grease. Too bad the POs didn't grease their gaskets!
Randy 25D Seraph #161
-
Shipscarver

- Posts: 173
- Joined: Sep 22nd, '08, 15:49
- Location: CD27
"SOUL MATE"
Replace port glass in 1980 CD27
Have you replaced the glass in a port? Mine is crazed like a broken windshield in a car. I know it is tempered glass, and that Spartan does not list it. How hard is it to remove and replace?
-
John Danicic
- Posts: 594
- Joined: Feb 5th, '05, 10:30
- Location: CD 36 - Mariah - #124 Lake Superior
- Contact:
An interesting job. After examining my portlight, it appears the glass is siliconed in place on the frame. I don't think it would be a hard job unless you tried to do it on the boat. You would have to break out the glass, clean up the frame with a chisel and then replace it. I would drive the hinges out to remove the glass and frame so that you could work on it in comfort on a work bench.
I do know, that when you order a whole portlight from Spartan, they cast it after your order which means that they must have the parts around ready to assemble. You might convince them to sell you the just precut glass or a good glass shop should be able to cut it for you. Tempered glass cutting requires some skill and the right tools. Spartan's telephone number is: 1-800-325-3287
Sail on
John Danicic
CD 36 -Mariah- #124
Lake Superior

Cheaper and simpler
Take the ports to a glass shop. Let them do the entire job. Cut and install, perhaps use safety glass. I did this for a CD 25 and even got "smoked safety glass" installed less expensively than buying smoked lexan and doing it myself.
On more thought, Shop around several shops and have one port with you when you price it out.
On more thought, Shop around several shops and have one port with you when you price it out.
Jim Davis
S/V Isa Lei
S/V Isa Lei
-
Wayne Grenier
- Posts: 149
- Joined: Mar 7th, '06, 18:30
- Location: 1974 CD 28 Meantime
-
Warren S

- Posts: 254
- Joined: Jul 27th, '06, 21:22
- Location: s/v Morveren
Cape Dory 270 Hull #5
Washington, NC
Aesthetics
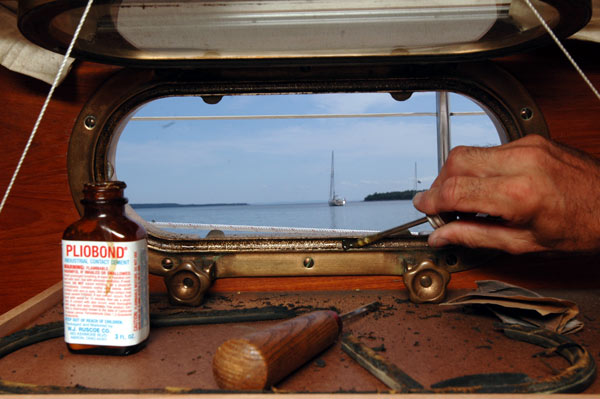
Useful information. I, for one, also enjoy the background shot of the sailboat and inlet in the background.
How do you keep the interior bronze frame nice and shiny? Steel wool? Polish?
Nice screens by the way. I scored 8 of 'em when we first acquired the 270.
How do you keep the interior bronze frame nice and shiny? Steel wool? Polish?
Nice screens by the way. I scored 8 of 'em when we first acquired the 270.
"Being hove to in a long gale is the most boring way of being terrified I know." -Donald Hamilton
-
Shipscarver
- Posts: 173
- Joined: Sep 22nd, '08, 15:49
- Location: CD27
"SOUL MATE"
Putting it back togeather
I pulled the port. The big item was penetrating oil to get the bolts out, followed by much sweat and a few harsh words getting the bronze off the walls (cauked/glued on). I now have the port out and on the bench and the hole duct taped. Today it goes to the auto glass shop. But, when finished what is the best product to seal it back in place?
BTW, when I examined the hinges it looked like they were made with extractable hex key bolts as hinge pins. I thought, "Great idea, just screw out the pins and remove the glass rim portion!" However, none of my keys work. So, the entire port sits on my bench.
BTW, when I examined the hinges it looked like they were made with extractable hex key bolts as hinge pins. I thought, "Great idea, just screw out the pins and remove the glass rim portion!" However, none of my keys work. So, the entire port sits on my bench.
Thoughts
For putting the port back in the boat, fast cure 4200, perhaps even 5200. On the glass, I admit I don't have a Spartan bronze port handy to look at, but if the glass shop is thinking silicone to glue the glass in, have him use fast cure 5200. Silicone is good for plastic, but you can be a lot more vigorous with glass. Seal the edges and the flange the glass sits onit sits on. Then a small bead around the inside edge.
Jim Davis
S/V Isa Lei
S/V Isa Lei
-
Bill Cochrane

- Posts: 212
- Joined: Feb 5th, '05, 13:42
- Location: Cape Dory 36 #114
s/v Phoenix
Silicone
I respectfully disagree...I wouldn't use 5200 or even 4200 to replace the portlights (To be clear, I'm talking about putting the bronze frames into the boat, not putting glass into the frame).
Silicone is ideal for this. You want a gasket but not much adhesion...you may need to remove them again someday. Whatever you use, you need to clean both the frame and gellcoat of the old sealant. I dry fit the frames to the boat, mask the gellcoat to the edge of the frame, remove the portlight frame, and run a good thick bead of silcone around inside the mask. Remount the frames but tighten only until it starts to compress the silicone a bit...you want it tight but you don't want to squeeze all or even most of the silicone out of the joint. Let it set up for 48 hours or so and then tighten down to compress your new gasket.
Silicone is ideal for this. You want a gasket but not much adhesion...you may need to remove them again someday. Whatever you use, you need to clean both the frame and gellcoat of the old sealant. I dry fit the frames to the boat, mask the gellcoat to the edge of the frame, remove the portlight frame, and run a good thick bead of silcone around inside the mask. Remount the frames but tighten only until it starts to compress the silicone a bit...you want it tight but you don't want to squeeze all or even most of the silicone out of the joint. Let it set up for 48 hours or so and then tighten down to compress your new gasket.
-
sfreihofer
- Posts: 223
- Joined: Dec 6th, '07, 22:05
- Location: 1981 Cape Dory 25 #794, S/V PEARL
- Contact:
Re: Putting it back togeather (sic)
If your ports are like mine, the hinge pins do not screw in... they are rolled ss pins that are pressed in. You can tap them out with a thin punch and a hammer. That worked for me.
Stan
CD25 #794
Ft. Lauderdale
Posted: Fri 9/26/08 6:54 am Post subject: Putting it back togeather
--------------------------------------------------------------------------------
I pulled the port. The big item was penetrating oil to get the bolts out, followed by much sweat and a few harsh words getting the bronze off the walls (cauked/glued on). I now have the port out and on the bench and the hole duct taped. Today it goes to the auto glass shop. But, when finished what is the best product to seal it back in place?
BTW, when I examined the hinges it looked like they were made with extractable hex key bolts as hinge pins. I thought, "Great idea, just screw out the pins and remove the glass rim portion!" However, none of my keys work. So, the entire port sits on my bench.
Instant Bubble-head. Just add water.