One of my Winter projects for Felicity is to finally replace some of the leaking seacocks
She still has the original Spartan seacocks.
I've lapped and greased them a few times now but some of them still leak.
I plan to unscrew the thru-hulls using a step-wrench and/or an inserted steel bar and wrench with breaker bar. If that doesn't work I'll try a puller made-up of some blocks of wood, threaded rod, washers and nuts.
Question:
1) There are two bolts that go through the hull that hold each seacock in place.
What is the best way to remove these with the least amount of damage to the hull?
What is the best way to seal the holes in the hull afterwards.
Note that I plan to use the Groco Backing Plates and epoxy them to the inside of the hull and won't be using bolts that go through the hull from the outside.
2) One of the seacocks is in a pretty tight spot.
Is it possible to unscrew the thru-hull with the seacock in place and thereby unscrew it from the seacock and the hull all at once? Has anyone tried that?
Thanks for any help.
I'll post some pictures as the work progresses.
Replacing Spartan SeaCocks with Groco - some questions
Moderator: Jim Walsh
Replacing Spartan SeaCocks with Groco - some questions
Ken Easley
Intrepid 9 Meter - Felicity
Southport Harbor, Connecticut
Intrepid 9 Meter - Felicity
Southport Harbor, Connecticut

Re: Replacing Spartan SeaCocks with Groco - some questions
Here's a good article on the subject, Ken When I have boat maintenance questions, this is the first site I visit.
It's not really feasible to remove the thru hull without first removing interior components. - Jean
https://marinehowto.com/replacing-thru- ... -seacocks/
It's not really feasible to remove the thru hull without first removing interior components. - Jean
https://marinehowto.com/replacing-thru- ... -seacocks/
Jean - 1983 CD 33 "Grace" moored in
Padanaram Harbor
Massachusetts
Padanaram Harbor
Massachusetts
-
Typhoon4Fun
- Posts: 87
- Joined: Apr 29th, '18, 09:34
- Location: TySr - Adeline
Re: Replacing Spartan SeaCocks with Groco - some questions
I did this a few years ago. That Marine How-To website was extremely helpful.
I seem to recall in my case that I could not remove the seacock until the thru-hull was removed because the mushroom head partially obscured the heads of the bolts, but I could be mistaken. In any case if I recall correctly I removed the thru-hulls first. I don't have a step wrench so I used a small piece of rectangular scrap metal inserted into the thru-hull to engage the dogs inside. A bit of heat and a pvc pipe on my wrench for more leverage and I was able to unscrew them surprisingly easily. Maybe some penetrating oil wouldn't hurt.
As for covering up the old holes, I epoxied G10 backing plates into place. The plates covered the old holes and I just filled them with thickened epoxy.
Re: Replacing Spartan SeaCocks with Groco - some questions
Unscrew the thru-hull from the seacock, remove the bolts and then lift off the seacock.
I was able to remove all the thru-hulls using a flat metal bar, pipe wrench and a length of pipe for leverage.
Applying a heat gun to the thru hull will help to break it lose, but you probably will not need it.
After scrapping off the heads of the screws, most will unscrew enough to pull out. If not, they can be punched out from inside the boat.
I agree that it will be enough to fill them in with thickened epoxy. It wouldn't hurt to countersink the holes on the outside.
Regardless of what product you use, West System's fiberglass manual is an excellent reference. Appendix D covers repairing machined holes in fiberglass laminate above and below the water line.
https://www.westsystem.com/wp-content/u ... l-2015.pdf
Re: Replacing Spartan SeaCocks with Groco - some questions
Thanks to all for some great info and tips.
I'll try to remove them soon and post some pictures.
I'll try to remove them soon and post some pictures.
Ken Easley
Intrepid 9 Meter - Felicity
Southport Harbor, Connecticut
Intrepid 9 Meter - Felicity
Southport Harbor, Connecticut
-
Typhoon4Fun
- Posts: 87
- Joined: Apr 29th, '18, 09:34
- Location: TySr - Adeline
Re: Replacing Spartan SeaCocks with Groco - some questions
One other thought.. curious how others handle this. The hull has some curvature where my seacocks are located. I was worried that if I just epoxied my backing plates in place they might not end up parallel to the hull (or tangential to that curve) and the thru-hull flange wouldn't mate perfectly to the outside of the hull. So to epoxy them in place, I used a board to wedge the old thru-hull in place, then pressed the backing plate down into the hull by screwinh a lock ring down onto the thru-hull. That way I knew the flange would mate to the hull and be parallel to the backing plate. I waxed the lock ring and thru Hull so they would come off easily.
Re: Replacing Spartan SeaCocks with Groco - some questions
I installed new seacocks with the studs threaded into G10 backing plates (no bolts thru the hull).Typhoon4Fun wrote:.. curious how others handle this.
When epoxying the backing plates in place, I waxed the threads of the thru-hull and the flange adapter and used them to hold everything in place while the thickened epoxy set.
After the epoxy hardened, I removed the wax and applied Silkflex 291 sealant.
Re: Replacing Spartan SeaCocks with Groco - some questions
We had a nice warm day here in Connecticut yesterday.
I was able to remove the 4 thru-hulls and seacocks.
I was surprised that it was not more difficult. Maybe it was the 44-year-old caulk.
I think that one of them leaked because the old caulk had given out.
First I removed the hose from each seacock after heating them with a heat gun.
I unscrewed the thru-hull using an old chisel for the larger ones and an old tire iron for the smaller ones.
From outside the boat I pounded the chisel or tire iron up into the thru-hull and then put an adjustable wrench on it with a 2 foot PVC pipe as a breaker-bar.
I didn't use the heat gun and they all unscrewed pretty readily with just some initial heft required.
After that I cleaned off the bolt heads from outside and then lifted off the seacocks and pounded out the bolts from inside the boat.
All in all maybe 3 hours work.
I'll update this later on after installing the new ones.
The Marine How To article is very good.
I also found a good Youtube from AtomVoyager which is the method I plan to use:
https://www.youtube.com/watch?v=G_eQkeXXl64&t=86s
I
I was able to remove the 4 thru-hulls and seacocks.
I was surprised that it was not more difficult. Maybe it was the 44-year-old caulk.
I think that one of them leaked because the old caulk had given out.
- IMG_5565.JPG (1.92 MiB) Viewed 4113 times
I unscrewed the thru-hull using an old chisel for the larger ones and an old tire iron for the smaller ones.
From outside the boat I pounded the chisel or tire iron up into the thru-hull and then put an adjustable wrench on it with a 2 foot PVC pipe as a breaker-bar.
- IMG_5573.JPG (2.45 MiB) Viewed 4113 times
- IMG_5575.JPG (5.39 MiB) Viewed 4113 times
After that I cleaned off the bolt heads from outside and then lifted off the seacocks and pounded out the bolts from inside the boat.
All in all maybe 3 hours work.
I'll update this later on after installing the new ones.
The Marine How To article is very good.
I also found a good Youtube from AtomVoyager which is the method I plan to use:
https://www.youtube.com/watch?v=G_eQkeXXl64&t=86s
I
Ken Easley
Intrepid 9 Meter - Felicity
Southport Harbor, Connecticut
Intrepid 9 Meter - Felicity
Southport Harbor, Connecticut
Re: Replacing Spartan SeaCocks with Groco - some questions
Further work on the new SeaCocks will have to wait for warmer weather.
Still too cold for epoxy and sealant.
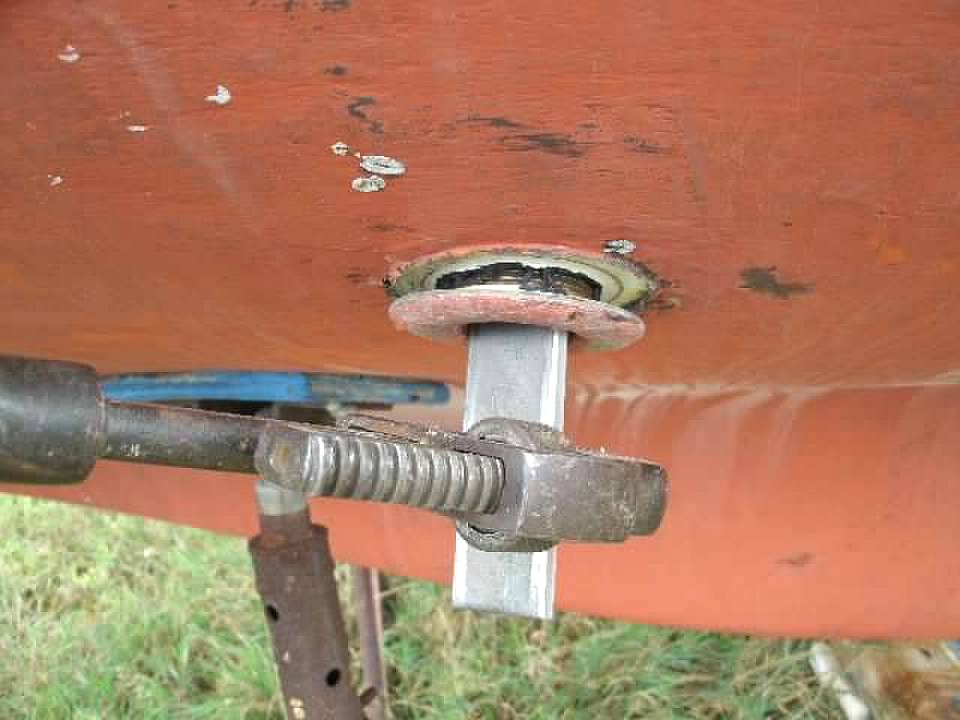
I made some progress a couple of weeks ago -
Cut the threaded part of the thru-hulls to fit.
Dry-fitted the thru-hulls to the hull/baseplate/flange to check for fit.
Most look pretty good: the thru-hull fits snug to the hull.
A couple of them look a little off. See picture:
Is this about as close as one can get?
Should I try to sand down the base plate to try to improve this?
Still too cold for epoxy and sealant.
I made some progress a couple of weeks ago -
Cut the threaded part of the thru-hulls to fit.
Dry-fitted the thru-hulls to the hull/baseplate/flange to check for fit.
Most look pretty good: the thru-hull fits snug to the hull.
A couple of them look a little off. See picture:
- SeaCock_9.JPG (1.65 MiB) Viewed 4051 times
Is this about as close as one can get?
Should I try to sand down the base plate to try to improve this?
Ken Easley
Intrepid 9 Meter - Felicity
Southport Harbor, Connecticut
Intrepid 9 Meter - Felicity
Southport Harbor, Connecticut
Re: Replacing Spartan SeaCocks with Groco - some questions
If the gap is localized to that visible radius I would be fine with a large bead of caulk. If it isn’t nearly flush throughout the remainder of the radius I would sand the contact area flush. If the gelcoat was broken through I’d slap a couple coats of barrier coat on the sanded section to protect the laminate and caulk the throughhull before installation.
Nice neat job with the seacock installation!
Nice neat job with the seacock installation!
Jim Walsh
Ex Vice Commodore
Ex Captain-Northeast Fleet
CD31 ORION
The currency of life is not money, it's time
Ex Vice Commodore
Ex Captain-Northeast Fleet
CD31 ORION
The currency of life is not money, it's time
-
tjr818

- Posts: 1851
- Joined: Oct 13th, '07, 13:42
- Location: Previously owned 1980 CD 27 Slainte, Hull #185. NO.1257949
Re: Replacing Spartan SeaCocks with Groco - some questions
Is that thru hull cocked because of being tightened down? Does it fit flush before clamping it down? This is your only chance to get it right before it goes back in the water, take a step back and think about this one overnight. 
Tim
Nonsuch 26 Ultra,
Previously, Sláinte a CD27
Nonsuch 26 Ultra,
Previously, Sláinte a CD27
Re: Replacing Spartan SeaCocks with Groco - some questions
Thank you all for some good ideas and insights.
Work is progressing this week on the installation of the backing plates.
I plan to use the thru-hull and flange to hold things in place and to get a good alignment while I use thickened epoxy to attach the backing plates.
How did you wax the thru-hull and flange?
Was it something like the wax used on the hull?
Was it melted paraffin?
How did you remove the wax afterwards?
Thanks again for your help.
Ken Easley
Intrepid 9 Meter - Felicity
Southport Harbor, Connecticut
Intrepid 9 Meter - Felicity
Southport Harbor, Connecticut
-
John Stone
- Posts: 3664
- Joined: Oct 6th, '08, 07:30
- Location: S/V Far Reach: CD 36 #61 www.farreachvoayges.net www.farreachvoyages.com
Re: Replacing Spartan SeaCocks with Groco - some questions
I use packing tape and then coat the tape with paste wax. No silicon. I have used johnson paste wax for years. Also you can fine pure carnival wx at auto zone.keneasley wrote:Thank you all for some good ideas and insights.
Work is progressing this week on the installation of the backing plates.
I plan to use the thru-hull and flange to hold things in place and to get a good alignment while I use thickened epoxy to attach the backing plates.
How did you wax the thru-hull and flange?
Was it something like the wax used on the hull?
Was it melted paraffin?
How did you remove the wax afterwards?
Thanks again for your help.
What you don't want is to let epoxy squeeze out get proud of the surface, harden and make removing the through hull difficult. It's been a while but I think I used clamps.
Re: Replacing Spartan SeaCocks with Groco - some questions
Thanks again for some great examples and advice.
The project is done.
Like most projects it took much longer than I thought it would but was not very difficult, just a lot of steps.
I did use barrier coat on the area around the holes before I put in the new thru-hulls.
I did use wax on the parts when installing them temporarily while epoxying-in the base plates.
Here are a few "after" pictures.
- SeaCock_22.JPG (3.15 MiB) Viewed 3964 times
- SeaCock_15.JPG (2.87 MiB) Viewed 3964 times
- SeaCock_17.JPG (2.35 MiB) Viewed 3964 times
Ken Easley
Intrepid 9 Meter - Felicity
Southport Harbor, Connecticut
Intrepid 9 Meter - Felicity
Southport Harbor, Connecticut
-
John Stone
- Posts: 3664
- Joined: Oct 6th, '08, 07:30
- Location: S/V Far Reach: CD 36 #61 www.farreachvoayges.net www.farreachvoyages.com
Re: Replacing Spartan SeaCocks with Groco - some questions
Great Job Ken. You likely did a much better job than any "professional" would have done.keneasley wrote:Thanks again for some great examples and advice.
The project is done.
Like most projects it took much longer than I thought it would but was not very difficult, just a lot of steps.
I did use barrier coat on the area around the holes before I put in the new thru-hulls.
I did use wax on the parts when installing them temporarily while epoxying-in the base plates.
Here are a few "after" pictures.