To all:
It is the end of the sailing season, or at least I can see it from here, and my thoughts are starting to turn to next year's upgrades.
On Mariah, the hardest and most dangerous single handed thing to do is to adjust the mainsail traveller while under a press of sail. She still has the original Nicro-Fico traveller car, rail and stops that require much man-handling when tacking.
Up grading this unit, so that I can adjust it from the cockpit with a 3 to 1 or 4 to 1 purchase, would be my goal.
Center sheeting to the curved traveller bar and the dodger complicate things. I have a few ideas but would like to know how other CD36's have been upgraded.
If you would, please describe and post a few photos of how your traveller control works. I am sure that others out there have solved this problem using many methods so it would be interesting to compare and contrast.
Any CD with the center boom sheeting and the curved rail can chime in.
As always, I thank the collective wisdom of the board in advance.
Sail on
John Danicic
CD36 - Mariah- #124
Lake Superior- The Apostle Islands
CDSOA #655
CD 36 mainsail traveller controls options
Moderator: Jim Walsh
-
John Danicic

- Posts: 594
- Joined: Feb 5th, '05, 10:30
- Location: CD 36 - Mariah - #124 Lake Superior
- Contact:
-
wstringer
- Posts: 16
- Joined: Sep 19th, '06, 17:52
- Location: s/v Eendracht CD 36 #54, 1981 Deltaville, VA
CD36 mainsheet traveller
John,
We made this upgrade several years ago - it is well worth it, although you will lose a couple inches of travel on each side. Our installation was done at and by Robinhood using a Harken traveller system. Our system has 4:1 purchase, which is marginal when we want to adjust the traveller to windward in a strong wind. 6:1 or leading the control line to a winch would be better.
As I recall the original track had to be replaced. Double blocks are attached to the traveller car and also fixed to each end of the bar. From the fixed block the control line leads forward about 18 inches to a turning block on the cabintop, then under the front of the dodger to a clam cleat near the aft outer edge of the cabintop. This was done to get the line down to the level of the cabintop and avoid putting a hole through the front of the dodger each side, but it does create a trip and fall hazard when we are standing on the cabintop, and we have to be careful. I too would be interested to know if other board members have come up with different solutions.
The other thing I would change is the clam cleat. I think a regular horn cleat would be better, so that I could belay the control line when easing it out under a load.
Hope this helps.
Warren
Warren Stringer
Check out Garhauer's traveler systems. I put one on to replace the original Nico 3 years ago. Without a doubt one of the most worthwhile upgrades I've made. Well built and ruggedly engineered.
________
MICHIGAN MARIJUANA DISPENSARIES
________
MICHIGAN MARIJUANA DISPENSARIES
Last edited by Ron M. on Feb 11th, '11, 06:22, edited 1 time in total.

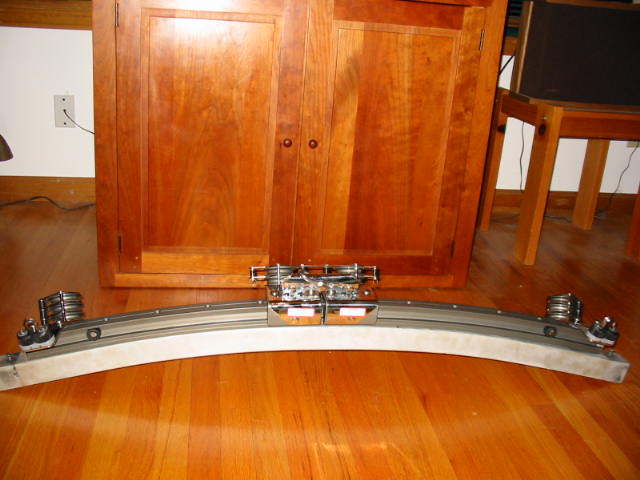
I got the Garhauer MT-UB2 traveler, and UR2 Risers. Garhauer can bend track to fit your existing riser, but I honestly saw no real reason to have a curved track complicate things anyway, so I just removed the old origonal riser and used garhauers (which is much more robust, its impressive). The result was terrific and I have a much wider range of adjustment then the origonal riser would have allowed for. It was a very easy DIY job that only took a couple hours.
Also, since the MT-UB2 supports 3 single blocks (rather then a single fiddle) I was able to increase purchase and allow much easier mainsail control. I bought all new blocks for the mainsheet as well.
Total cost isnt cheap, but compare it to other systems such as harken, and you will find what I got is a fraction of the price. We are talking spending $1000 total for garhaurer vs $2000+ for others. And its still high quality and attractive gear, as anyone who has used their stuff can attest to.
Russell
s/v (yet to be named) Tayana 42CC
s/v Lady Pauline Cape Dory 36 #117 (for sale)
s/v (yet to be named) Tayana 42CC
s/v Lady Pauline Cape Dory 36 #117 (for sale)
-
mahalocd36

- Posts: 591
- Joined: Feb 5th, '05, 10:51
- Location: 1990 CD36 Mahalo #163
- Contact:
garhauer as well
We went with Garhauer as well, though curved.
Infinitely better than the old system, and we actually use it (versus keeping it centered all the time with the pin system because it was such a pain/dangerous).
Our original thread has outdated links to pictures, but it came up again here:
http://www.capedory.org/board/viewtopic ... +traveller
Infinitely better than the old system, and we actually use it (versus keeping it centered all the time with the pin system because it was such a pain/dangerous).
Our original thread has outdated links to pictures, but it came up again here:
http://www.capedory.org/board/viewtopic ... +traveller
Melissa Abato
www.sailmahalo.com
www.sailmahalo.com
-
John Danicic
- Posts: 594
- Joined: Feb 5th, '05, 10:30
- Location: CD 36 - Mariah - #124 Lake Superior
- Contact:
Photos out there?
Thanks for the responses.
If it's not too much to ask, does anyone have photos of their set up? You can email them to me and I will post them.
Warren. I would particularly want to see yours since Robinhood constructed it for you. I too want to run the control lines under rather then through the dodger.
Russel. Did you change from a curved traveler to a straight one?
Thanks again to all for the info.
Sail on
John Danicic
CD36 - Mariah- #124
Lake Superior- The Apostle Islands
CDSOA #655
-
Bill Goldsmith
- Posts: 625
- Joined: Feb 7th, '05, 08:47
- Location: CD 32
Re: Photos out there?
I will try to find some photos of my Traveler project from last winter, but this diagram is essentially what I did:John Danicic wrote:Thanks for the responses.
If it's not too much to ask, does anyone have photos of their set up? You can email them to me and I will post them.
Warren. I would particularly want to see yours since Robinhood constructed it for you. I too want to run the control lines under rather then through the dodger.
Russel. Did you change from a curved traveler to a straight one?
Thanks again to all for the info.
Sail on
John Danicic
CD36 - Mariah- #124
Lake Superior- The Apostle Islands
CDSOA #655

I completely replaced the entire traveler system with a 6:1 Harken. I originally looked at the Garhauers, but I thought the Harken presented an overall lower profile. See the way the Garhauer blocks stick up on the sample below I found on the web--they just look to me like you don't want to fall against them. On the other hand the Harken cost me double what the Garhauer would have!!!!

On the original Nico-Fico I could not adjust the traveler under load, and wanted a major upgrade. This was a cascading project. I did not like the original setup because the control lines faced FORWARD, and you had to go up to the seahood to adjust the traveler. Then I reversed the direction of the old controls, but I was faced with cutting slots in the dodger to accomodate the control lines. I decided to run the control lines down and aft to the cockpit, under the dodger.
At first I thought I could remove the old Nico Fico track and attach a new Harken track to the existing riser bridge. Despite the reported success of others in separating the track from the bridge, I had no success--years of dissimilar metals in contact made that impossible.
Working closely with the guys at Rgging Only I devised a deck-up refit, using new risers and a custom-bent track. It did not have to be bent much at all because there was no longer a large aluminum box beam with a track on top--The Harken track is so beefy, you don't need a bridge at all--the track spans from one riser to the other.
I installed turning blocks and cam-cleats, with hefty backing plates. I filled the old mounting holes with epoxy and drilled new ones with the drill-and-fill method. I made new aluminum backing plates for the main risers that are larger than the factory ones. All in all this was a great upgrade that enhanced the boat's performance this season. Now I have to make nice access covers for the interior ceiling, which I have been putting off!!!
-
mahalocd36
- Posts: 591
- Joined: Feb 5th, '05, 10:51
- Location: 1990 CD36 Mahalo #163
- Contact:
Here's one:

Our dodger has a zip up front window and the zippers are where the control lines go through so it can be controlled from the cockpit easily.
Our dodger has a zip up front window and the zippers are where the control lines go through so it can be controlled from the cockpit easily.
Melissa Abato
www.sailmahalo.com
www.sailmahalo.com
-
bottomscraper

- Posts: 1400
- Joined: Feb 5th, '05, 11:08
- Location: Previous Owner of CD36 Mahalo #163 1990
- Contact:
On Mahalo when I ordered the track I ordered it the same length
as the original track. If I were to do it again I would probably use
the Garhauer risers like Russell has done. Even though we
ended up with a little less overall travel it is still an order of
magnitude better than the original system.
as the original track. If I were to do it again I would probably use
the Garhauer risers like Russell has done. Even though we
ended up with a little less overall travel it is still an order of
magnitude better than the original system.
Rich Abato
Nordic Tug 34 Tanuki
Previous Owner Of CD36 Mahalo #163
Southern Maine
http://www.sailmahalo.com
Nordic Tug 34 Tanuki
Previous Owner Of CD36 Mahalo #163
Southern Maine
http://www.sailmahalo.com
-
Bill Goldsmith
- Posts: 625
- Joined: Feb 7th, '05, 08:47
- Location: CD 32
I envy that you were able to separate the old track from the box beam, and the box beam from the original risers! If I had been able to do that I would have saved about one boat unit!!!bottomscraper wrote:On Mahalo when I ordered the track I ordered it the same length
as the original track. If I were to do it again I would probably use
the Garhauer risers like Russell has done. Even though we
ended up with a little less overall travel it is still an order of
magnitude better than the original system.
Re: Photos out there?
Bill Goldsmith wrote: I originally looked at the Garhauers, but I thought the Harken presented an overall lower profile. See the way the Garhauer blocks stick up on the sample below I found on the web--they just look to me like you don't want to fall against them. On the other hand the Harken cost me double what the Garhauer would have!!!!
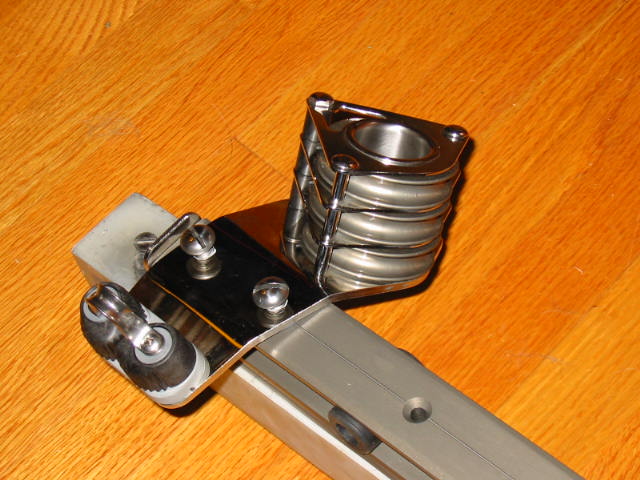
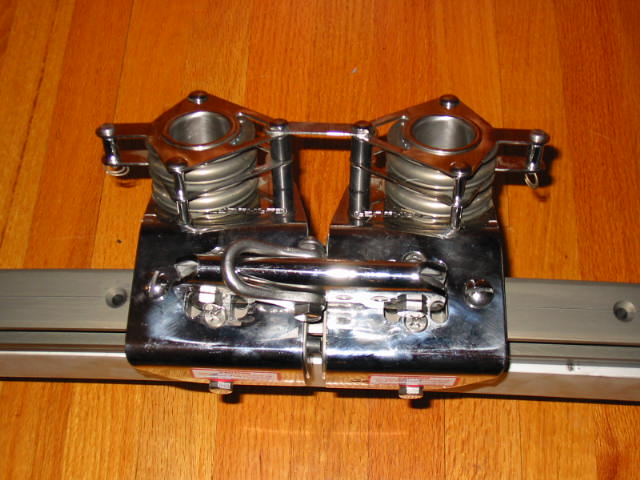
Note that Garhauer makes two styles of traveler, the one you pictured, that Rich also installed, and also the UB series, which I bought. The UB series are much lower in profile.

Also the risers in the picture you found are not Garhauer, looks like something someone had inexpensively made, these are what garhauers look like:

And John, I did indeed do a strait track. While I understand aestheticly a curved one may look better, I didnt think it made that much difference, plus it simplified the job and cost. I will try to get a picture of my own installation, I just stuck my camera on the charger and will take a photo tommorow.
Russell
s/v (yet to be named) Tayana 42CC
s/v Lady Pauline Cape Dory 36 #117 (for sale)
s/v (yet to be named) Tayana 42CC
s/v Lady Pauline Cape Dory 36 #117 (for sale)
-
John Danicic
- Posts: 594
- Joined: Feb 5th, '05, 10:30
- Location: CD 36 - Mariah - #124 Lake Superior
- Contact:
under dodger
Russell:
Does your control lines go under the dodger into cockpit? If so how do you accomplish that?
The UB series looks like the way to go. Being a fresh water boat, Mariah's towers and rail should not be to much trouble to remove.
Thanks for your input.
Sail on
John Danicic
CD36 - Mariah- #124
Lake Superior- The Apostle Islands
CDSOA #655
One way I have seen the traveler lines pass the dodger is thru a grommet put in the fabric.
________
Jugallette
________
Jugallette
Last edited by Ron M. on Feb 11th, '11, 06:23, edited 1 time in total.
-
bottomscraper
- Posts: 1400
- Joined: Feb 5th, '05, 11:08
- Location: Previous Owner of CD36 Mahalo #163 1990
- Contact:
Ours wasn't all that hard. Kroil is your friend! I made a very longI envy that you were able to separate the old track from
the box beam, and the box beam from the original risers! If I had
been able to do that I would have saved about one boat unit!!!
wrench for getting the nuts inside the box beam using a short 12
point box wrench and a piece of "EMT" tubing as an extension. It
took some patience but it really wasn't that hard. It wa a good
off season project.

Kroil Web Site Link: www.kanolabs.com
Rich Abato
Nordic Tug 34 Tanuki
Previous Owner Of CD36 Mahalo #163
Southern Maine
http://www.sailmahalo.com
Nordic Tug 34 Tanuki
Previous Owner Of CD36 Mahalo #163
Southern Maine
http://www.sailmahalo.com
-
Bill Goldsmith
- Posts: 625
- Joined: Feb 7th, '05, 08:47
- Location: CD 32
bottomscraper wrote:Ours wasn't all that hard. Kroil is your friend! I made a very longI envy that you were able to separate the old track from
the box beam, and the box beam from the original risers! If I had
been able to do that I would have saved about one boat unit!!!
wrench for getting the nuts inside the box beam using a short 12
point box wrench and a piece of "EMT" tubing as an extension. It
took some patience but it really wasn't that hard. It wa a good
off season project.
Kroil Web Site Link: www.kanolabs.com
Thanks. A friend recommended Kroil at the time and I did liberally apply it to the track screws as well as the screws attaching the box beam to the risers. I let them soak, reapplied, and patiently waited. The wrench extension trick only works if you can get the box beam out of the risers. Those screws never budged, not after Kroil, not after PB Blaster, and not after some careful nudging with an impact driver (after having taken the whole riser/traveler assembly off the boat to my workshop--I was not about to use an impact driver while still attached to the boat).
Interestingly, despite the "welded in place" nature of the screws on the assembly, the screws holding the risers to the coachroof presented very little difficulty to remove. They were threaded directly into the aluminum backing plates, and despite dissimilar metals, there was no corrosion whatsoever. This is a testament to the quality of the overall Cape Dory construction--there were no leaks in the bedding of the original risers in 25 years.
My next alternative was going to be drilling out the riser/box beam screws on my drill press. The amount of work involved in drilling out and the most definite risk of mangling the cast aluminum risers or the box beam in the process started to seem like more work than ordering and installing a replacement.
Then it dawned on me that Neptune was indeed sending me a message: "r e p l a c e t h e w h o l e a s s e m b l y, BILL!!"
One thing I REALLY like about the newer design risers (Harken, Garhauer, Schaefer and others) is the ease of disassembly. You pull out a very strong pin on each side, and the whole traveler comes right off, leaving only the bases in place. A major improvement over the OEM Nico Fico, IMHO.