Today I made it out to Emerald and was able reassemble the thermostat housing. One bolt hole was apparently stripped, but it appears to be holding. Although that may only be because there's no water flowing through the system.
I was amazed that the motor actually started up. Really only because I visited the web site of someone here (can't remember the name!) who posted a video showing how long it took to crank that thing to get it to start during cold weather. Had I not watched that I probably would have surrendered long before ignition. Instead, I cranked that thing for a good LONG time, and finally it came to life. So, without coolant flow I can run it for a few minutes, long enough to get out and in where I need.
The really bad news is that I confirmed that the boat did sink at some point. As soon as they put her back in the water a stream started flowing through the stuffing box. I installed a new automatic bilge pump, which should hopefully keep her off the bottom for now.
How on earth does one adjust that stuffing box? I tried the Channel-locks that PO Scott describes using--and which were still on board--but there didn't seem to be nearly enough room to swing those things in there.
Also, I don't understand why that wasn't fixed to begin with. Is it possible to damage that tube irreparably? I have to admit to coming away pretty discouraged today. This boat will need quite a bit more work than I'd hoped for.
The good with the bad...
Moderator: Jim Walsh
The good with the bad...
Alex Diaz
Chantilly, VA
Chantilly, VA
On the stuffing box question
If it's the slotted type you can free the locking nut with a large flat screwdriver and a hammer. If it's hex you're going to need 2 wrenches, one to hold the packing nut and one to turn the lock nut. You may want to spray it with penetrating fluid first. Once free, back the lock nut off a little and screw the bigger packing nut until it's snug. Keep an eye on it, and make quarter turn adjustments until It only drips a couple of times a minute when running. And only occasionally when stopped. Hopefully it has not been overtightened already.There's flax packing in there and it compresses as you tighten.
GD
GD
-
Neil Gordon
- Posts: 4367
- Joined: Feb 5th, '05, 17:25
- Location: s/v LIQUIDITY, CD28. We sail from Marina Bay on Boston Harbor. Try us on channel 9.
- Contact:
Re: On the stuffing box question
Just to be clear, you don't want to be in there adjusting while the engine is running!Dalton wrote:Keep an eye on it, and make quarter turn adjustments until It only drips a couple of times a minute when running.
Fair winds, Neil
s/v LIQUIDITY
Cape Dory 28 #167
Boston, MA
CDSOA member #698
s/v LIQUIDITY
Cape Dory 28 #167
Boston, MA
CDSOA member #698
-
Zeida

- Posts: 600
- Joined: May 27th, '05, 07:10
- Location: 1982 CD33 "Bandolera II" Hull #73Key Biscayne-Miami, Florida
- Contact:
Stuffing Box
Alex, here are pictures of what the stuffing box is... the inside is packed with the packing flax rings you stuff in there to adjust the flow of water into the boat.. designed to help cool off the spinning prop shaft.
You probably need to repack yours and then adjust the water drip properly. This you better get someone who knows how to do this with the boat in the water. It is no big deal, but only if you know how to do it. We all have to do it every 4 or 5 years. The packing gets worn out.
ALL our boats have required LOTS of work and TLC on our parts. Do not get discouraged. You learn as you go along.
[img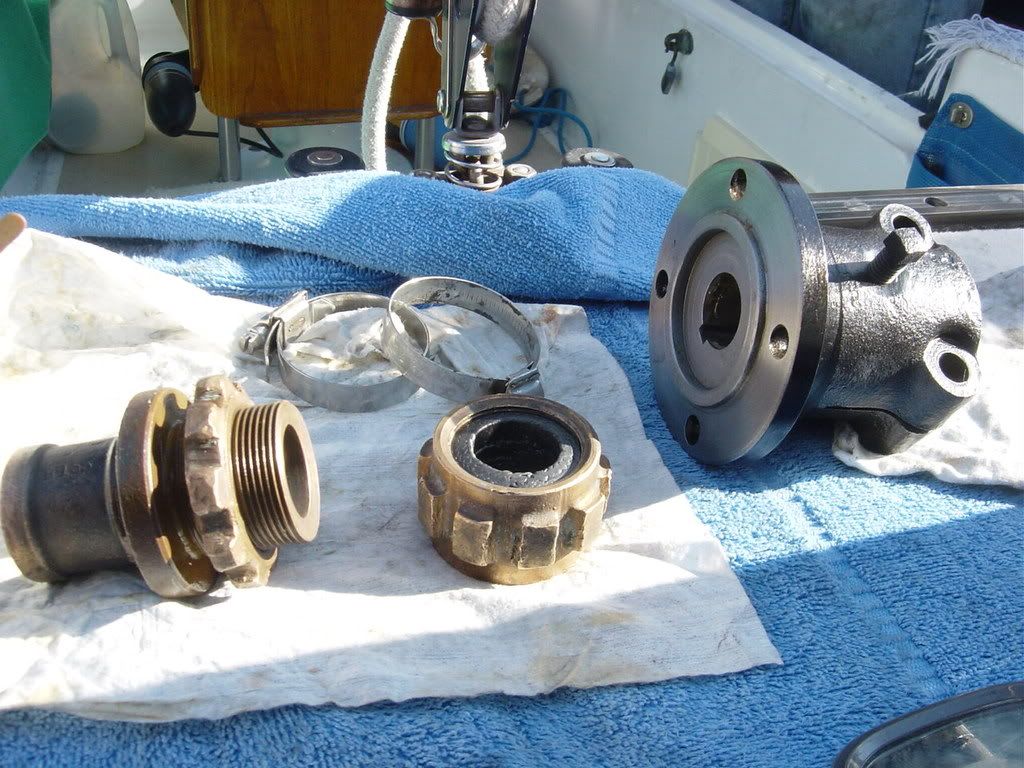 [/img]
the black piece is the coupler... the bronze pieces are the 2 parts of the stuffing box, with the black packing inside.
[img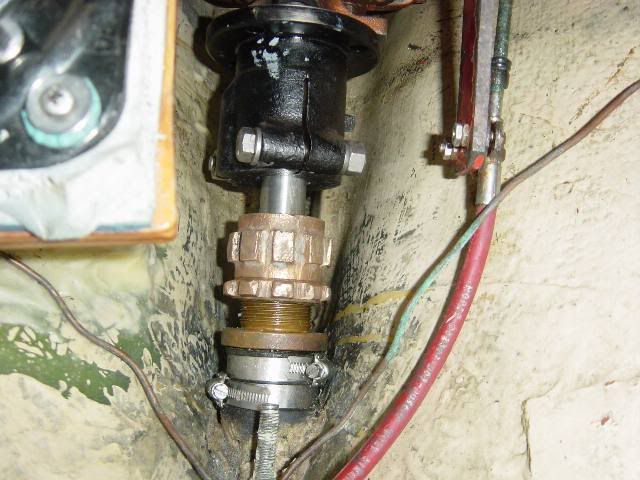 [/img]
this is the whole thing put together...
[img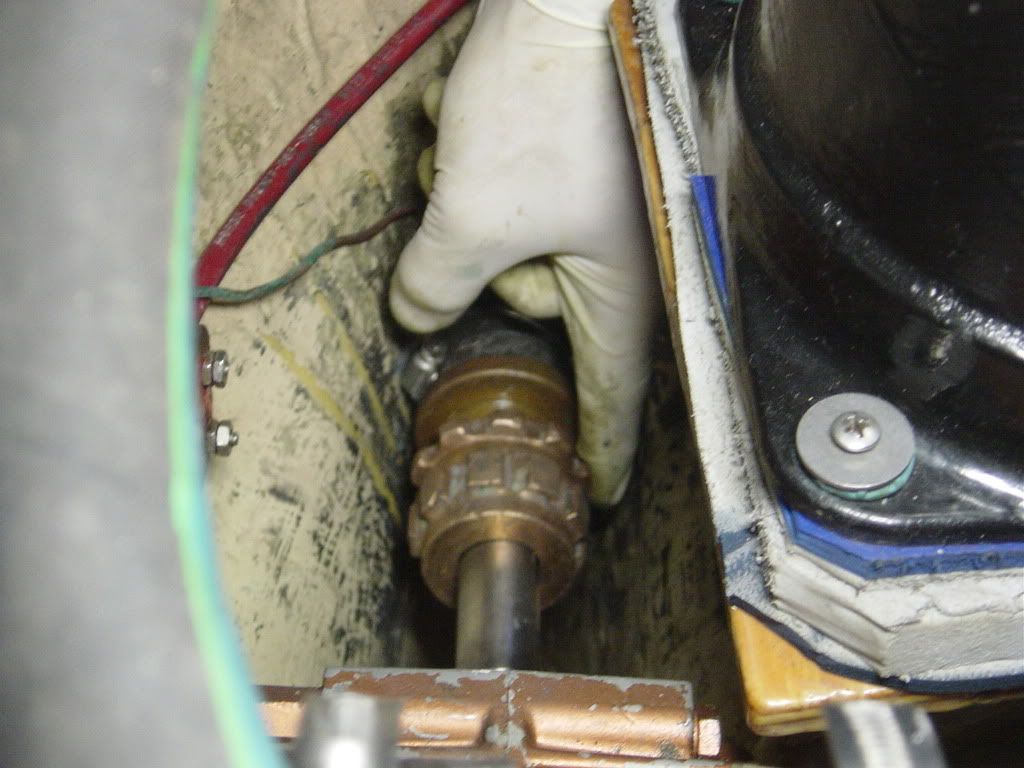
adjusting the ring to graduate the water flow...[/img]
You probably need to repack yours and then adjust the water drip properly. This you better get someone who knows how to do this with the boat in the water. It is no big deal, but only if you know how to do it. We all have to do it every 4 or 5 years. The packing gets worn out.
ALL our boats have required LOTS of work and TLC on our parts. Do not get discouraged. You learn as you go along.
[img
[/img]the black piece is the coupler... the bronze pieces are the 2 parts of the stuffing box, with the black packing inside.
[img
[/img]this is the whole thing put together...
[img
adjusting the ring to graduate the water flow...[/img]
Zeida
CDSOA Member
CDSOA Member
Great Pics
Great pictures Zeida. They remind me of an off season question I have: In the middle photo, you can see one of the bolts which comes in through the hull from the broze shoe where the shaft penetrates. There is a second bolt below the shaft as well. Does that bolt pentrate the interior of the hull or is it a lag?
When we replaced my cutlass and would up rebuilding all of this, there were a couple aspects of teh job I was uncomfortable with and I would like to get a handle on how the original work was done (not that I thought it was a particularly well designed portion of the boat . . .).
TIA
Matt
When we replaced my cutlass and would up rebuilding all of this, there were a couple aspects of teh job I was uncomfortable with and I would like to get a handle on how the original work was done (not that I thought it was a particularly well designed portion of the boat . . .).
TIA
Matt
Thank you for the pictures and the link. It's not at all what I thought it was--I didn't realize the flax was inside the end nut. I have the hex nut style, which I still don't quite see how there's room to fit any wrench in there, especially on the lock nut. The slotted version as in Zeida's pictures seems to make a lot more sense.
Regardless, I should have mentioned before that my water doesn't appear to be leaking through the end of the stuffing box (i.e., through the forward end), although I can see water welling there. It appears to be leaking in somewhere behind and below that area, which is why I worry about the structure. I didn't realize there was a section of hose between the box and the stern tube (?), so perhaps that's what is damaged. That would be a lot better than damage to whatever structure it ties to there, although it does mean that in-water repair is unlikely.
Regardless, I should have mentioned before that my water doesn't appear to be leaking through the end of the stuffing box (i.e., through the forward end), although I can see water welling there. It appears to be leaking in somewhere behind and below that area, which is why I worry about the structure. I didn't realize there was a section of hose between the box and the stern tube (?), so perhaps that's what is damaged. That would be a lot better than damage to whatever structure it ties to there, although it does mean that in-water repair is unlikely.
Alex Diaz
Chantilly, VA
Chantilly, VA
-
Tom Keevil
- Posts: 453
- Joined: Feb 6th, '05, 23:45
- Location: Cape Dory 33 "Rover" Hull #66
Matt
On Rover, the lower bolt penetrates the hull; it is not a lag screw.
Tom and Jean Keevil
CD33 Rover
Ashland OR and Ladysmith, BC
CD33 Rover
Ashland OR and Ladysmith, BC

Re: The good with the bad...
1. Yep, because they don't have glow plugs, old Volvo MD7As have to crank a long time to start once nightime temperatures start dipping below 50 degrees. Took me about a minute to start mine this morning, about two minutes last Monday. If you have to crank for more than 30 seconds or so, I would close the raw water seacock and then reopen it as soon as the engine fires. I'm not sure if our layout would allow water to back up into the engine, but I wouldn't chance it.AlexDz wrote:Today I made it out to Emerald and was able reassemble the thermostat housing. One bolt hole was apparently stripped, but it appears to be holding. Although that may only be because there's no water flowing through the system.
I was amazed that the motor actually started up. Really only because I visited the web site of someone here (can't remember the name!) who posted a video showing how long it took to crank that thing to get it to start during cold weather. Had I not watched that I probably would have surrendered long before ignition. Instead, I cranked that thing for a good LONG time, and finally it came to life. So, without coolant flow I can run it for a few minutes, long enough to get out and in where I need.
The really bad news is that I confirmed that the boat did sink at some point. As soon as they put her back in the water a stream started flowing through the stuffing box. I installed a new automatic bilge pump, which should hopefully keep her off the bottom for now.
How on earth does one adjust that stuffing box? I tried the Channel-locks that PO Scott describes using--and which were still on board--but there didn't seem to be nearly enough room to swing those things in there.
Also, I don't understand why that wasn't fixed to begin with. Is it possible to damage that tube irreparably? I have to admit to coming away pretty discouraged today. This boat will need quite a bit more work than I'd hoped for.
2. Don't run the engine without the raw water flowing, even for a short time. That will cause the raw water impeller to disintegrate and god only knows where the little bits willl end up.
3. You adjust the stuffing box by using a hammer to drive a stout screwdriver against the flats on the nuts. There is no room for anything else. Do this NOW. Most automatic bilge pumps are pieces of garbage (can you spell R U L E?) and you do not want a piece of garbage to be the only thing keeping your boat afloat.
1. Assuming you still have the original equipment, your boat doesn't have the usual stern tube/hose/stuffing box arrangement. There's not enough room. You have a single bronze fitting which combines the stern tube and the stuffing box. There is no hose.AlexDz wrote:Thank you for the pictures and the link. It's not at all what I thought it was--I didn't realize the flax was inside the end nut. I have the hex nut style, which I still don't quite see how there's room to fit any wrench in there, especially on the lock nut. The slotted version as in Zeida's pictures seems to make a lot more sense.
Regardless, I should have mentioned before that my water doesn't appear to be leaking through the end of the stuffing box (i.e., through the forward end), although I can see water welling there. It appears to be leaking in somewhere behind and below that area, which is why I worry about the structure. I didn't realize there was a section of hose between the box and the stern tube (?), so perhaps that's what is damaged. That would be a lot better than damage to whatever structure it ties to there, although it does mean that in-water repair is unlikely.
2. If you have a below the waterline leak other than the stuffing box, you better start trying to stop it with some kind of underwater epoxy asap. Again, you do not want some POS bilge pump to be the only thing keeping your boat afloat.
OK, so that explains why I don't recall seeing any hose clamps back there. Is the stern tube fiberglass? Is the bronze fitting just epoxied on or does it go through the hull? If so, is it a good idea to do any hammering on that lock nut? I think I'll pick up some of that waterproof epoxy and go back out there tomorrow to see if I can help it any.Stan W. wrote:1. Assuming you still have the original equipment, your boat doesn't have the usual stern tube/hose/stuffing box arrangement. There's not enough room. You have a single bronze fitting which combines the stern tube and the stuffing box. There is no hose.AlexDz wrote:Thank you for<SNIP>
2. If you have a below the waterline leak other than the stuffing box, you better start trying to stop it with some kind of underwater epoxy asap. Again, you do not want some POS bilge pump to be the only thing keeping your boat afloat.
I'm looking at this picture of someone else's and I see what looks like a couple of wires going through that area. Is that part of the grounding system?
http://www.thebaillies.net/jstark/CD28/ ... %20box.JPG[/url]
Alex Diaz
Chantilly, VA
Chantilly, VA
The bronze fitting is the stern tube. There is no fiberglass tube. The fitting goes through the hull and is secured with two bolts. The top bolt is shown in the photo you linked. Don't worry about hammering; because everything is bronze, the nuts turn pretty easily. Yes, the wires are part of the grounding system.AlexDz wrote:OK, so that explains why I don't recall seeing any hose clamps back there. Is the stern tube fiberglass? Is the bronze fitting just epoxied on or does it go through the hull? If so, is it a good idea to do any hammering on that lock nut? I think I'll pick up some of that waterproof epoxy and go back out there tomorrow to see if I can help it any.Stan W. wrote:1. Assuming you still have the original equipment, your boat doesn't have the usual stern tube/hose/stuffing box arrangement. There's not enough room. You have a single bronze fitting which combines the stern tube and the stuffing box. There is no hose.AlexDz wrote:Thank you for<SNIP>
2. If you have a below the waterline leak other than the stuffing box, you better start trying to stop it with some kind of underwater epoxy asap. Again, you do not want some POS bilge pump to be the only thing keeping your boat afloat.
I'm looking at this picture of someone else's and I see what looks like a couple of wires going through that area. Is that part of the grounding system?
http://www.thebaillies.net/jstark/CD28/ ... %20box.JPG[/url]
OK, so that means there's quite a bit of fiberglass holding that tube, making it highly unlikely that the leak is a failure of the tube/hull interface. That's good news, so in that case the leak must be the stuffing box, no?Stan W. wrote:<SNIP>
The bronze fitting is the stern tube. There is no fiberglass tube. The fitting goes through the hull and is secured with two bolts. The top bolt is shown in the photo you linked. Don't worry about hammering; because everything is bronze, the nuts turn pretty easily. Yes, the wires are part of the grounding system.
I plan to go back out there tomorrow to make sure the battery charger is keeping up with demand on the battery, and install a second bilge pump on the second level shelf as a backup in case the one down at the bottom fails.
While there I'll take another shot at the stuffing box with what I've learned here. I've got PBBlaster and will dull one of my chisels to work on that lock nut. Has anyone tried a strap wrench on that thing?
It's 5-6 hours on the road everytime I go out there. I can't wait to get her back across to Deale!!
Alex Diaz
Chantilly, VA
Chantilly, VA

Hi Alex,
I use a flat piece of steel that's about 1/8" x 1" x 10" and a small ball-peen hammer. There really isn't enough room to use much else on CD28.
-michael
I use a flat piece of steel that's about 1/8" x 1" x 10" and a small ball-peen hammer. There really isn't enough room to use much else on CD28.
-michael
-michael & Toni CDSOA #789
s/v KAYLA CD28 #318
2012 FLSTC Heritage Classic
Niceville FL
+30° 30' 24.60", -86° 26' 32.10"
"Just because it worked, doesn't mean it works." -me
No shirt + No shorts = No problem!
s/v KAYLA CD28 #318
2012 FLSTC Heritage Classic
Niceville FL
+30° 30' 24.60", -86° 26' 32.10"
"Just because it worked, doesn't mean it works." -me
No shirt + No shorts = No problem!
Success!
Well I headed back out to the boat today armed with a second new bilge pump, a second battery charger, and a dulled chisel.
Thanks to the great pictures and advice I got here, I was able to tighten that stuffing box up and stop the leak. It took a couple of rounds of PB Blaster, and quite a bit of pounding on that chisel, but the lock nut finally gave way. It only took a little over a flat's worth of tightening to stop the water flow.
As it turned out the on board battery charger was keeping the power up and the bilge pump (a Johnson--Rule is the failed unit I found on the boat) was working fine, so I didn't need the new ones.
On another note, I found the boat hard aground when I got there. Apparently there ISN'T 4' of water in the slip they gave me. I'm not sure what I must have done to those people in that marina in a previous life, but I'm sure I must deserve what I'm getting there.
Anyway, thanks everyone!
Alex Diaz
Chantilly, VA
Chantilly, VA