Greetings,
It's taken me awhile to get this on the board but I would like to ponder it this winter for dealing with it in the spring fitting out.
Our venerable Universal 24 hp model 5424 has what looks like the original wrapped exhaust pipe exiting the manifold, turning straight up for the water injection then down to the waterlift. I am getting some exhaust in the engine compartment from the pipe area, and recently I saw some healthy smoke when I really accidentally revved her high up briefly. It is time to look under the (asbestos?) wrapping of the mummy. But I am scared of what I will find. Was asbestos already on the way out in 1982?
Anyway, any suggestions on replacing this piece? Where would I find one? What other work would you do at this time? And if anyone has done this before, gimme the secret - besides getting dirty, painfully contorted and black lung disease- all perfectly manly ways to be cursed!
Paul
Universal 5424 Exhaust Riser Question
Moderator: bobdugan
-
Steve Laume

- Posts: 4127
- Joined: Feb 13th, '05, 20:40
- Location: Raven1984 Cape Dory 30C Hull #309Noank, CT
- Contact:
Been there last spring
Paul, when I started the boat this spring I had the same symptoms you are experiencing. I figured out where it was coming from then went to work on removal and replacement. The hardest part was getting the bolts out of the exhaust flange on the back of the motor. First of all they a bugger to get at and then they have been hot for a long time. Soak them with PB Blaster and bulk up on patience. When I removed the riser it fell apart in my hands. Well after I got it out I wondered up to the yard store that stocks most of the stuff I need. We went through the Universal parts book and had a very hard time finding the riser and mixing elbow. They finally ordered something for me and it was on back order forever. So I was in there questioning/complaining about the part when one of the mechanics said they had what I needed. He walked back between the shelves and grabbed a mixing elbow and told me the rest was just black pipe fittings. My old one looked like old rusted black pipe fittings with fiberglass wrapped around it. He said I could get the pieces at a plumbing supply. Then as it was mid winter and they were not too busy he offered to just make it up for me. I brought the old one and with a couple of lengths of pipe an elbow, the mixing elbow and my exhaust flange he made it up. I walked it do to the boat to make sure it would fit. Then I brought it back and he tightened the snoggers out of it and wrapped it with new fiberglass wired in place. He had the yard bill me a half hours labor. So he got some Coronas in the fridge and I have latched onto him as my go to guy for any other problems I may have that I can't figure out. A new Universal exhaust flange gasket, new bolts with never seize, exhaust hose to connect to the muffler and I set. The best part is the the engine starts much better and smokes less. The mixing elbow was so rusted and full of carbon that is was mostly blocked. Not an easy job but at least you will not have to figure out that there is no Universal exhaust riser, just a few pieces of pipe. I felt a bit like I was on a snipe hunt holding the rusted riser, instead of a bag, Steve.
-
Bill Goldsmith
- Posts: 625
- Joined: Feb 7th, '05, 08:47
- Location: CD 32
Paul,
It's not all that hard a job. From 1982 it's not likely to be asbestos pipe insulation. But to be safe, wear a mask and put the old insulation right into a trash bag.
Two years ago I replaced my exhaust manifold on my Westerbeke W21a and realized that I was going to have to replace the riser piping and the mixing elbow because the piping was screwed right into the old EM and was never coming out.
I bought a replacement mixing elbow from Hansen Marine in Mass, the same distributor that carries Universal parts. You may also want to check the Torresen Marine website--they seem to have everything.
I bought some plain old black pipe in lengths to match the old riser/elbow assembly and proceeded to make a replacement. Fortunately the new EM had a flange/flange and clamp arrangement instead of the original pipe-thread installation. That meant I could make up the entire assembly on the bench and then just clamp it in place.
As long as you are doing this, you should probably consider replacing the exhaust manifold, as they do have a finite lifespan.
I bought some fiberglass/foil pipe insulation from McMaster-Carr (which also has everything) and wired it in place. Finally, I installed a new length of hose between the assembly and the muffler, and voila!
Hope this helps.
-
Tom Keevil
- Posts: 452
- Joined: Feb 6th, '05, 23:45
- Location: Cape Dory 33 "Rover" Hull #66
It looks like the design life of this part has expired. We did this replacement last summer. Same symptoms of exhaust leaking through the asbestos (I assume it's asbestos). Upon unwrapping we discovered that the exhaust riser was in fact mostly the asbestos with a bunch of rust inside. Be careful with this, as you can get asbestos and soot all over the boat with the slightest air movement.
Our exhaust riser was totally shot, but at the top it was welded to a stainless tube for the descent, that had the water injection pipe welded on as well. I assume this was done by a prior owner when the part near the injection rusted out. The stainless was in perfect condition.
Getting the flange off of the exhaust manifold was a chore. First of all you have to get at it. Fortunately I have a priceless wife who not only fits in behind the engine, but is also willing to be the primary mechanic. I offer her tools and advice. The bottom of the three studs is deeply imbedded in the flange, and despite soaking with PB Blaster overnight we broke it off inside the manifold - you should be more patient than we were. That required removal of the exhaust manifold, that required removal of the alternator, that required......(you get the idea). While we were at it we also removed the steel base for the muffler, and found it was rusted all to pieces as well.
At any rate, once we got it all apart we took it to a local welding/fabrication shop recommended by locals (we did all this in the middle of an aborted summer cruise, tied to the transient dock). In a remarkably short time, for a remarkably small price they made a new stainless tube to replace the rusted bit, welded it to our perfectly good other half, removed the broken stud pieces from both the flange and the manifold, cleaned up the flange so we could use it again, made us a new muffler base and sent us on our way.
After we installed our new transmission (that's the other half of the story), we put it all back together, wrapped it with fiberglass cloth, and it works just fine. You definitely want to do this. We had been getting a "hot" odor when running the engine at high rpm, even though the temperature wasn't high. It turns out we were smelling engine exhaust - not a good thing for your health!
Here's a few pictures (I hope - my first try at posting pictures). I apparently didn't get a good one of the new riser, but here it is having dinner with us. Doing this while living on the boat should not be your first choice.
[img]http://www.jeffnet.org/~keevil/90%20Rus ... xhaust.JPG[/img]
[img]http://www.jeffnet.org/~keevil/101%20Di ... nifold.JPG[/img]
[img]http://www.jeffnet.org/~keevil/106%20Je ... rtment.JPG[/img]
Tom and Jean Keevil
CD33 Rover
Ashland OR and Ladysmith, BC
CD33 Rover
Ashland OR and Ladysmith, BC
-
Leo MacDonald
- Posts: 251
- Joined: Feb 5th, '05, 21:00
- Location: 'EVENING LIGHT' CD33 No. 38, Pine Isl. Bay, Groton, CT
Primary Mechanic?????
Hi Tom,
How in the world did you talk your wife into the 'Primary Mechanic' job? You HAVE TO share these words of wisdom with us
Fair Winds,
Leo
How in the world did you talk your wife into the 'Primary Mechanic' job? You HAVE TO share these words of wisdom with us
Fair Winds,
Leo
-
Dean Abramson
- Posts: 1483
- Joined: Jul 5th, '05, 11:23
- Location: CD 31 "Loda May"
Living Large
A glass of good red wine and a table full of parts. It doesn't get much better than this.
Dean Abramson
Cape Dory 31 "Loda May"
Falmouth, Maine
Cape Dory 31 "Loda May"
Falmouth, Maine
-
Zeida

- Posts: 600
- Joined: May 27th, '05, 07:10
- Location: 1982 CD33 "Bandolera II" Hull #73Key Biscayne-Miami, Florida
- Contact:
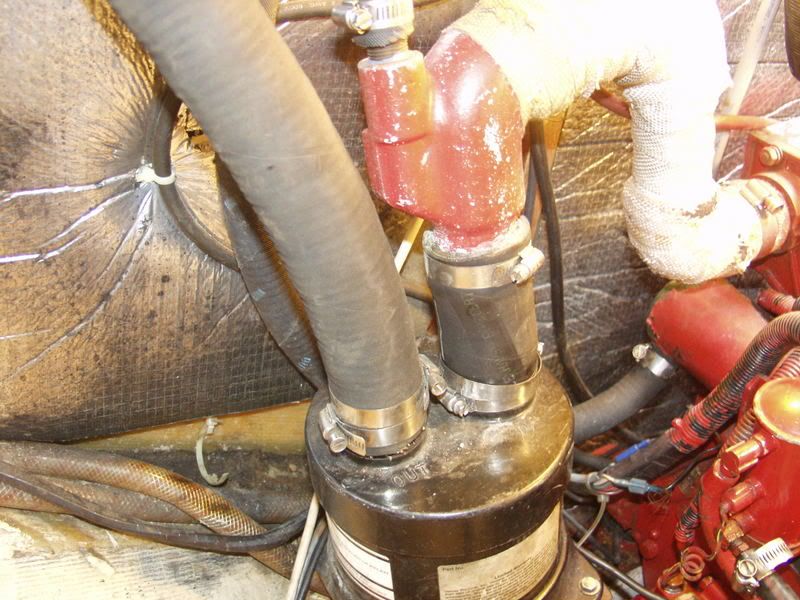
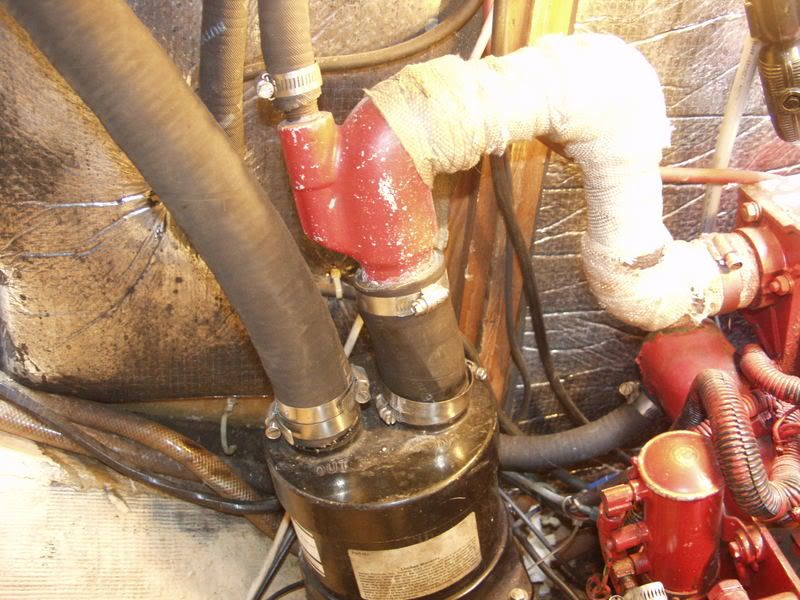
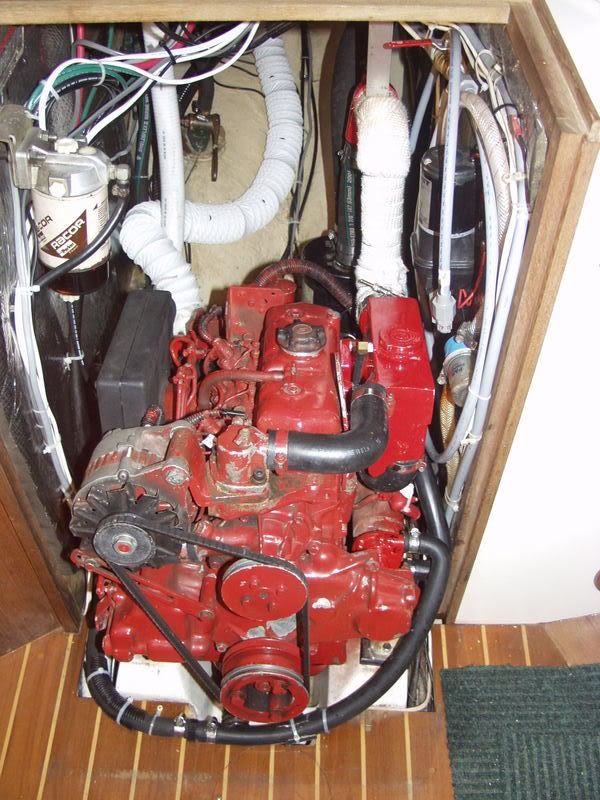
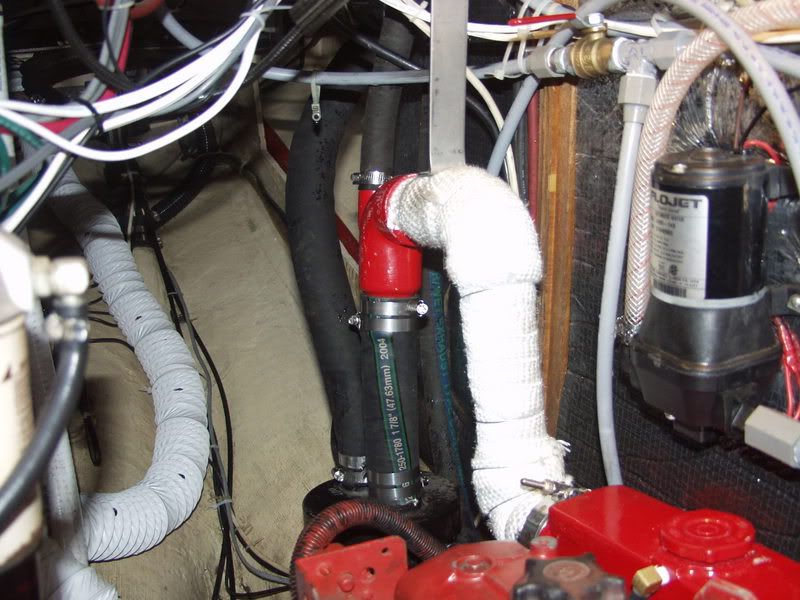
Like "Rover", I replaced the riser on "Bandolera II" my CD-33 hull #73. It all started when I discovered the metal base for the muffler which was bolted to the side of the tranny was corroded, the bolts were loose and would not stay in place, and the old "mummy" wrapping on the riser was falling apart. A muffler shop fabricated a new stainless riser to match the dimensions of the old one and covered it with a new fiberglass cover. After four years, the stainless got pitted in a couple of areas, and then I fabricated (myself) a bronze riser -much more sturdy- with different pieces that I could screw into each other. The stainless I now keep as a back-up, since it has been fixed. I took the bronze riser to a machine shop and they welded every seam to make sure there is no fumes leaking from it. It was also very difficult to get the bolts out from the flange into the manifold, but it was accomplished. I also built a separate little shelf and glassed it to the hull and installed the muffler there, separate from the tranny.
[img]http://www.imagestation.com/picture/sra ... 9afc6c.jpg[/img]
[img]http://www.imagestation.com/picture/sra ... 9afc6a.jpg[/img]
[img]http://www.imagestation.com/picture/sra ... 9afc48.jpg[/img]
[img]http://www.imagestation.com/picture/sra ... 9afc24.jpg[/img]
[img]http://www.imagestation.com/picture/sra ... 9afc00.jpg[/img]
[img]http://www.imagestation.com/picture/sra ... 9afbf7.jpg[/img]
The smaller stainless riser I keep as a backup. In the meantime, my Universal 5424 "Goldie" is working fine.
Zeida
CDSOA Member
CDSOA Member
-
Warren S

- Posts: 254
- Joined: Jul 27th, '06, 21:22
- Location: s/v Morveren
Cape Dory 270 Hull #5
Washington, NC
Hi Zeida...
If it ain't too much trouble... =8-D
Next time you are down in those parts with your camera, would you mind terribly getting a picture of that shelf? I will need to fabricate the exhaust support next year as it is. I'd like to consider the shelf approach.
Thanks!
Next time you are down in those parts with your camera, would you mind terribly getting a picture of that shelf? I will need to fabricate the exhaust support next year as it is. I'd like to consider the shelf approach.
Thanks!
Thanks folks,
I am not as afraid any more but I do still worry about getting the thing off the manifold. I can get back there alright but the bolts are ominous. I did a story on shearing a bolt on my thermostat housing once for Good Old Boat magazine and I would not like to have another story from this project.
Zeida, I am curious as to how your bronze pipe is coping with the mount to the motor. Any corrosion there yet? Mind you I wouldn't have much up here in the cold clear fresh waters of Superior. But that looks really simple to build and bomber (strong) as we say in the climbing business.
I am sure, if I started up my motor next spring without replacing the pipe, the exhaust pressure will replace it for me, right when I am coming into dock in a stiff wind. So, as my brother says, "You know what you gotta do now!" Spoken as sort of a question but more of a prophetic warning.
Thanks again,
Paul Danicic
Insulation "jacket"
This looks like a great solution for a riser, easy to build and cost effective.I wonder if one with more knowledge than I can address how bronze reacts to continual expansion and contraction this application requires ?
What is the insulating material ? Nice job. Thanks
________
SILVERSURFER VAPORIZER
What is the insulating material ? Nice job. Thanks
________
SILVERSURFER VAPORIZER
Last edited by Ron M. on Feb 11th, '11, 05:33, edited 1 time in total.
-
Chris Reinke

- Posts: 179
- Joined: Apr 14th, '05, 14:59
- Location: CD330 - Innisfail (Gaelic for "A Little Bit Of Heaven on Earth"), Onset, MA
Cast Stainless is an option
I did a similar replacement a few years back. I went to a commercial marine mechanic in Port Judith RI as I was sailing past. He recommended cast stainless over the standard black pipe for use in a marine environment. The cost was a bit more (about $100), but it looks just as good today as it did 3 years ago. I also had a local welding shop fabricate a new muffler shelf out of stainless ($45.00) and that also looks new. I considered moving the shelf or fabricating directly to the hull, but I know from past experience that I need to clearance to pull the bell housing to remove the transmission.
One additional point - I also added a standard home CO detector. I want the peace of mind since I sail with family aboard and my kids run in and out of the cabin all the time.
One additional point - I also added a standard home CO detector. I want the peace of mind since I sail with family aboard and my kids run in and out of the cabin all the time.
-
Zeida
- Posts: 600
- Joined: May 27th, '05, 07:10
- Location: 1982 CD33 "Bandolera II" Hull #73Key Biscayne-Miami, Florida
- Contact:
Chris, when I built my little shelf to reposition the muffler, I measured and remeasured the spot where I needed it to be in order for me to be able to pull out the bellhousing/tranny when the need arose... I ALMOST missed the mark, but made it!
Like you, I have TWO carbon monoxide detectors installed inside the boat, one to the left of the engine cover, and a second one in the V-berth.
The big bronze riser is working fine, so far. I also have the cast stainless (preferred by all marine exhaust makers, since they can charge lots more $$) and keep it as a back up.
Zeida
CDSOA Member
CDSOA Member
-
Chris Reinke
- Posts: 179
- Joined: Apr 14th, '05, 14:59
- Location: CD330 - Innisfail (Gaelic for "A Little Bit Of Heaven on Earth"), Onset, MA
Hi Zeida - I just read your other posting just after responding to this thread. I like the shelf project you completed - it looks great and I bet accessing the packing nut is a bit easier as well. What really impressed me was the fact that you were able to get in the aft engine compartment and squish far enough aft so only the tip of your shoe is in the picture...that is real talent! I am afraid if I made any permanent changes to the aft engine compartment I would never be able to fit my growing (width) body in the compartment again.
The robust bronze pipe is nice, and I like the added safety of the welded joints.
The robust bronze pipe is nice, and I like the added safety of the welded joints.
-
Cathy Monaghan

- Posts: 3503
- Joined: Feb 5th, '05, 08:17
- Location: 1986 CD32 Realization #3, Rahway, NJ, Raritan Bay -- CDSOA Member since 2000. Greenline 39 Electra
- Contact:
Bruce completely rebuilt the exhaust side of the engine in 2005 which also included that riser. Here's what the old one for our Westerbeke 21A looked like.
<img width="540" src="http://i30.photobucket.com/albums/c349/ ... 031901.jpg">
<img width="540" src="http://i30.photobucket.com/albums/c349/ ... 031900.jpg">
Here's the new one. Note the new bracket that extends from the bulkhead above the engine to the riser. That addition was recommended by the mechanics at the boat yard where we keep our boat. They fashioned the bracket and welded the bolt onto the riser. Bruce had the yard build the riser. It's the only part of the job that we didn't do.
<img width="540" src="http://i30.photobucket.com/albums/c349/ ... 251991.jpg">
<img width="540" src="http://i30.photobucket.com/albums/c349/ ... 251990.jpg">
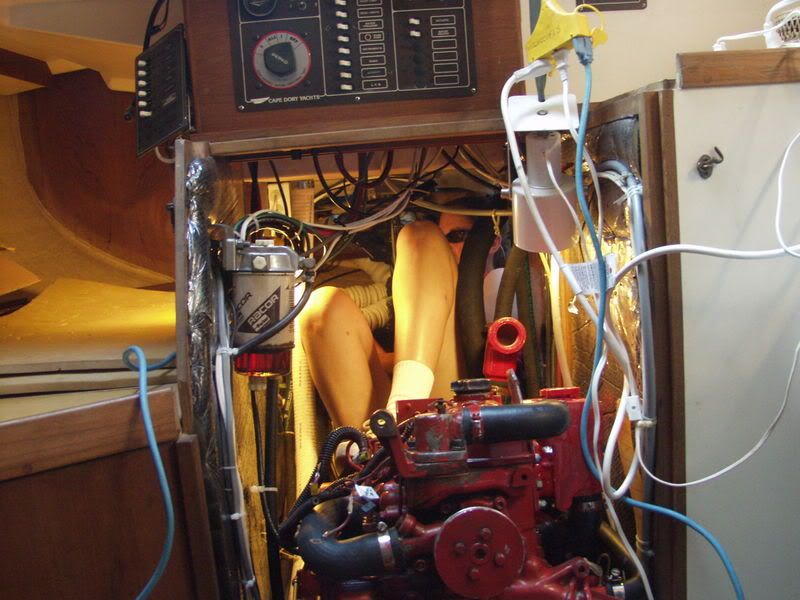
These are the kind of photos you get when your husband takes some snapshots without you knowing it.
That's me in the engine compartment re-installing the hose for the raw water intake. This snap was taken before the installation of the new riser.
<img width="540" src="http://i30.photobucket.com/albums/c349/ ... 241937.jpg">
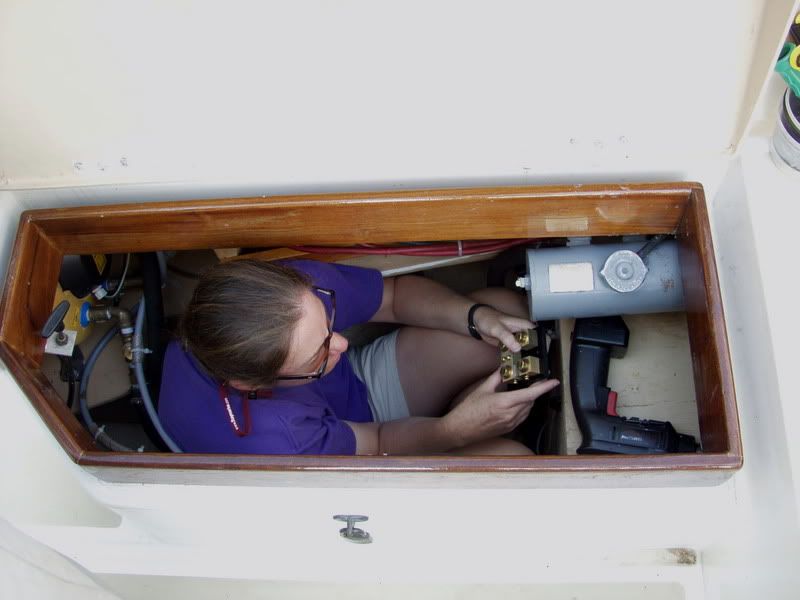
And here I am taking care of some electrical work in the port lazarette.
<img width="540" src="http://i30.photobucket.com/albums/c349/ ... 091973.jpg">
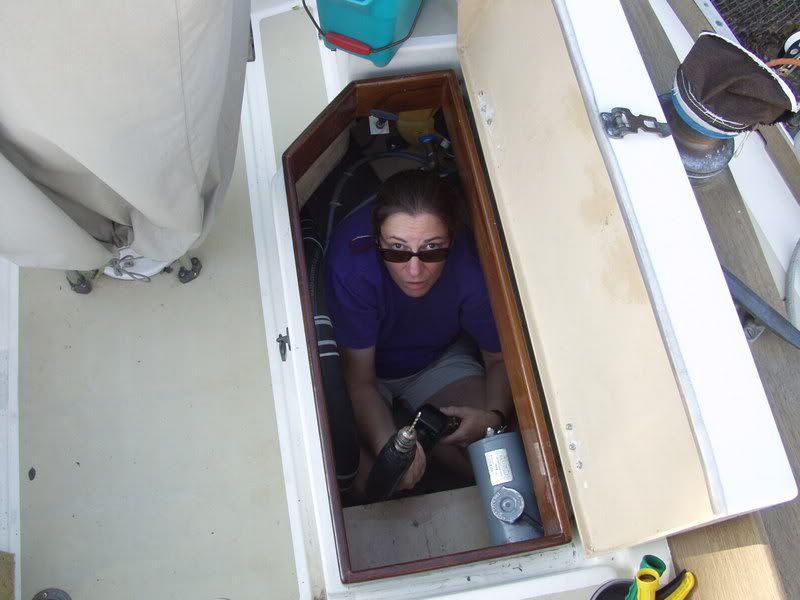
Hey, what are you doing with that camera!
<img width="540" src="http://i30.photobucket.com/albums/c349/ ... 091974.jpg">
The access into the engine compartment on the CD32 is from that lazaratte. Just empty the lazarette, remove the cover for the engine compartment and slide yourself in (much easier said than done).
Fair winds,
Cathy
CD32 Realization, #3
Rahway, NJ
Raritan Bay
<img width="540" src="http://i30.photobucket.com/albums/c349/ ... 031901.jpg">
<img width="540" src="http://i30.photobucket.com/albums/c349/ ... 031900.jpg">
Here's the new one. Note the new bracket that extends from the bulkhead above the engine to the riser. That addition was recommended by the mechanics at the boat yard where we keep our boat. They fashioned the bracket and welded the bolt onto the riser. Bruce had the yard build the riser. It's the only part of the job that we didn't do.
<img width="540" src="http://i30.photobucket.com/albums/c349/ ... 251991.jpg">
<img width="540" src="http://i30.photobucket.com/albums/c349/ ... 251990.jpg">
These are the kind of photos you get when your husband takes some snapshots without you knowing it.
That's me in the engine compartment re-installing the hose for the raw water intake. This snap was taken before the installation of the new riser.
<img width="540" src="http://i30.photobucket.com/albums/c349/ ... 241937.jpg">
And here I am taking care of some electrical work in the port lazarette.
<img width="540" src="http://i30.photobucket.com/albums/c349/ ... 091973.jpg">
Hey, what are you doing with that camera!
<img width="540" src="http://i30.photobucket.com/albums/c349/ ... 091974.jpg">
The access into the engine compartment on the CD32 is from that lazaratte. Just empty the lazarette, remove the cover for the engine compartment and slide yourself in (much easier said than done).
Fair winds,
Cathy
CD32 Realization, #3
Rahway, NJ
Raritan Bay