Rudder repair - fiberglass work

Discussions about Cape Dory, Intrepid and Robinhood sailboats and how we use them. Got questions? Have answers? Provide them here.

Moderator: Jim Walsh

Post Reply
Jerry S.
Posts: 28
Joined: Apr 4th, '05, 19:50
Location: Cape Dory Typhoon (soon to be named)

Rudder repair - fiberglass work

Post by Jerry S. »

The following pictures show our Typhoon's rudder as it is attached to the hull. As can be seen, water penetrated this area and rotted the material underneath the fiberglass. We gouged out the rotten material as far as seemed necessary. Apparently the material was made out of foam of some type.

This is what I am planning to do next.

Cut a piece of marine grade plywood to partially fill in the gap. Cover the plywood and adjoining surfaces in fiber glass. Fair out any remaining uneven surface then sand and paint.

Is this the correct approach? Will the rudder stay affixed to the hull using this method? Would I be better off not using marine grade plywood but fill the entire gap with multiple layers of fiberglass?

Thanks,

Jerry.

Image
Image
Image
Image
Image
Image
Image
Jerry S
Oswego John
Posts: 3535
Joined: Feb 5th, '05, 20:42
Location: '66 Typhoon "Grace", Hull # 42, Schooner "Ontario", CD 85D Hull #1

Rudder repair - fiberglass work

Post by Oswego John »

Hi Jerry,

First of all, I have seen this type of failure on other boats, CDs as well as other makes. It usually takes place on the older models

There are a couple of ways to go about this repair. I will try to tell you about what course of action I might take. Also, I'll mention a few things that you might want to take special notice of before the repair starts.

I'm concerned about what the 5th photo from the top shows. It looks like reddish brown flakes of some sort of material. I hope that it's not metallic.

Take a close look at the joint between the 4" or 5" wide section of the aft section of the keel and the keel proper. There should be 4 or 5 "rebars" of bronze stock embedded in both parts of the sections to bind them together. Take notice if there is any failure or decomposition of the rods, electrolytic or otherwise.

If you suspect that there is any mechanical failure to any degree, I would suggest that you bolster up the tie-ins with additional bronze strapping. In the past, I have used 3/4" wide, flat, 3/16" or 1/4" thick bronze stock for this purpose. The exact dimensions aren't that critical.

Cut the straps about 6" or 7" long. At each end of a strap, bend an "ell" that is about 1/2" long. Lay the strap across the joint of the two sections of keel and mark the upper and lower edges with a pencil. The pencil marks will delineate the area that is to be routed out with a Dremel type tool equipped with a rotary burr. Grind a channel out of the fibreglass of both sections and grind hollows to accomodate the "ells" of the straps. I use a rotary grinding cutoff wheel for the hollows. The finished straps should lie below the surface of the keel sections. Use as many reinforcing straps on each side as you feel necessary.

I think that I wouldn't use marine plywood in the joint between both keel sections. I would probably use epoxy soaked glass matting in the joint and cap it with several layers of overlapping fibreglass cloth. Fair and feather the joint to it's original condition.

That aft 4" section of the keel is a very important integral part of the hull. That section must be "as one" with the rest of the keel. The aft part of the section supports the rudder post, and through it, all the forces of the flowing water pressing against a "hard over" rudder will be conveyed through it in order to maneuver the entire boat. That joint is critical, it must be strong.

I hope that this is of some help.

Good luck,
O J
User avatar
Mark Yashinsky
Posts: 258
Joined: Feb 6th, '05, 15:24
Location: 1980 CD27, #173
Second Chance

Hey, Oswego John,

Post by Mark Yashinsky »

just wondering, but the failure area is really in the fairing of the keel and not the rudder, correct??? Seems like this fairing was "added on", given the outline that Jerry shows in his photos (previous repair???). Would have thought that the whole keel would be one big fiberglass job and not have a separate area, leading to the rudder. Just wondering...
Jerry S.
Posts: 28
Joined: Apr 4th, '05, 19:50
Location: Cape Dory Typhoon (soon to be named)

rebars and firberglass repair

Post by Jerry S. »

Hi John,

Fortunately, the "rebars" are there and intact. The material on the floor is a powder like substance that was gouged out from behind the fiberglass and from around the rebars.

I am going to begin the repair as you suggest, by filling in the void with glass mat and then cover and finish with glass cloth.

Should the final glass cloth just butt up to the material forward of the gap and aft of the gap as in figure A, or should it be wide enough to generously overlap each edge of the gap by an inch or 2 as in figure B? I have included a picture to illustrate this question.

Thanks,

Jerry.

Image
Jerry S
Oswego John
Posts: 3535
Joined: Feb 5th, '05, 20:42
Location: '66 Typhoon "Grace", Hull # 42, Schooner "Ontario", CD 85D Hull #1

Re: Hey, Oswego John,

Post by Oswego John »

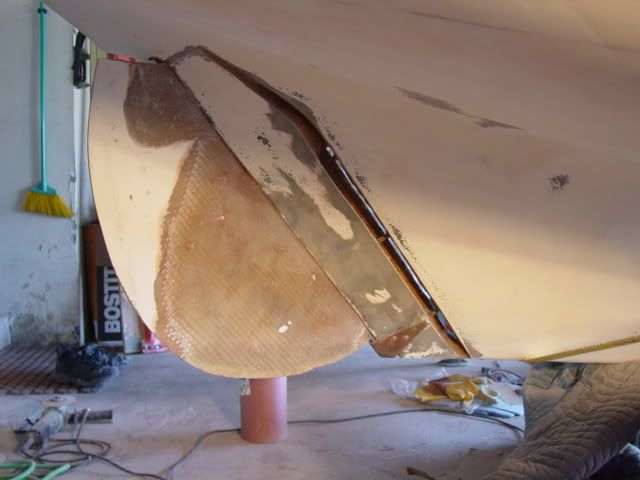
Mark Yashinsky wrote:just wondering, but the failure area is really in the fairing of the keel and not the rudder, correct??? Seems like this fairing was "added on", given the outline that Jerry shows in his photos (previous repair???). Would have thought that the whole keel would be one big fiberglass job and not have a separate area, leading to the rudder. Just wondering...


Hi Mark,

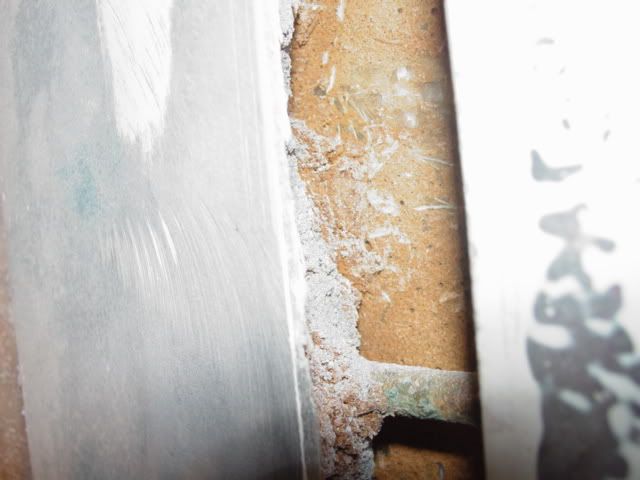
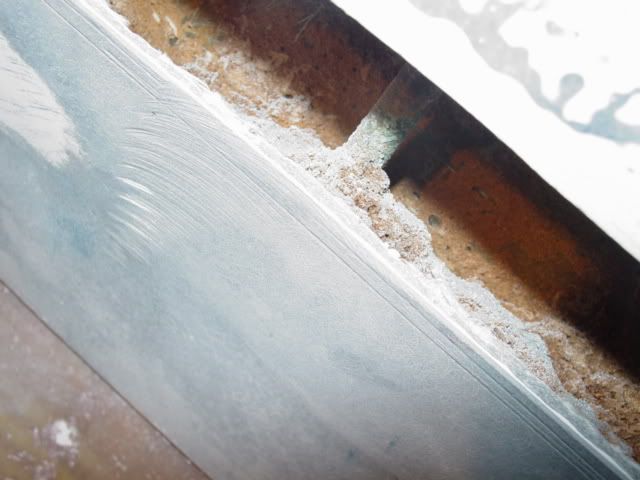
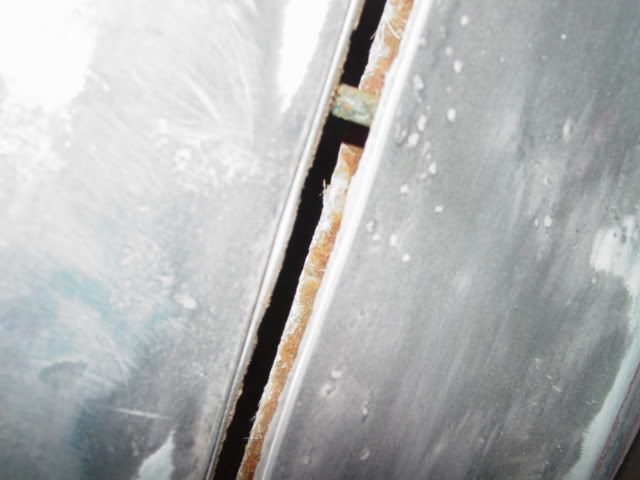
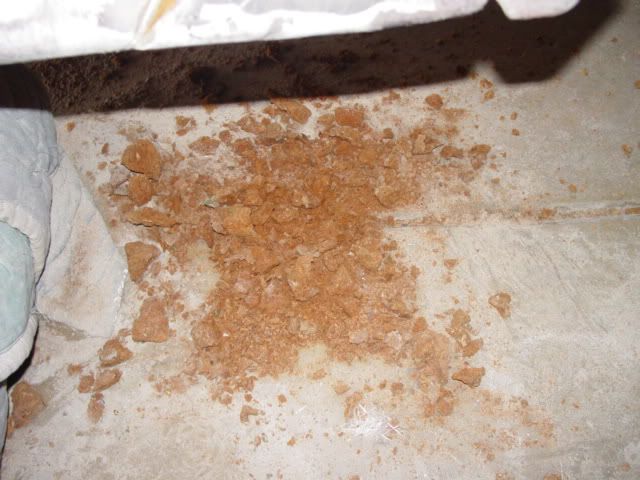
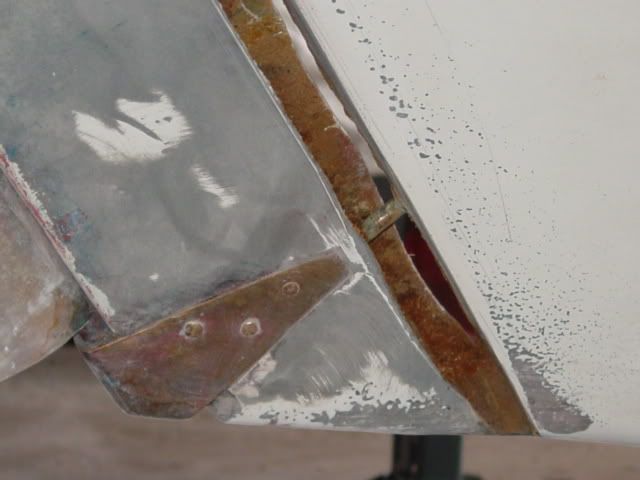
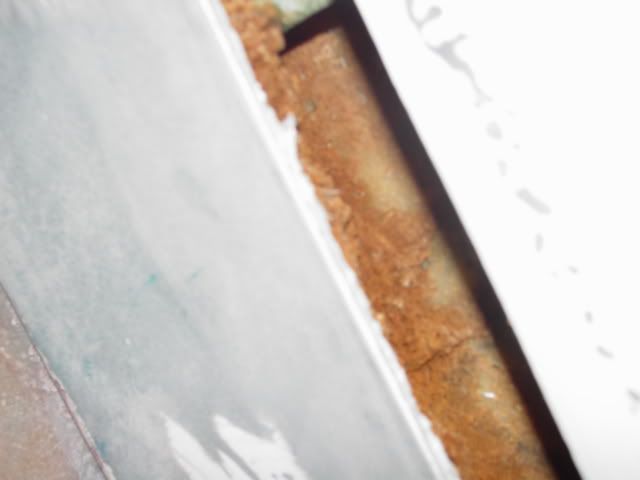
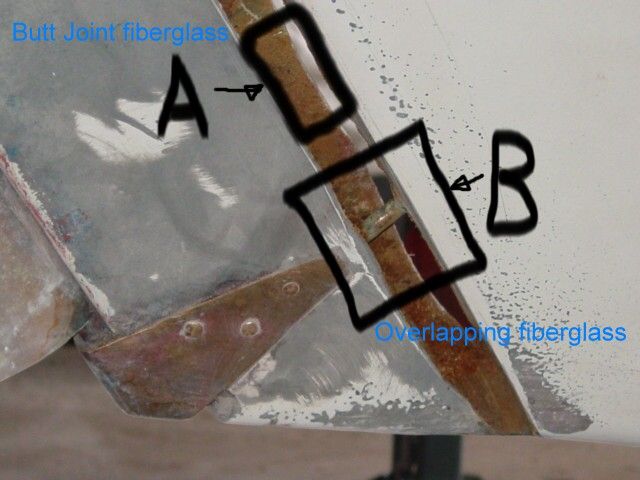
Yes, the failure is in the joint between the two sections of the keel. It has nothing to do with the rudder. However, the effect of the rudder is transmitted to the rest of the vessel through this aft section of the keel.

On my Ty, this aft keel section is 6" wide. It was added on when it was constructed. I can't say if the newer models have this keel section added on, but that was the way the earlier models of CDs were built.

This keel joint problem was discussed on the board about three weeks ago. Fred B's post shed some light on the subject. To review it click "Search".

Next, type in "Typhoon chainplate and rudder repair advice requested". This was posted by Jerry S. on 4/10/05.

Fred B (fenixrises) explains the process of molding and stripping the early hulls. It isn't a repair but a method that shipbuilders used in forming hulls.

Best regards,

O J
User avatar
fenixrises
Posts: 450
Joined: Feb 13th, '05, 08:01
Location: SunShine S2 11c
Contact:

Post by fenixrises »

Hi Jerry,

I would suggest that in your repair you finish with two layers of mat. This will give you a much easier surface to smooth.

Finishing with cloth means you must fill the weave of the cloth before fairing and if you grind through the thin cloth, easy to do,
what strength it adds is gone.

While you could fill the entire void with fiberglass it may be easier to put two laminations of bi-axial/mat on one side for structural purposes. Then fill the bulk of the void with a mixture of resin/milled fiber/talc. Then smooth and roughly fair the filler. Apply two layers on the other side. Then fair the whole thing and seal with a couple of coats of epoxy.

Here's a rough drawing:

Image

Happy filling
Fred B.
You should always have an odd number of holes in your boat!
User avatar
Mark Yashinsky
Posts: 258
Joined: Feb 6th, '05, 15:24
Location: 1980 CD27, #173
Second Chance

Oswego John, Thanks,

Post by Mark Yashinsky »

was trying to understand the "why" of having two sections of the keel, and not so much of the actual repair. Trying to get into the builder's mind.
Jerry S.
Posts: 28
Joined: Apr 4th, '05, 19:50
Location: Cape Dory Typhoon (soon to be named)

mixture of resin/milled fiber/talc

Post by Jerry S. »

Fred,

Thank you for the diagram; it was most helpful and I understand how to proceed for everything but the "void". When you say to fill the void with a mixture of resin/milled fiber/talc, would this be equivalent to using West System #407 low density fairing filler mixed with epoxy? I have begun to fill this area using #407... and see it will take many coats unless I pump in enough in one batch to fill a void 2"x2"x20"long in one shot, in which case I wonder how it will cure.

I would appreciate any clarification about the "void" area.

Thanks Fred -
much appreciated,

Jerry
Jerry S
Oswego John
Posts: 3535
Joined: Feb 5th, '05, 20:42
Location: '66 Typhoon "Grace", Hull # 42, Schooner "Ontario", CD 85D Hull #1

Rudder repair - fiberglass work

Post by Oswego John »

Hi Jerry ,

As I first stated in my previous post, there are several ways to go about this repair. All of them should work, some greater than others for one reason or another.

You are trying to repair a vertical void of considerable volume. That is the reason that I suggested to fill the void with matting that is thoroughly saturated with epoxy. Unless you use matting or thicken the epoxy with fiber, talc or any other thickener, it will run and sag and will require many layers to fill the void.

Fred told you basically what I have been saying. Fill the bulk of the void with wetted matting. I guess that we differ in the method of capping off the joint.

The way that I generally finish off the repair is to taper grind the old fiberglass, beveling in toward the joint, as Fred's diagram points out. After the joint is filled flush and has cured with the beveled surface, I then proceed to lay up the joint with 2" glass cloth, bridging the joint and adhering it to both parts of the keel. I then apply a second layer of cloth 4" wide on top of the first layer. Finally, I layer on a third cloth that is 6" wide. Cap off the final layer with a few coatings of epoxy, as Fred points out, to fill the texture with epoxy and build up and fair out the contour.

I like this method because it bridges over the gap and mechanically binds both sections of the keel together in a stronger fashion. Building up the joint with varying widths of glass cloth helps fill the taper.

One thing to make note of, if there is any length of time between filling and layering, wash off any blush that may appear on the joint with soap and warm water and thoroughly dry before continuing.

To repeat myself, there are many ways to do this job. I feel that there is no hard and fast definitive way to do it. Circumstances dictate using varying procedures. There's different ways to skin a cat. I am just saying how I would do it, and why.

Good luck, O J
User avatar
fenixrises
Posts: 450
Joined: Feb 13th, '05, 08:01
Location: SunShine S2 11c
Contact:

Reply to Jerry last question

Post by fenixrises »

Hi Jerry,
I understand how to proceed for everything but the "void". When you say to fill the void with a mixture of resin/milled fiber/talc, would this be equivalent to using West System #407 low density fairing filler mixed with epoxy? I have begun to fill this area using #407... and see it will take many coats unless I pump in enough in one batch to fill a void 2"x2"x20"long in one shot, in which case I wonder how it will cure.
It would be similar. West's low density filler is most likely microballons. I'm sure it would be fine but pretty expensive. Industrial grade talc costs about $18 for a 50lb bag. In bulk, milled fibers are about $2/lb.

The only caution would be not to fill the entire void at one time. Most two part resins are exothermic. That is they generate heat when curing. A void of that size might generate enough heat to cause the epoxy to crack or deform. In some instances it is possible for the mixture to spontaniously ignite.

What OJ said is true. Epoxy can be very difficult to apply on verticle surfaces. Even with a filler mixed in, it sags, sometimes a lot when using thin set epoxy.

Pump away,
Fred B.
You should always have an odd number of holes in your boat!
Post Reply