This bulletin board, hosted by the CDSOA, Inc., is the on-line meeting place for all Cape Dory owners and groups. We welcome everyone's questions, answers and comments about Cape Dory sailboat
I am working down my list of pre-launch projects....
Last season, the transducer for my Datamarine depthsounder had a slow leak so I decided to remove the transducer from it's thru hull to replace the "O" rings. From the outside of the hull, I tapped the tranducer into the boat only to learn that there are no "O" rings and that the unit was not designed to be "dismantled". I now need to remove the remaining bronze thru hull to install a complete new plastic tranducer sending unit and plastic thru hull. Has anyone else replaced their depth transducer and can advise best method to remove the bronze thru hull? It is mounted with a 2 1/4" bronze nut on the inside of the hull and it does not have the nibs inside the thru hull as a seacock does.
Next project is to lead the main halyard to the cockpit. What is the recommended technique for mounting a winch, rope clutch and turning blocks to the cabin roof? Do I need a backing plate for each hardware piece? My thinking is to drill one inch holes in the cabin liner ceiling; then drill 1/4" mounting holes through the cabin deck; mount the winch, etc. with 1/4" bolts, nuts and fender washers; and, then plug the one inch holes with plastic inserts so the cabin ceiling looks neat. Any other experience or suggestion on this project?
I completed this project last spring, and I recommend a belt-and-suspenders approach, which is to say that in addition to the through-bolting with nuts and fender washers you should use backing plates. In my case this meant larger holes in the headliner, but I just manufactured my own covers out of teak. Looks sharp.
Warren Kaplan, who I'm sure will be chiming in here shortly (ding dong!), used a different approach. He filled the void between the deck and headliner for a few square inches beneath each hardware piece with very viscous thickened epoxy, let that set, then drilled through that, using it to insure load spreading. The nuts and washers come through the liner and I believe are painted white to blend in.
Here's a link to my projects page for last year so you can have a look, for what it's worth.
We recently removed the bronze thru-hull for our old knotmeter. It also lacked the inside nibs, so there was nothing to get ahold of. We put a long bolt with a large fender washer through from the inside. The bolt then went through a hole drilled in a piece of scrap wood, also fitted with a washer. This piece of wood was braced a few inches off of the hull with a few bits of 2x4, and then the nut on the bolt was tightened, drawing the thru-hull out.
It was held in with something very tenacious - probably 5200, and took a lot of force. Use a large bolt. We used maybe a 5/16" one, and though it worked, it really was too small for the task.
Tom and Jean Keevil
CD33 Rover
Ashland OR and Ladysmith, BC
I did drill all the way thru the headliner and secured the bolts that way. As Carter mentioned, I put in lots of epoxy first to make a nice solid base and went thru. I used large fender washers painted white to match the color of the liner and I put little white "rubber feet" over the ends of the bolts. Considering other hardware that came with the boat originally have the bolts inside the cabin, I decided to do it that way. Certainly mounting above the liner is fine with using plugs to hide the mounting.
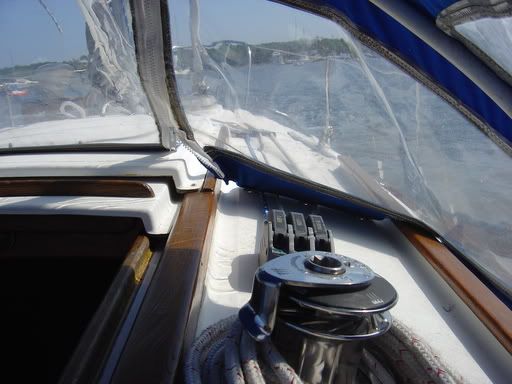
Look at the picture. I have some suggestions when you do this. Note that the Andersen 12ST winch is over near the companionway. I was going to have it more outboard but luckily I remembered to put my dodger up first. I found that having the winch close to the companionway was the only way I could use a winch handle with the dodger up. An 8" winch handle at that.
Take a good look below before you drill. One of my mounting bolts just touches the edge of one of the cabin lights. If I hadn't checked first, I might have drilled right into the light fixture!.
Lay everything out on deck first. The deck organizer up forward, the rope clutch in front of the winch and the winch itself. Then make sure you run the lines from the mast thru all the hardware you laid out. You want to make sure everything runs fair and true. Then you can mark your spot for each piece of hardware. Remember the cardinal rule of carpenters: Measure twice! Cut once! Take your time. Think about what you are doing and again, lay everything out first before you even think of picking up that drill.
Hope this helps!
"I desire no more delight, than to be under sail and gone tonight."
(W. Shakespeare, Merchant of Venice)
for the lines lead back to the cockpit. Per Warren's pic, looks like he has three led back there, plus the two jib sheets, and whatever is on the traveler. Add spaghetti sauce and you have dinner. Just the jib and traveler drives me crazy at times.
Mark,
The three lines coming back to the cockpit are the main halyard and two reefing lines. They all come down from the mast, thru blocks attached to a Dwyer halyard organizing plate I installed below the maststep, then thru a 3 sheave Schaefer deck organizer (look thru the window on the dodger and you can see it up forward) thence thru a Lewmar triple rope clutch, all with great access to the Andersen 12ST winch. Nobody can say that I don't spread the bread around to all the marine equipment manufacturers!! Works great for me. Its really a happy day when I can reef from the cockpit when the wind and water pipes up! Especially since I sail single handed so often.
"I desire no more delight, than to be under sail and gone tonight."
(W. Shakespeare, Merchant of Venice)
I didn't see anyone mention that the cabin top is cored and as such needs to have the bolt holes drilled oversize, filled with epoxy, and ONLY then drilled to the correct size for the bolt.
rtbates wrote:I didn't see anyone mention that the cabin top is cored and as such needs to have the bolt holes drilled oversize, filled with epoxy, and ONLY then drilled to the correct size for the bolt.
randy 25D Seraph #161
That's correct. I made a much larger hole than the actual bolt size (I have forgotten sizes right now). I filled the holes with epoxy and let it cure. Then I came back another day and drilled the smaller holes called for by the bolt size, put a nice smear of LifeCaulk under the winch base and mounted the winch, leaving the bolts loose. When the LifeCaulk cured, I tightened everything up. Its been 3 years and everything is hunky dory. No leaks, etc.
"I desire no more delight, than to be under sail and gone tonight."
(W. Shakespeare, Merchant of Venice)
only meant to say that adding three more lines loose in the cockpit might be a bad thing and to think about what to do about it. Do you have any line organizer beneath the winch??? Do you have your compass mounted there also?
Mark Yashinsky wrote:only meant to say that adding three more lines loose in the cockpit might be a bad thing and to think about what to do about it. Do you have any line organizer beneath the winch??? Do you have your compass mounted there also?
Mark,
There is a compass there on the forward starboard bulkhead. As for the lines...I don't have it organized with sheet bags or the like, though I should. What I have done to keep the cockpit clear is to let those lines dangle down through the companionway hatch into the cabin below. They hang pretty straight and aren't really a bother unless someone is constantly going up and down into the cabin. One other thing. When the mainsail is set (which is most of the time) a lot of reefing line goes aloft with the hoisted sail. There just isn't that much line left in the cockpit to make the spaghetti unbearable.
"I desire no more delight, than to be under sail and gone tonight."
(W. Shakespeare, Merchant of Venice)
Mike,
When I mounted my turning block (deck organizer) and rope clutch, I drilled 1/4" holes through just the top (upper) laminate of the cored deck and into the balsa core. Then I chucked a bent nail into an electric drill and ground up the balsa to a diameter of about 1". Then I vacumed out the balsa saw dust and filled the hole with epoxy. After the epoxy hardened I redrilled the 1/4" holes through the deck and headliner. I enlarged the headliner holes to allow nuts and standard diameter stainless washers to go up through the headliner and onto the 1/4" bolts. I finished if off the headliner with 1/2" (or 5/8"?) white plastic buttons available from Home Depot. I didn't mount a winch on the cabin top because I find I can hoist the main without needing a winch.
Kurt