Oh, the joys and pitfalls of older boats......
Moderator: Jim Walsh
Oh, the joys and pitfalls of older boats......
I'm not sure if I'm posting this so that I can clear my head of the frustration I feel over the prior owners self installed "upgrades, or so that future CD 28 owners will know what to look for - above and beyond the "usual" items.
And for those of you who have already gone through something like this, grab a drink and have a laugh.
Bear in mind as you read this that I am living aboard.
I bought Mathilda (her new name) knowing full well that there were issues that needed to be addressed and since I had already rebuilt 2 slightly smaller boats from the keel up ( an early Gary Mull Ranger 22 and a `59 Type I `Frisco Flyer) I felt up to the task.
The water in the tanks was smelly and at first I thought I'd just replace the hoses, dis-assemble, clean and reinstall the pump and then run fresh water with a little bleach through the tanks `til they overflowed through the vents into the bilge. Then the bilge pump would kick on and empty it all overboard.
Well......
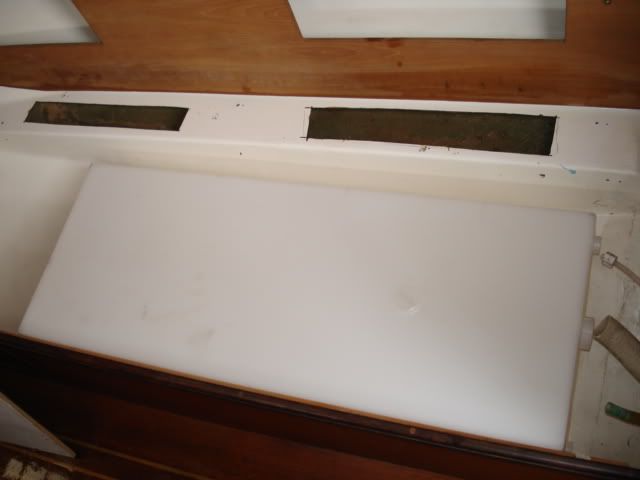
The tanks overflowed alright, right onto the cabin sole. They were both cracked on top and the water never reached the vents.
Cleaned that up. Drained the tanks after taking apart the berths to reach the attached hoses which were only on the upper 3" of the tank ends. No hoses anywhere near the bottoms of the tanks.
Luckily, the starboard tank still had the OEM label on it, so I called the OEM supplier (Kracor) and got prices on the replacement tanks.
$458. Plus shipping. Each.
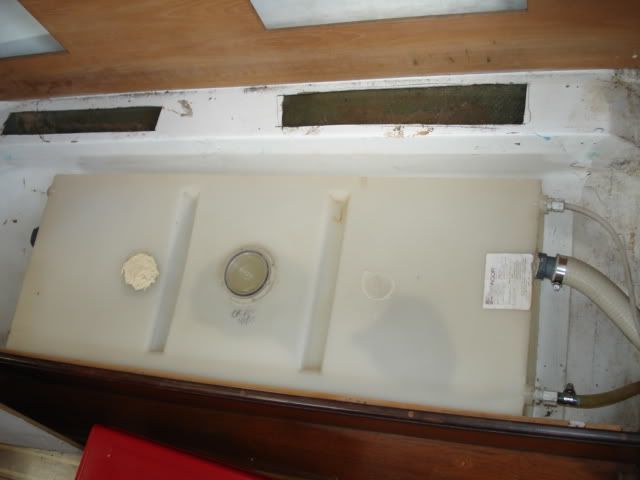
Now $1100 for two 30 gallon water tanks sounded a little over the top to me, so I got online and made some calls. Found a company in CA (www.ronco-plastics.net) that had a very similar, albeit smaller (25 vs 30) tank for almost half the price. Got those ordered. There is only one real difference between the old/new tanks and that is that the liner under the berth has a ridge in the middle of the bay where the tank sits and the OEM tank has a corresponding groove in it. The ridge helps keep the tank from moving forward and aft in a seaway. The new tanks don't have that groove.
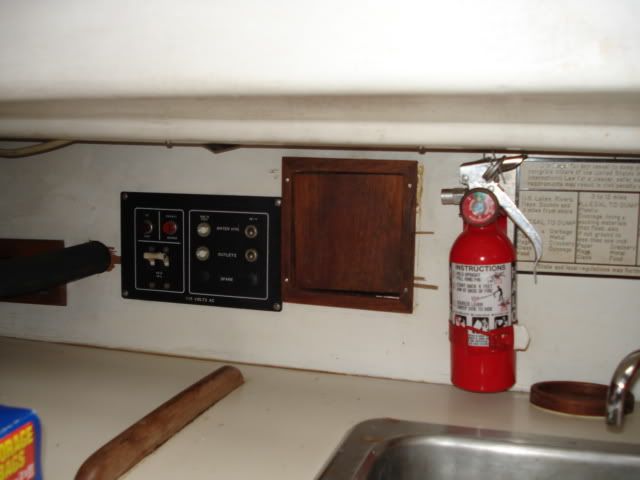
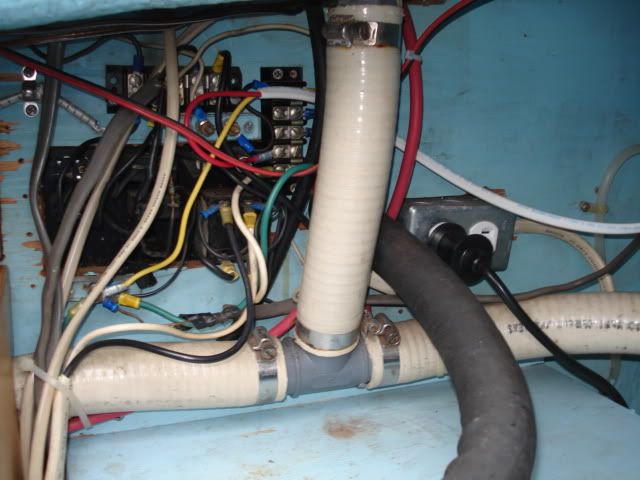
While thinking about solutions to that issue, I decided to start replacing the hoses. The deck fill is on the starboard bridge deck and the fill hose "T's" just below it. I hadn't really paid attention to that fact `til now. And now is when I realize that if I just replace the hose in the same position it's in now, I'll be running it within an inch of the unprotected backside of the charging panel. Not the best of ideas.
After staring at the panel for about an hour, and realizing what a mess the wiring was in, and trying to make all sorts of dubious choices about running the hoses this way and that, I finally decided to just start over.
That's right, I'm going to re-wire Mathilda - properly - just so I can have fresh water.
This means that I'll have to pull the shore power for a week while I patch the holes in the bulkhead and run wires in between going to work, etc.
Luckily, it's a balmy 47 degrees as I write this.
As you look at the pictures below, you'll notice the prior owners "upgrades".......seems a shame to replace it all.....
The "door" in the last picture led to a trash bin in the lazarette. Hiding behind the black hose in the same picture is a 110 outlet. It's on the backside of the outlet in the 2nd picture.
I'm disinclined to acquiesce to your request. Means no.
- Steve Laume
- Posts: 4127
- Joined: Feb 13th, '05, 20:40
- Location: Raven1984 Cape Dory 30C Hull #309Noank, CT
- Contact:
I feel fortunate to have purchased a boat that was largely unaltered by the previous owners. I have done a tremendous amount of work on Raven that I hope will meet or exceed the standards of all future owners.
I added a shore power outlet in almost the same place as yours. This is so that if I ever do have shore power and want to plug in the water heater its will reach. It also comes in handy for an automotive type battery charger or power tools so that you don't have to run cords from inside the cabin. I did use marine grade wire and a weather proof enclosure for the receptacle.
I have the same tanks as you had. They have the indents in the top but there is no cleat to index them. They sit in their pan and the bunk base is a tight enough fit to hold them there. If clean water tanks are to be a goal for your future you might think about adding an access port to the top of your new tanks. I use mine all the time to fill the tanks and also for winterizing and clean out. With the ports opened I can get a shop vac in there and suck out anything that sits in the bottom of the tank.
I don't envy you trying to do this work while living aboard but at least it adds incentive and saves travel time, Steve.
-
- Posts: 380
- Joined: Mar 14th, '05, 09:14
Some CD28 Water Tank Comments
I suspect you are already well experienced in this stuff, but here are some notes on CD28 dual water tanks from a long-time owner with the same setup you seem to have.rorik wrote: ... water in the tanks was smelly ...
Point One: I think you will find that while the original port and starboard tanks were specified at 30 gallons, they don't actually hold anywhere near that amount. I have filled my tanks many times using 5 gallon jerry jugs and have never fitted 6 full 5 gallon jugs from empty. I don't max out the tanks anyway for other reasons (see below)
Point Two: I did not read your post carefully enough to know whether you are fitting inspection ports into your new tanks. If not, you must do this. You will use these ports for adding "stuff" (water, bleach, baking soda, cheap scotch, etc.), in addition to looking. Also fit BIG inspection ports so you can get down in there when necessary.
Point Three: You could just as easily have skipped replacing the deck fill and changed your routine to filling the tanks via the inspection ports. This has many advantages that have been discussed ad nauseum on this board. Take the cash you would have spent on the new deck fill and put it toward a good in-line filter. Cuno makes some practical models that fit in the engine compartment.
Point Four: Get at least one of those siphons with the little brass ball assembly that I have discussed here before. Great for emptying the tanks when winterizing, dumping bad water, filling the sun shower, and ... etc.
Point Five: DON'T fill the tanks completely in use. If you do and then go sailing, you will almost surely have water from the tanks spill into the accommodation when heeling. Not dangerous but just another pain to clean up. Also you may not like the feeling you get in your upper chest when you look below and see water above the cabin sole, whatever the cause.
The new tanks I bought are supposed to hold 25 gallons. As long as it's relatively close, I'm happy.
There is a single indent in the bottom of the tanks too, that indexes to a ridge in the pan.
I'm skipping the inspection ports for now. They tend to leak over time and then leak into the cabinetry. If I get the new fill hose run properly, so both tanks fill equally, I should be able to add whatever I need that way. And, if I'm careful, and the inline filter in the fill hose works, I shouldn't have to clean them for several years. There's no need to winterize, I live aboard year-round.
I'm not changing the deck fill or its location. I'm moving the shore charger . That whole panel, outlet, door and it's attendant mess in picture 2 will be gone. Nothing but a nice clean "T" and a filter.
And althoughI prefer vodka, scotch is never so cheap that you should add it in bulk to the tanks. What if a tank leaked?
I'm disinclined to acquiesce to your request. Means no.
-
- Posts: 56
- Joined: May 10th, '05, 12:18
- Location: 1979 Cape Dory 28' Intrepid
Purchasing custom poly tanks
My CD28I did not have a tank when I bought it for the waste, only an overboard hose.
I added a tank, whale pump, deck pumpout and Y valve which all work very well.
There was a company in Rhode Island which I purchased a 25+ gal tak which fit under the left birth. The tank was custom designed by me so my outlet pipe is 1" from the bottom, my inlet from the head are at the top and I have a 5" inspection port on the top. I think I paid about $325 for the tank. The bottom and sides are contoured to the boat hull to maximize the support area while maximizing the volume.
I tried to find something that would not be customer to fit and there was too much wasted space and the price was similar for custom versus stock tank.
"Thank that good old Internet for helping me out!"
Bob Condon
The two tanks I bought from ronco-plastics are only about an inch smaller in a couple of dimensions than the originals from Kracor. The only real difference is the missing indentation on the bottom of the new tank. And since I got got both new tanks for the price of one tank from the OEM, I think that making an "adjustment" in the fitment is worth it. The new tank is in picture 3. Theses are just for fresh water. I already replaced the head and holding tank system.
I'm disinclined to acquiesce to your request. Means no.
what model tank did you order?
I believe the model number from ronco-plastics.net was B470, a 25 gallon tank. It is almost exactly the same as the OEM tank. The only real difference is that the new tank is missing the indentation on the bottom that fits over the ridge in the liner where the tank sits.
If you give ronco a call, ask for Chris. He had all the details.
I'm disinclined to acquiesce to your request. Means no.
- BubbaThePirate
- Posts: 59
- Joined: Mar 14th, '07, 19:05
- Location: CD28, Douglas, MI
- Contact:
Hull #53
My CD28 is hull #53. The water tank is under the Vberth which is a bit lower than the later models. Though it does in later models, the Ronco tank will not fit in my boat. I took out some composting or something holding tank under the aft port side of the vberth. I'm still looking for a tank and a place to put it. I may build a tank.
~~~~~~~/)~~~~~~~
Eat When You're Hungry
Work When You're Broke
~~~~~~~~~~~~~~~
Member #1005
~~~~~~~~~~~~~~~
Eat When You're Hungry
Work When You're Broke
~~~~~~~~~~~~~~~
Member #1005
~~~~~~~~~~~~~~~