Sealing The Deck Core From Moisture (how to)

Discussions about Cape Dory, Intrepid and Robinhood sailboats and how we use them. Got questions? Have answers? Provide them here.

Moderator: bobdugan

Post Reply
Maine Sail
Posts: 839
Joined: Feb 8th, '06, 18:30
Location: Canadian Sailcraft 36T

Sealing The Deck Core From Moisture (how to)

Post by Maine Sail »

Hi All,

For years I have been trying to describe, as have others, in words, how to "pot" or fill deck hardware penetrations with thickened epoxy to seal the decks core from further moisture damage.

I have also been trying to describe why a slight bevel to each hole that penetrates the deck is a good idea. Sometimes folks understand it via words, and sometimes they don't.

I have had this article on my mind for years and finally over the last month or so had the chance to make it all happen with some late nights in the barn.

As far as I know this is the only article of it's type that uses deck lamination cut-a-way samples to show what goes on inside the deck when you "pot" with epoxy and countersink the bolt holes..

I hope this helps make some sense of something that really isn't all that difficult to tackle just difficult to describe..

If you see any typos, and I'm sure you will, please let me know and I'll fix them as soon as I can. I'm not a writer, but do have a lot of tricks & techniques I've learned over my years of boating that I like to share with fellow boaters. Some of these I feel can best be illustrated through pictures, with the help of some words of course..

Click this to read it:

http://www.pbase.com/mainecruising/sealing_the_deck


And some of the photos from the article;
Image
Image
Image
Image
Image
Image
-Maine Sail
CS-36T
Broad Cove, Maine

My Marine How To Articles
chase
Posts: 532
Joined: Jul 22nd, '05, 22:45
Location: "Cheoah" PSC 34

excellent!

Post by chase »

Maine Sail, this is some seriously professional, detailed documentation you have here.

Starting in reverse from now on,

Chase
User avatar
D Rush
Posts: 137
Joined: Oct 20th, '07, 16:57
Location: JAZ'D, 1978 CD 25, #595, Hull, MA

Post by D Rush »

I've been visiting your website and "How to" articles since an earlier "Replacing Seacocks" discussion thread. For a "tadpole" sailor / boat owner and inapt DIYer, I enjoy your postings. The "How To" concepts and instructions illustrated with pictures really help me make my boat repairs and restoration decisions.
Your articles help me confirmed that my boat repair thinking & logic is always only partially right and / or complete.
Like John Vigor's books I reread your postings multiple times before attempting the repairs.
Thank you for great efforts to educate this wannabe DIYer.

BTW: Your Cape Dory Board postings are also great as well as your "Maine Sailing" photo galleries. I love surfing Cape Dory Board contributors websites.

Hi, I'm Denis and I'm a DIYer Wannabe & a cheap bastard.
Denis
Tod M
Posts: 90
Joined: Jul 27th, '07, 07:12

very good documentation!

Post by Tod M »

Thanks, Rodd!
Troy Scott
Posts: 1470
Joined: Jan 21st, '06, 01:23
Location: Cape Dory 36 IMAGINE Laurel, Mississippi

protecting balsa core while creating structural "hard p

Post by Troy Scott »

I do it a little bit differently. I don't remove the structural fiberglass on top. I incorporate a fiberglass backing plate into the structure. I drill the fastener hole first. Then I go to the bottom and start a new, larger hole using a hole saw, usually about 1" for a 1/4" fastener. I stop cutting with the hole saw as soon as I'm through glass on the bottom of the sandwich deck structure. Then I stop and pop the fiberglass off the bottom. Then I switch to a "bottom cutting bit" that cuts a nice clean cylinder. I cut with that until the balsa is completely gone and I've perfectly exposed the clean bottom of the upper, outer skin. Then I bond on an oversized fiberglass backing plate using an epoxy spooge. At this point I have a top skin and a nice, thick backing plate, but the space where the balsa and the lower skin was is now a hollow cylinder. I use a syringe to fill this cylinder with epoxy thickened with milled fiber. When this is all done the area all around and under the fastener is FRP. In most cases the base of a cleat will be about the size of this solid area.

I abbreviated the above plan to made it easier to follow. Actually, I incorporate a few additional steps. My backing plates are made from bought, prefabricated sheet fiberglass of various thicknesses. A large cleat will usually get a 1/2 inch thick FRP backing plate. A chainplate may get 3/4". A stancion base will get 1/4". I sand the area where I will bond on the backing plate. I "pre-seal" the exposed balsa with resin before I bond on the plate. If the hollow cylinder will be very large, I sometimes use the same holesaw to create thick FRP "washers" to partially fill the void. I use waxed "throwaway" mild-steel bolts and nuts to hold the backing plate under the deck while the initial spooge cures. I use the same length bolts so I can determine when the backing plate is parallel to the surface. Usually only one bolt will really be tight, and the others will be drawn up to match. I always do a "dry run" first so I will know exactly how it should be when I'm dealing with spooge. If I need the FRP "washers", I just slip them on the bolts before pushing the plate up into position. I still finish filling the cavity with resin in order to make sure I have a perfect seal and a sturdy, solid structure. This is a two step process, because filling the cavity takes place after the backing plate is cured and the bolts are removed. After removing the waxed bolts, I redrill very slightly larger to make sure I get rid of the wax residue. Then I use tape to seal the bolt holes from the bottom. I completely fill the cavity, and redrill the holes later. I countersink the top of the hole slightly to provide a place for bedding compound to do it's job. I don't tighten the fasteners at first. I draw them up almost completely, then, days later, finish tightening them. This way I don't squeeze all the bedding out.

I hope this helps somebody. It has worked well for me for many years.
Regards,
Troy Scott
Maine Sail
Posts: 839
Joined: Feb 8th, '06, 18:30
Location: Canadian Sailcraft 36T

Re: protecting balsa core while creating structural "ha

Post by Maine Sail »

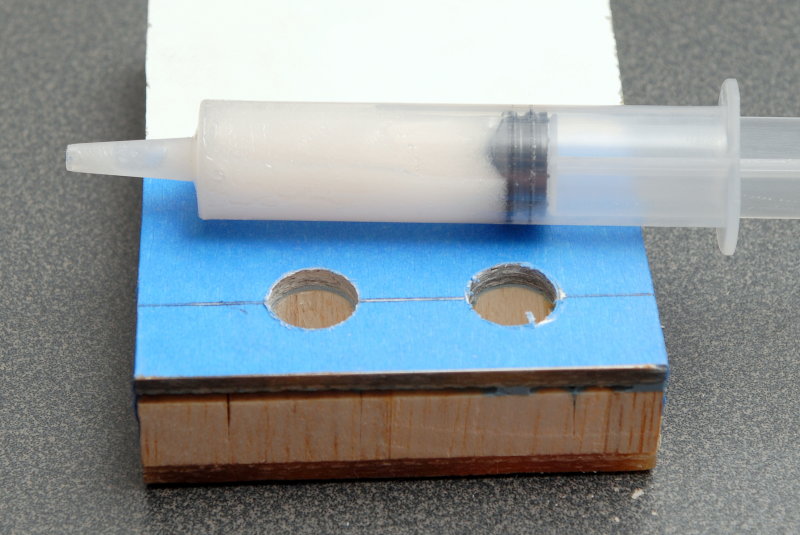
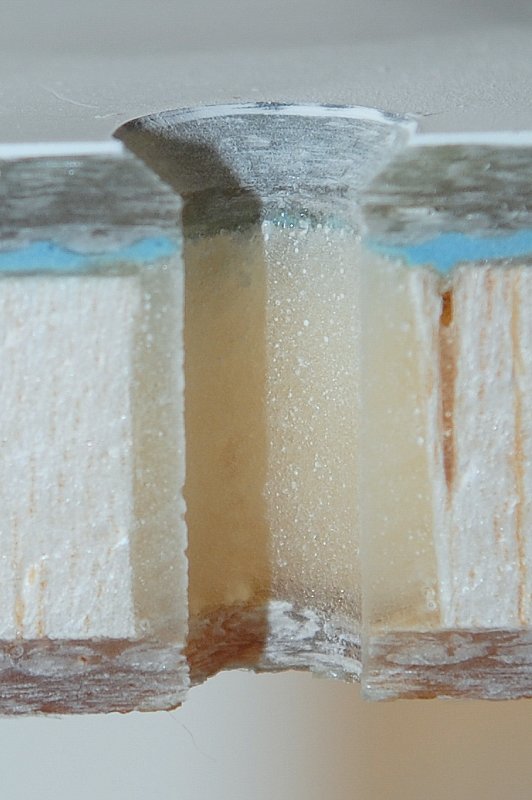
Troy Scott wrote:I do it a little bit differently. I don't remove the structural fiberglass on top. I incorporate a fiberglass backing plate into the structure. I drill the fastener hole first. Then I go to the bottom and start a new, larger hole using a hole saw, usually about 1" for a 1/4" fastener. I stop cutting with the hole saw as soon as I'm through glass on the bottom of the sandwich deck structure. Then I stop and pop the fiberglass off the bottom. Then I switch to a "bottom cutting bit" that cuts a nice clean cylinder. I cut with that until the balsa is completely gone and I've perfectly exposed the clean bottom of the upper, outer skin. Then I bond on an oversized fiberglass backing plate using an epoxy spooge. At this point I have a top skin and a nice, thick backing plate, but the space where the balsa and the lower skin was is now a hollow cylinder. I use a syringe to fill this cylinder with epoxy thickened with milled fiber. When this is all done the area all around and under the fastener is FRP. In most cases the base of a cleat will be about the size of this solid area.

I abbreviated the above plan to made it easier to follow. Actually, I incorporate a few additional steps. My backing plates are made from bought, prefabricated sheet fiberglass of various thicknesses. A large cleat will usually get a 1/2 inch thick FRP backing plate. A chainplate may get 3/4". A stancion base will get 1/4". I sand the area where I will bond on the backing plate. I "pre-seal" the exposed balsa with resin before I bond on the plate. If the hollow cylinder will be very large, I sometimes use the same holesaw to create thick FRP "washers" to partially fill the void. I use waxed "throwaway" mild-steel bolts and nuts to hold the backing plate under the deck while the initial spooge cures. I use the same length bolts so I can determine when the backing plate is parallel to the surface. Usually only one bolt will really be tight, and the others will be drawn up to match. I always do a "dry run" first so I will know exactly how it should be when I'm dealing with spooge. If I need the FRP "washers", I just slip them on the bolts before pushing the plate up into position. I still finish filling the cavity with resin in order to make sure I have a perfect seal and a sturdy, solid structure. This is a two step process, because filling the cavity takes place after the backing plate is cured and the bolts are removed. After removing the waxed bolts, I redrill very slightly larger to make sure I get rid of the wax residue. Then I use tape to seal the bolt holes from the bottom. I completely fill the cavity, and redrill the holes later. I countersink the top of the hole slightly to provide a place for bedding compound to do it's job. I don't tighten the fasteners at first. I draw them up almost completely, then, days later, finish tightening them. This way I don't squeeze all the bedding out.

I hope this helps somebody. It has worked well for me for many years.
Troy,

There are many ways to skin the cat! That's just one example of another good method. I have used a similar method using G-10. If only we had the access to get a drill and hole saw to all our bellow deck penetrations... I could probably get a drill and hole saw to about 80%, but not all, even with a right angle drill..

One thing of concern is your "gasket". Letting these marine sealants cure for days can create a failure at the bolt if it is twisted even slightly after cure.

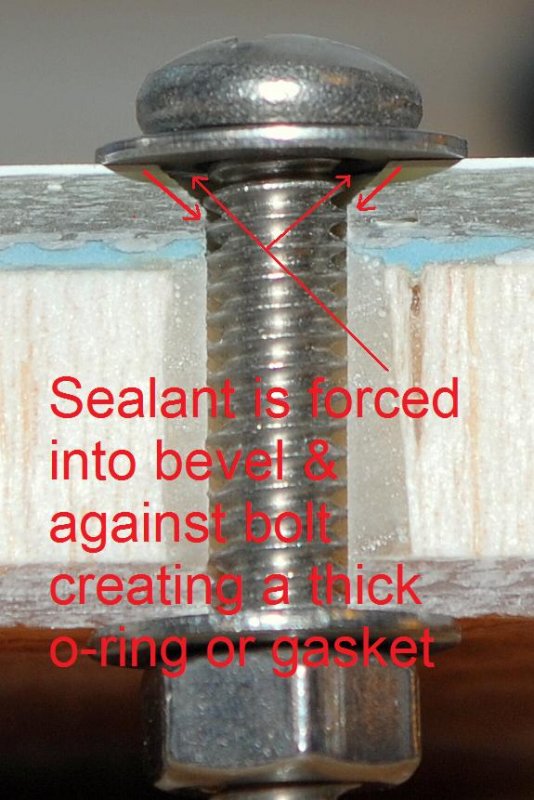
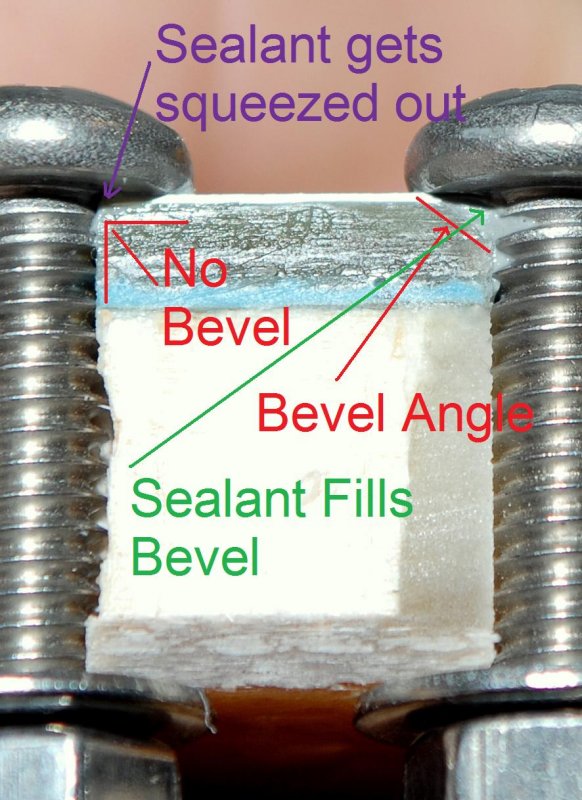
The other thing that can happen is compressive resistance of the marine sealant. This resistance can still leaves enough "gasket" for a piece of deck hardware to move slightly even with seemingly tight bolts. With a chamfer there is no need for using the Don Casey method and you can tighten that day all the way and be done.

I was also wondering how you clean the amine blush from the inside of the hole after you affix the backing plate but before injecting the filler? Do you use a no blush epoxy?


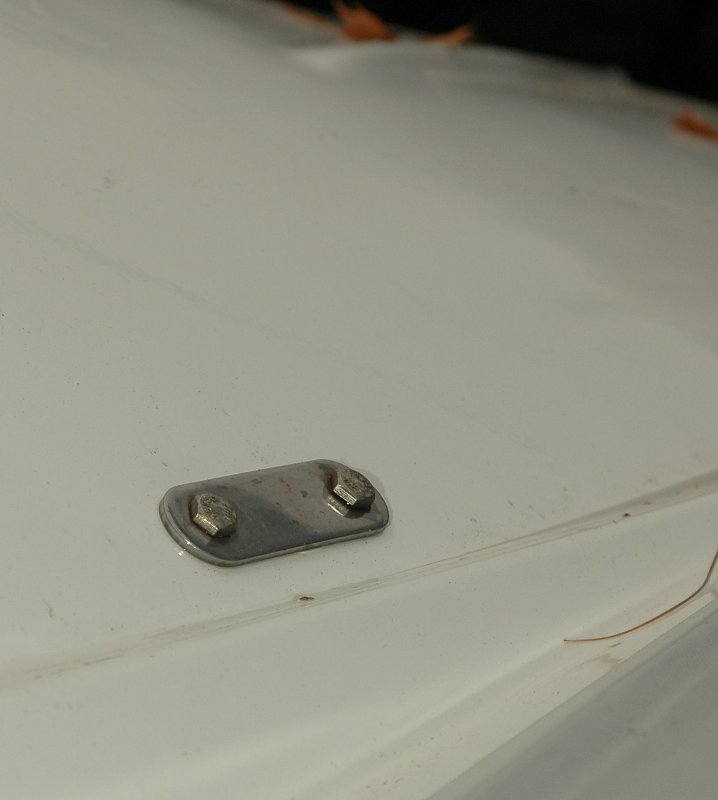
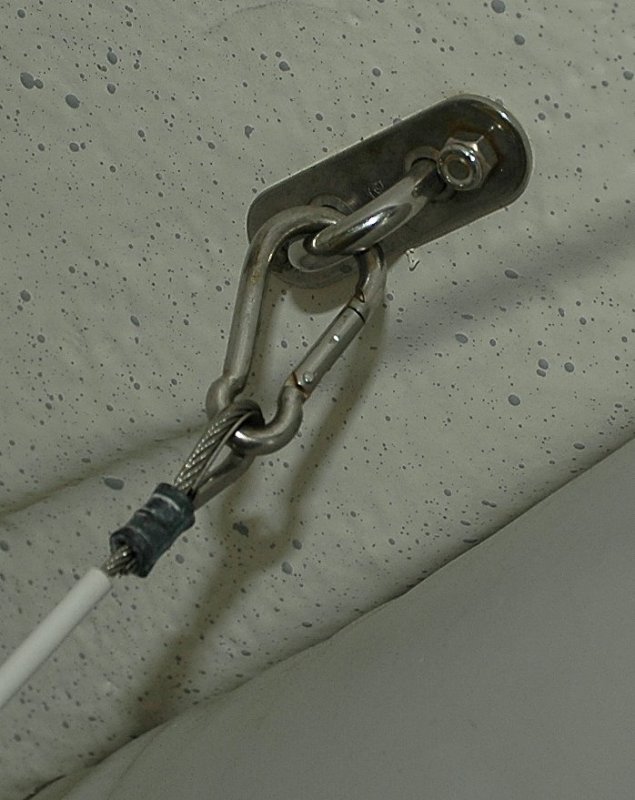
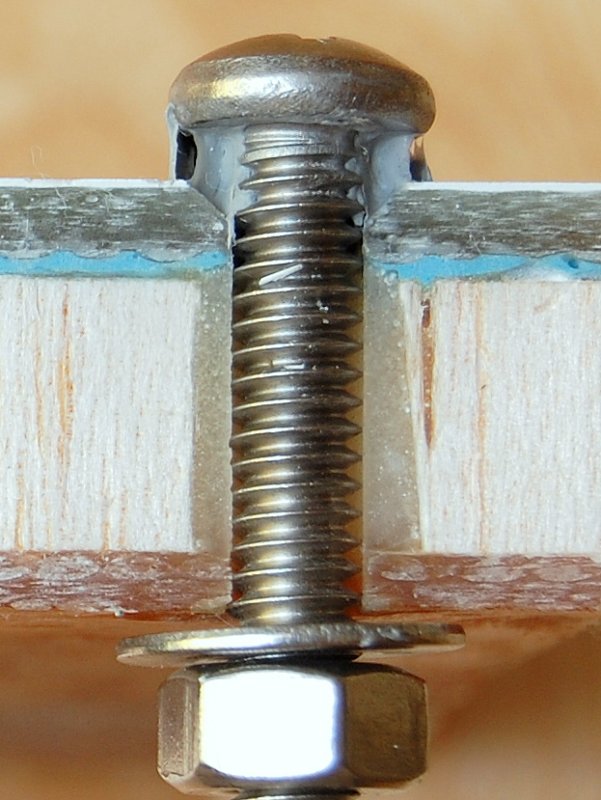
I present you the photo below. The photo is the lifting pad eye for my RIB. To bed it I used 3M 101 and tightened it immediately with a chamfered hole. I did not wait for it to set up or partially cure.

Forming a gasket or partial cure can lead to hardware movement and other associated problems because you can't always get the hardware tight enough against the deck due to compressive resistance if it has cured too much.

This lifting davit is BELOW the waterline and has been bone dry now for seven years even with the loads exerted while lifting it into & storing it on the davits. With a proper countersunk hole you do not need to let it partially cure. This photo is but one example of why you don't need to "form a gasket", all be it a good one, when you have also countersunk. Keep in mind this pad eye is submerged and deck hardware is not..;)

Below the waterline and tightened immediately!
Image
Image
-Maine Sail
CS-36T
Broad Cove, Maine

My Marine How To Articles
Kurt
Posts: 188
Joined: Feb 8th, '05, 11:12
Location: 27' Cape Dory (Alerion),
9' Dyer,
Grosse Pointe, Michigan

Another way to skin the cat

Post by Kurt »

First, I drill down through the top laminate (above the balsa or other core) typically with a 1/4" drill bit. Next I put a "L" shaped bent nail into my drill chuck and work it down into the core and use the drill to grind and loosen the core creating a pocket about 1" in diameter. Then I vacuum the hole to remove the ground up balsa. I then fill the void with epoxy creating a solid plug. Finally, after the epoxy hardens, I redrill the 1/4" hole through what is now a solid area of the deck. If there's a headliner involved, I take a 3/4" hole saw and cut away some of the headliner allowing a washer and nut to placed on the fastener.
User avatar
John Vigor
Posts: 608
Joined: Aug 27th, '06, 15:58
Contact:

Double trouble

Post by John Vigor »

Kurt, this looks like TWO another ways to skin the cat.

Cheers,

John Vigor

http://www.johnvigor.com/Blog.html
Maine Sail
Posts: 839
Joined: Feb 8th, '06, 18:30
Location: Canadian Sailcraft 36T

While the bent..

Post by Maine Sail »

Having potted perhaps a few hundred or more deck holes I can assure you that using a bent nail can be troublesome at the very least and quite messy at the worst leaving an odd shaped deck hole and gelcoat chipping.

In balsa it works ok but most builders laminate marine plywood under deck fittings like stanchions, winches and cleats. Attempting to use a bent nail on dry marine plywood can result in quite a mess and headache. The only way I've successfully found to use the bent nail trick on harder woods like marine ply is to bend multiple nails at varying degrees of bend and work up to 1/4", 1/2" or more inches..

Sometimes I feel like the expert authors that recommended these ideas never actually tried it them selves...

Do yourself a favor before attacking your deck and drill a 1/4" hole in a piece of plywood then stick a bent nail in a drill and see how it works before you try this on your boat. Again with balsa it will work but most builders, especially good ones, never laminated balsa under high load deck hardware and used the much tougher to grind out marine ply..
-Maine Sail
CS-36T
Broad Cove, Maine

My Marine How To Articles
Kurt
Posts: 188
Joined: Feb 8th, '05, 11:12
Location: 27' Cape Dory (Alerion),
9' Dyer,
Grosse Pointe, Michigan

Bent nail technique - best for balsa core

Post by Kurt »

Mainesail,
I've used the bent nail technique on probably 20-25 holes that all were admitedly in balsa core. I had excellent results with all of them.
Troy Scott
Posts: 1470
Joined: Jan 21st, '06, 01:23
Location: Cape Dory 36 IMAGINE Laurel, Mississippi

a little more explanation

Post by Troy Scott »

Maine,

WRT the "gasket" I do initially draw the fasteners up to essentially their final position. I just wait to actually adjust them to the proper torque until after the bedding compound has had time to "set". I never turn the bolt or screw, only the nut.

WRT amine blush, I don't have that problem with WEST products.

There are probably many other ways to protect the core and create good hard points. The point is to do a structurally sound, nice-looking, value adding job.
Regards,
Troy Scott
SPIBob
Posts: 103
Joined: May 10th, '06, 15:29
Location: CD28 #230 Zephyr, Port Isabel TX

bent nail variation

Post by SPIBob »

Another way to clear out the core is with a hex head machine bolt. Use a size that will just fit through the drilled hole. Take a small triangular file and make some notches in the six corners of the bolt head.

After inserting the bolt head into the hole, press outward and fire up the drill. Keep moving it around until the bolt shaft rides on the edge of the hole. The action is similar to a router.

I have found this to be faster and easier to use than a bent nail. It doesn't bounce and jump around and doesn't break.

BTW, if one substitutes "disembowel a puppy" for "skin a cat", it might be easier to see how some people might found this offensive. Then again, maybe not.
User avatar
drysuit2
Posts: 310
Joined: Apr 22nd, '05, 18:52
Location: Segue, 1985 Cape Dory 26 Hull # 15 Port Washington NY
Contact:

Post by drysuit2 »

-Maine Sail,

Nice how to. I love the photos. I'm a picture vs. words guy.

May I ask you two questions?

ONE:
When I'm re bedding hardware, and I find that the Balsa core is already wet from water intrusion... Do I have to dig out all the wet balsa core? or is there a way of effectively drying it?

TWO: When working with Foam Core, EPS etc. I've had occasion where West system epoxy was too hot and melted my core. In that case, do you recommend Polyester resin?; or another epoxy brand that doesn't kick off too hot.

Thank you

Frank
Post Reply